How Registration Details are Stored in ClarisWorks 2.0 and 2.1
Where is the Registration Data Stored?
Older versions of Claris software store the registration details in the data fork. In the 68k only versions of software, it is the only information stored there and so deleting all data in the data fork resets the software to unregistered (only ever try this on a duplicate copy of the program) and you are prompted to enter new registration details when you next launch the software. This is how utilities such as Repersonalize clear the registered details in early Claris software, as well as Microsoft software.
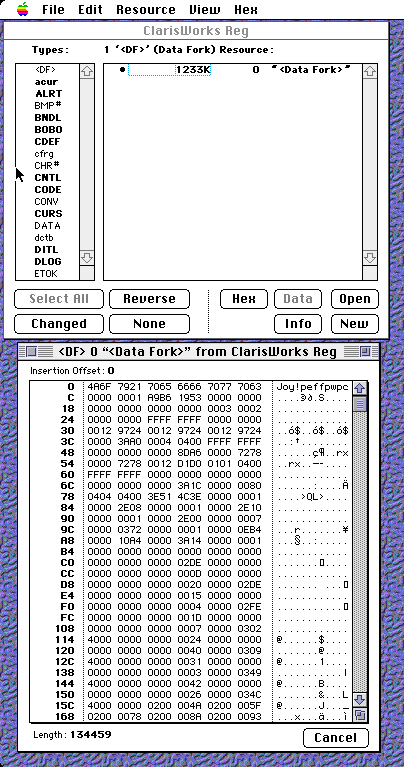
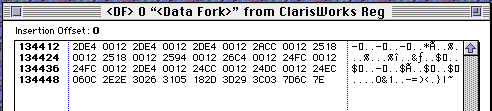
PowerPC code in Mac applications is actually stored in the data fork, in both PPC and FAT applications. This means that running a program like Repersonalize on a PPC version will damage the application by removing all the PPC code. Looking at the data fork and comparing before and after registering a fresh copy, I found that the registration information is stored at the very end of the data fork and if you know which section it is, it can be still manually removed. I used the software Resorcerer which lets you view the data fork as well as the resource fork.
The first version of ClarisWorks to support PowerPC processors natively that I know of is version 2.1, and it is specifically 2.1CDv3 that I’ve been looking at. In this exact version, the data/code at the end of the PowerPC code in the data fork is “0012 24EC” and the first offset of the registration data is at offset 134448. This will likely vary between versions.
I might write an automated tool for this at some point if I can make sure it works with various versions.
How is the Registration Data Stored?
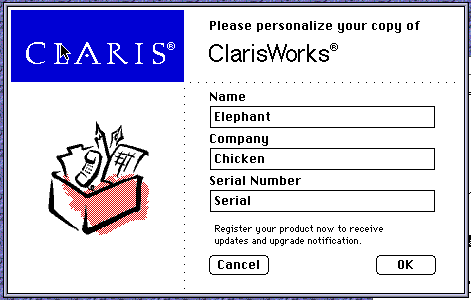
When you register ClarisWorks 2.1CDv3 (and some other Claris software), there are three fields, Name, Company and Serial Number. All three accept just about any text. The three strings are obfuscated, concatenated, and then appended to the data fork as three pascal strings. This means that the first byte of each string is the length of the string, and the three strings are joined together (each starting with their length).
The strings are not readable as stored because each character has been XOR’d with a number. Claris alternated between two numbers, 79 and 66 (at least in ClarisWorks 2.1CDv3). XOR means Exclusive OR, and is a binary operation. XORing a byte with another byte (which we’ll call Brian for clarity) effectively inverts (flips) any bits in the byte that match locations that are a ‘1’ in Brian, when viewed in binary notation.
For example, if our byte is 11110000, and Brian is 10101010, then XORing our byte with Brian will give the result “01011010” – we flipped every second bit. By applying Brian a second time, the bits are flipped back, and we get the original data.
You can work out what the XOR value is (i.e. Brian), if you have the input byte and the result, by XORing the original value and recorded result. So, because
Result = Byte XOR Brian
It is also true that…
Brian = Byte XOR Result
Remembering that in this case the byte is the ASCII value of a known letter in the registration details.
A Worked Example
Imagine we enter the following data into the three fields in ClarisWorks to register the software…
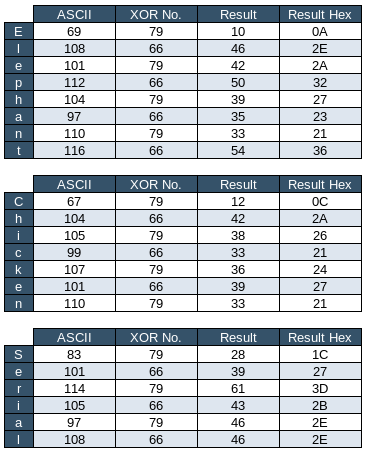
First, lets consider the easy bit. The first string is 8 characters long, the second is 7, and the third is 6. We now know that the three lengths that will be included will be those. I made a little spreadsheet to get the ASCII values of each letter, XOR it with 79 or 66, and then display the result in Hex.
Putting the lengths and three strings together in hex we would have…
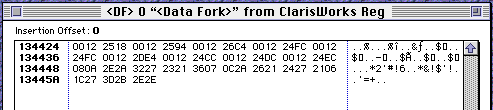
So lets check if we got it right by loading the registered copy of ClarisWorks in Resorcerer…
Yay! It matches, so I’m not daft. The reverse is also possible, lets start with the data as stored in the datafork…
So our hex data is…
060C 2E2E 3026 3105 182D 3D29 3C03 7D6C 7E
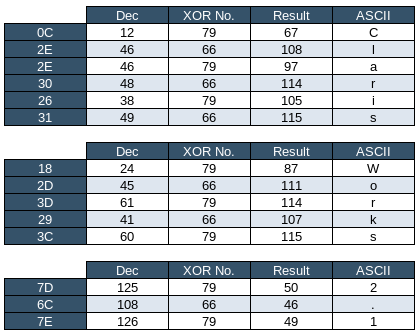
We can see the first byte is a 6 (in hex remember, but in this instance it is 6 in hex and in decimal), so we count 6 bytes, then one more, to find the next length… which is 05, so we count 5 bytes, then one more, and find 03. So our three strings are 6, 5 and 3 characters long. Lets make another spreadsheet.
Oh look, it says “Claris”, “Works” and “2.1”! If you would like a play, you can download the spreadsheet (in OpenOffice format, compatible with Excel and LibreOffice) here :
How Much Memory Does My Vintage Mac Really Accept?
In the early days of Macs, Apple stated the theoretical maximum memory a Mac could use. But with the Macintosh II, a mixture of issues meant that in reality, you really struggled to reach the theoretical 128MB. There were ROM bugs, you needed a Memory Management Unit upgrade, there was no 32bit addressing and the standards for RAM changed meaning the Mac II and IIx accidentally trigger a test mode in normal 4MB SIMMs and crash.
They got sued.
As a result, there after, Apple generally only quoted the maximum RAM a computer had been tested with during development, which was usually, but not always less than the actual maximum.
Note that maxing out the RAM on a Mac will make the built in RAM test take as long as 2 minutes in some cases. During the test the computer will sit with a black, empty screen. On later OSes, possibly from about Mac OS 8.5 onwards, it is possible to disable the Memory test with a hidden option in the Memory control panel. If I remember correctly, it appears when you open the control panel with the Command and Option keys held down.
For Apple’s official recommended maximum RAM for each machine, please see the Service Source document “Apple Memory Guide” from 1998. Where I haven’t included a machine on this page, either Apple’s maximum actually applied, or I’m unfamiliar with the model. Apples maximums apply to machines including the… Plus, SE, Classic, Classic II, Colour Classic, LC, LC II, LC III, IIvx, IIvi, IIci, IIfx, Quadra 660av, Quadra 840av, Quadra 900, Quadra 950, Performa 6200, Performa 6300, Performa 6400, Performa 6500, as well as other machines that are very similar (such as the 5*** series equivalents to 6*** machines, and Performa equivalents to LCs).
I’m not very familiar with PowerBooks, so have mostly excluded them.
Actual Capacities and Observations
The following does not consider hacks or modifications to ROM or hardware, but only what can be easily done by any user.
Macintosh II / IIx
128MB, but you’ll need IIx ROMs and a MMU in the Mac II, plus both need PAL SIMMs and either a 32bit clean ROM, or MODE32.
See Apple Memory Guide for how to correctly fill the two banks of RAM.
Macintosh IIcx & SE/30
128MB, but your’ll need a 32bit clean ROM or MODE32.
See Apple Memory Guide for how to correctly fill the two banks of RAM.
Macintosh IIsi
The IIsi will take four 16MB SIMMs plus the 1MB soldered, for a total of 65MB. Set your hard disk cache to 1MB for improved CPU performance due to a quirk of the video circuit design.
Performa / LC / Quadra 630 & LC / Performa 580
There are two logic board variants. A one RAM slot machine will take up to 128MB plus the onboard 4MB for a total of 132MB. A two slot machine will take up to 196MB. Note the second slot only works with 4, 16, or 64MB SIMMs.
The LC / Performa 580 uses the same board as the two slot 630.
These machines will accept a 128MB SIMM, for a total of 132MB including 4MB onboard.
Centris / Quadra 610
A quirk of the ROM in these machines means that even though the hardware is capable of seeing banks of up to 64MB, the ROM only checks for 32MB banks at most. There are up to two banks per SIMM, but not all SIMMs have two banks. Weirdly, this means that the most RAM you can fit is 128MB + onboard RAM (4MB) for 132MB total, but because 64MB SIMMs are usually single bank, you need to fit two 128MB SIMMs. The computer recognises each 128MB as two 32MB banks instead of two 64MB banks, but otherwise works fine.
Quadra 700
The Quadra 700 accepts up to four 16MB SIMMs plus 4MB of soldered RAM, for a total of 68MB.
Upgrade with a matched set of four.
Quadra / Centris 650 and Quadra 800
A quirk of the ROM in these machines means that even though the hardware is capable of seeing banks of up to 64MB, the ROM only checks for 32MB banks at most. There are up to two banks per SIMM, but not all SIMMs have two banks. Weirdly, this means that the most RAM you can fit is 256MB + onboard RAM (4 or 8MB) for a total of 260 or 264MB, but because 64MB SIMMs are usually single bank, you need to fit four 128MB SIMMs. The computer recognises each 128MB as two 32MB banks instead of two 64MB banks, but otherwise works fine.
Upgrade in matched pairs for improved performance due to memory interleaving.
Power Macintosh 4400
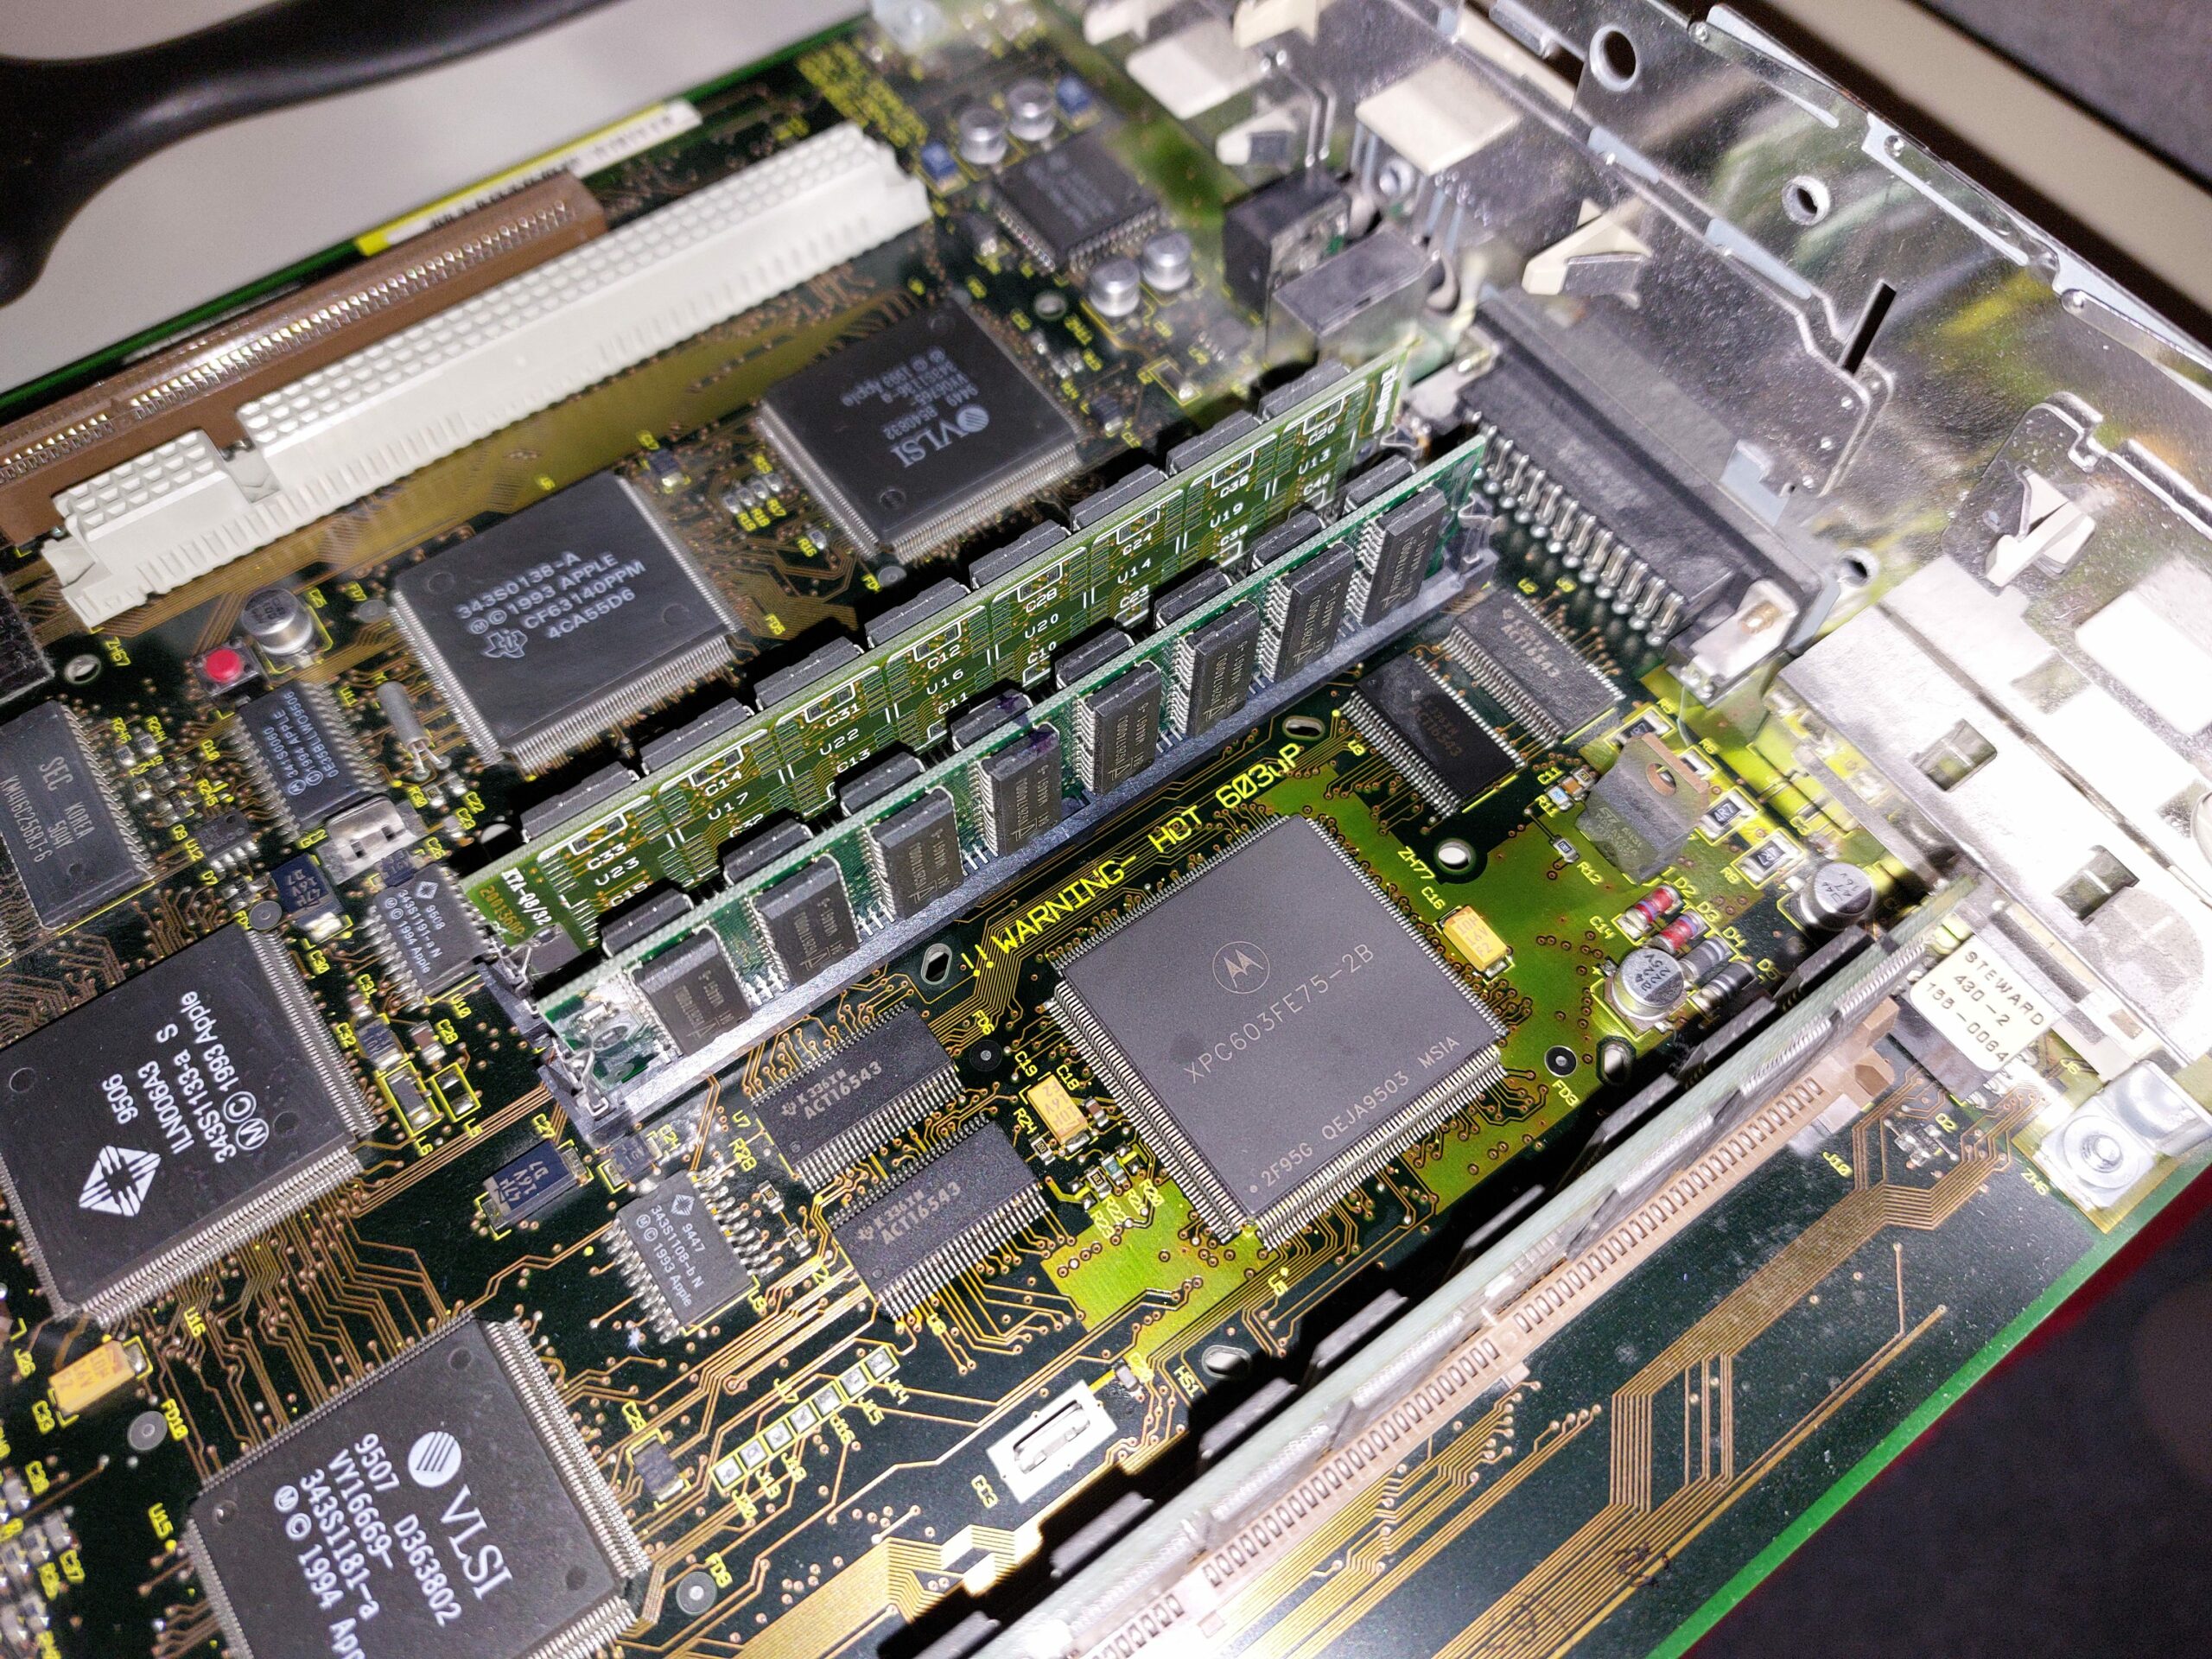
You can fit two 64MB SIMMs and one 32MB DIMMs for a maximum of 160MB. Thanks to D Cook for confirming this for me!
Warning : This machine requires 3.3V 168 pin DIMMs. Very unusual for this era of Macs.
Power Macintosh 6100
The Power Macintosh 6100 can actually recognise two 128MB SIMMs, plus 8MB onboard for a total of 264MB of RAM.
Upgrade with matched pairs.
Power Macintosh 7200 / 8200
Technically, the 7200 could recognise 768MB if you could find some 5V, FPM, 256MB SIMMs, short enough to fit in the chassis. I’ve never seen any. That means you’re likely looking at 384MB, which will be expensive as 168 pin 128MB 5V FPM DIMMs are not cheap.
Power Macintosh 7500, 7600, 7300, 8500 and 8600
Technically, if you could find 256MB 5V FPM or EDO DIMMs that fit the chassis, the maximum would be 1.5GB of RAM (limited by the OS). I’ve never seen any that aren’t too tall. That means you’re likely looking at 1GB, which will be expensive as 168 pin 128MB 5V FPM or EDO DIMMs are not cheap.
Can be upgraded individually, but works better with matched pairs.
Power Macintosh 9500 & 9600
With 12 slots, these will take up to 1.5GB using 128MB 168 pin, 5V FPM or EDO DIMMs.
Can be upgraded individually, but works better with matched pairs.
Power Macintosh G3 (Beige)
These machines will accept three 256MB PC66, PC100 or PC133 DIMMs for a total of 768MB. The DIMMs need to be physically short to fit in the desktop case, and additionally, “high density” DIMMs do not work. Practically, this means you need physically short DIMMs with 16 chips (eight on each side).
PowerBook G3 Pismo
Some (but not all) 512MB PC100 and PC133 SODIMMs work in the Pismo, for a maximum of 1GB of RAM.
UPDATE 31st July 2024 – This post has been updated to reflect more recent versions of QEMU m68k as I was notified that the instructions I had followed were out of date. The 68k specific patches have more recently been integrated into the main build and so it is no longer necessary to use the q800.upstream branch I originally used.
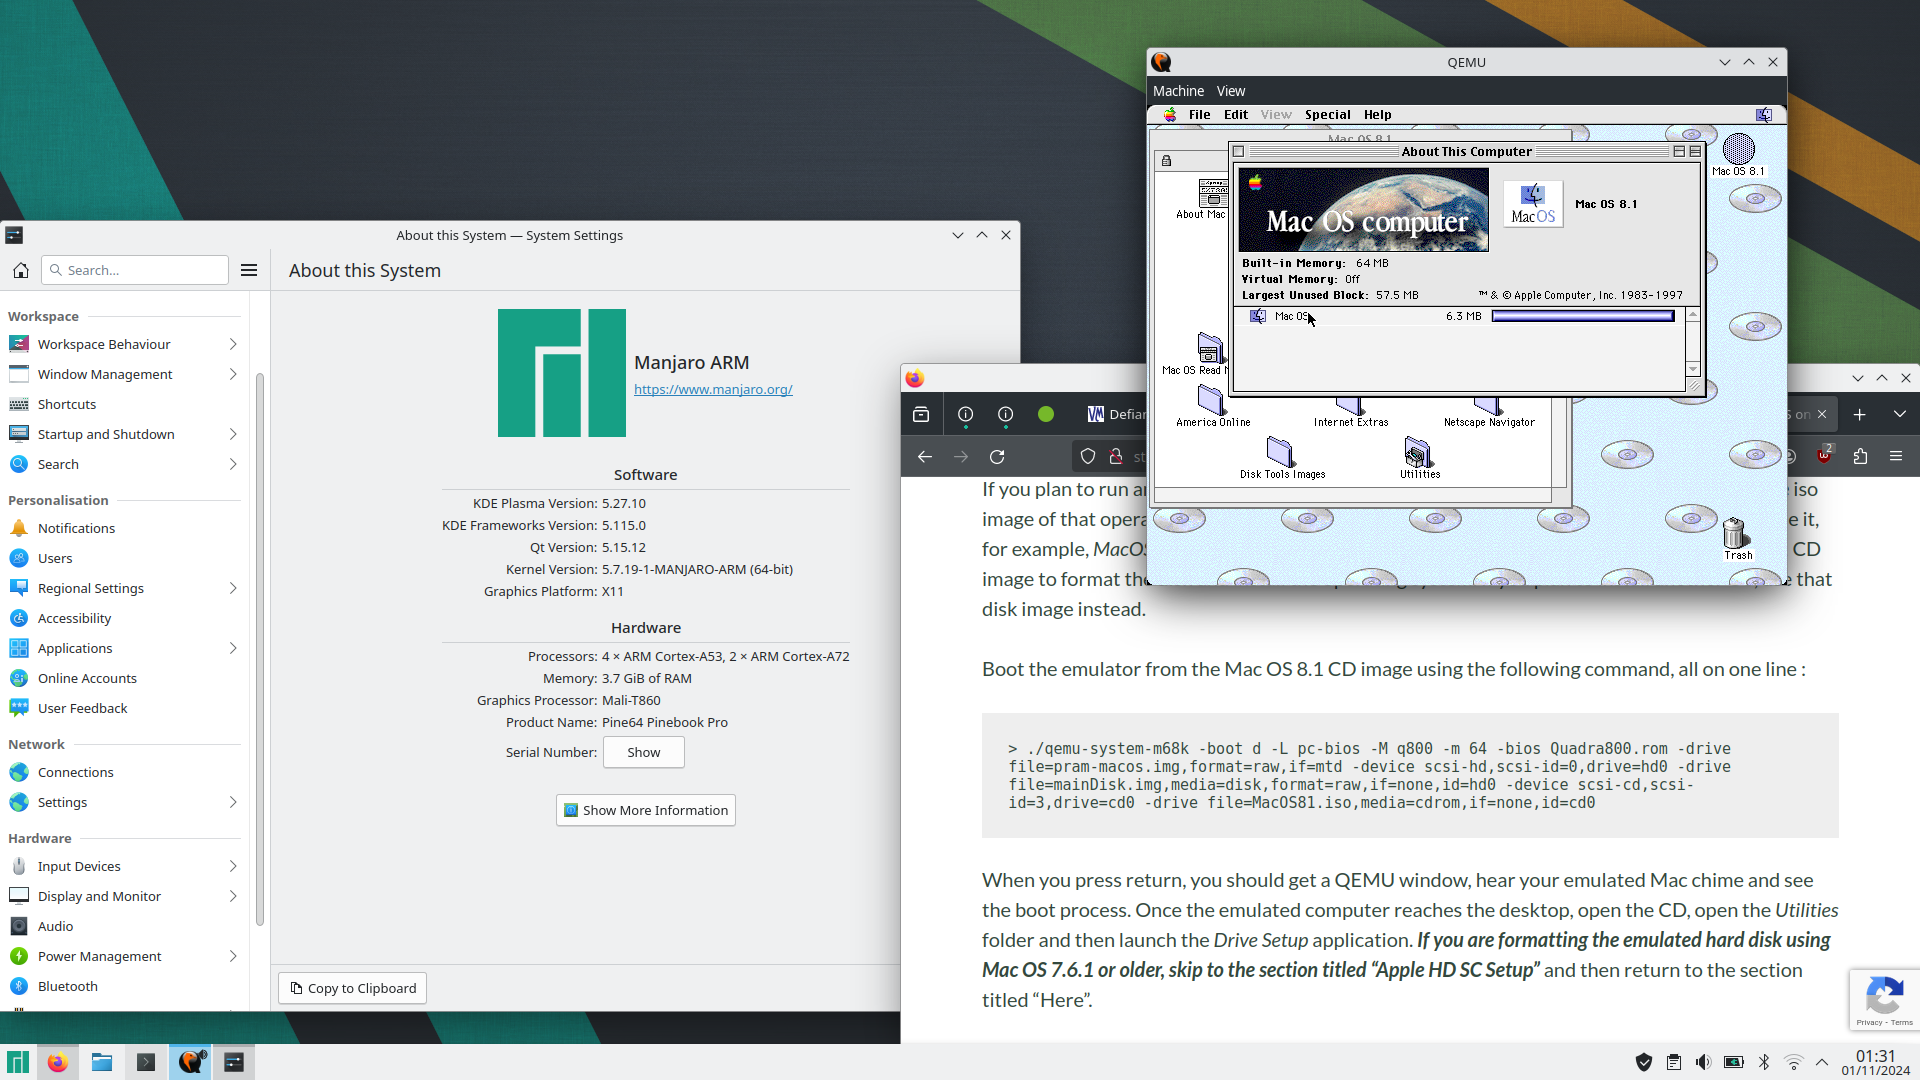
UPDATE 1st November 2024 – Last night I was able to build and run 68k QEMU on an 64bit ARM based PineBook Pro running Manjaro Linux. Manjaro uses yum instead of apt, so grabbing software was different, but all I needed to do was update installed software, then I installed the repository’s copy of qemu-system-m68k (a lazy way of getting most dependencies), then I had to install the build environment ninja. After that, everything worked exactly as described below, although compiling took quite a while. I haven’t benchmarked the system, but it feels like it runs pretty well. Mac OS 8 didn’t take too long to install. Given this, I would expect this software to be happy compiling on other ARM based Linux PCs and SBCs, such as the Raspberry Pi.
QEMU m68k Running Mac OS 8.1 on Manjaro-ARM (click to view)
Introduction
I recently installed the 68k version of QEMU on Linux (Pop! OS) and struggled to find detailed step-by-step instructions by googling, so thought I’d upload some notes to help others. I suspect that part of what tripped me up is that previously, it was necessary to build from a branch and not the central source, which led me down the wrong path to to get the m68k variant of QEMU to build, but in truth building the main branch source now gets you to a working emulator (although not the copy in the Debian software repository). This is slightly muddied by the out of date threads that are returned as the primary results when you search for instructions on building QEMU for 68k on Linux.
Building m68k QEMU
My primary source for building qemu-system-m68k for Linux was here but ultimately I needed some guidance from a contributor to the project who saw my post and got in touch to point me in the right direction. I’m very appreciative of the time they took to help me on my way. This assumes you plan to run Classic Mac OS (between 7.1 and 8.1), and not AUX or anything more exotic.
Navigate to your home folder

> sudo apt update
> sudo apt-get build-dep qemu-system-misc ninja
> git clone https://gitlab.com/qemu-project/qemu.git
> cd qemu
> ./configure --target-list=m68k-softmmu --enable-gtk --enable-sdl --enable-slirp
> make -j4
I then copied the executables qemu-system-m68k and qemu-img from the build folder, into the folder I wanted to run them from.
Creating / Getting the Required Files
To run, you will need to generate two disk images, and a copy of the Quadra 800 ROM. Place the ROM in the same folder as the executables, and name it Quadra800.rom. I next used some of the instructions from here to work out how to generate the needed image files as follows. Run these two commands in the location you placed qemu-system-m68k and qemu-img previously.
> qemu-img create -f raw -o size=1G mainDisk.img
> qemu-img create -f raw pram-macos.img 256b
On the first line, change “1G” to other values to change the image size from this example of 1 gigabyte.
Launching the Emulator for the First Time
The emulator “captures” the mouse (and keyboard) once you click in the window. To free the mouse, press Ctrl+Alt+g.
To initially format the disk image, you can use Drive Setup (Mac OS 8.x) or Apple HD SC Setup (7.6.1 and older) while booted from the OS installer CD. It is critical that the CD iso image you use has been properly created and includes the driver partitions and is bootable, otherwise you will just get a flashing question mark on a floppy disk icon. If you do not already have an image, you can grab one from the Macintosh Garden here (which is a direct link to download #6 (at time of writing) on this page), or from my own site here.
Rename the iso image as MacOS81.iso and place it in the same folder as qemu-system-m68k and qemu-img.
If you plan to run another version of Mac OS on the emulated computer, download a bootable iso image of that operating system, for example Mac OS 7.6.1, place it in the same folder and name it, for example, MacOS761.iso. In the following instructions I will assume that you are using a, 8.1 CD image to format the disk and install the operating system. If you plan to install another OS, use that disk image instead.
Boot the emulator from the Mac OS 8.1 CD image using the following command, all on one line :
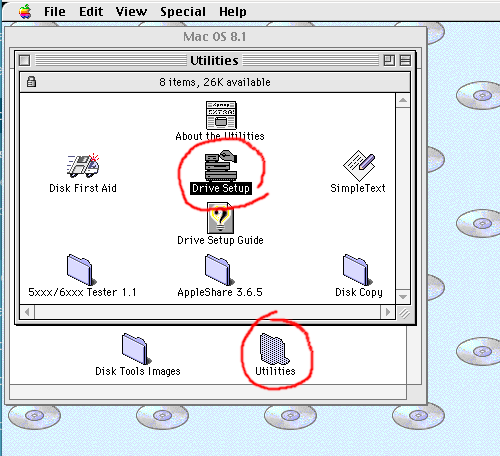
When you press return, you should get a QEMU window, hear your emulated Mac chime and see the boot process. Once the emulated computer reaches the desktop, open the CD, open the Utilities folder and then launch the Drive Setup application. If you are formatting the emulated hard disk using Mac OS 7.6.1 or older, skip to the section titled “Apple HD SC Setup” and then return to the section titled “Here”.
In Drive Setup, select the unformatted hard disk from the list, click the Initialize button, and then in the Initialize dialog box, click the Custom Setup… button, select “1 Partition” from the Partitioning Scheme popup menu, ensure the other popup menu says “Mac OS Standard” and not “Mac OS Extended” (if you plan to use the hard disk image with Mac OS 7.x), click OK, and lastly click Initialize. Once this is done, you can quit out of Drive Setup, and rename the hard disk you just formatted if you haven’t already. “Macintosh HD” is traditional. Once you’re done, you can install your operating system.
Here
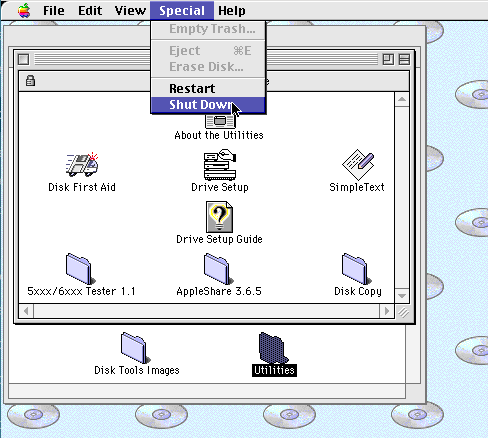
To install an OS, navigate to the desktop. If you have just booted you will be there by default, otherwise if you are following these instructions and have just formatted your “hard disk” you may need to quit out of the formatting utility and close some Finder windows. Once you get to the desktop, open the CD and run the main installer application. Follow on-screen instructions to complete the install. If you’re unfamiliar with the process, the default settings should be just fine. Selecting Restart (if offered in a dialog box, or from the Special menu at the desktop) should bring you back up in your installed copy of Mac OS.
You can shutdown the emulated computer by selecting Shutdown from the Special menu while at the desktop.
If you wish to start QEMU again, but from a different CD image, for example a Mac OS 7.6.1 iso image we downloaded and called MacOS761.iso, enter and execute the following command, which is identical to the previous command, except the CD Image filename has been updated.
Once you’re done, Shutdown and we’ll set up a simpler (less typing intensive) way of launching the emulator, as well as consider a couple of helpful customisations.
Create and edit a new bash script in the folder with qemu-syetem-m68k…
On the first line “-g 1152x870x8″ sets the display to 1152 by 870 pixels (Apple’s 21” monitor resolution) at 256 colours (8bit). If you want to run the display at 640 by 480, or 800 by 600 at 24bit colour, delete the “-g 1152x870x8” text (move the cursor with the cursor keys in nano. The default display mode allows you to switch between 640×480 and 800×600 from the Monitors control panel within the emulated computer.
If your host computer has an optical drive, the last two lines set up the emulator to directly access disks put in that drive. If you do not have an optical drive, you may need to delete these last two lines.
Press Ctrl-x and when prompted, press “y” to exit and save changes.
Now, when you want to launch the emulator, you can run the bash script launch68k.sh, for example by navigating in the terminal to the folder, and then typing ./launch68k.sh.
Apple HD SC Setup
If you format the emulated hard disk using a Mac OS 7.6.1 or older version of System 7, you will need to use the formatting utility Apple HD SC Setup. This is because older versions of Drive Setup were exclusively for PowerPCs and / or formatting IDE hard disks (and we’re emulating a SCSI disk). While the process is pretty simple, an quirk I noticed while setting up my emulator was that Apple HD SC Setup only created a very small data partition on the emulated hard disk. This is simple to fix though.
Step 1
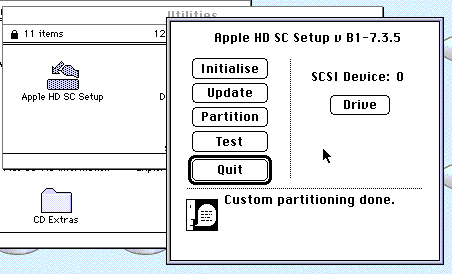
Launch Apple HD SC Setup, likely in the Utilities folder on the top level of the CD you have booted from. Select the SCSI ID of the emulated hard disk you want to format by clicking the Drive button, you most likely want “SCSI Device: 0”. Do not get this wrong or you could erase the data on whatever hard disk image you have mounted in your emulator.
Step 2
Click the Initialize button and wait. This takes quite a while.
Step 3
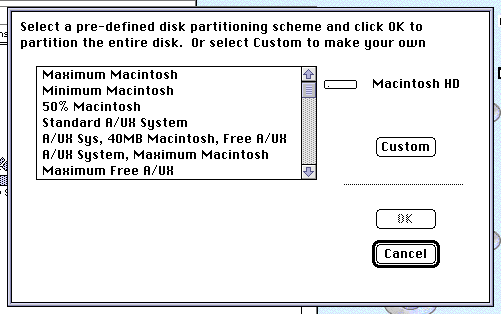
Click the Partition button, then click on the Customize button if available.
Step 4
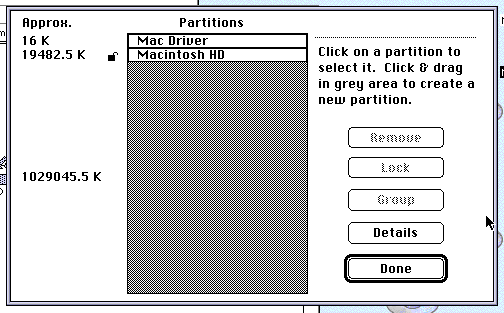
If the disk utilisation graphic shows partitions taking up most of the disk, you’re good to quit out of the utility, but if like me, the data partition is only using a small portion of the disk and the remainder is grey half tone, select the partition and click remove.
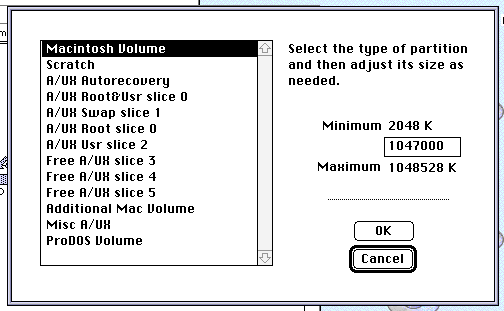
Click towards the bottom of the grey area. In the dialog box that appears, select the option “Mac Volume” on the left, and then in the text field on the right hand side, enter a value (in K) that is about 1000 less than the maximum value quoted below the text field. Click OK once you’re happy. You should now have a small amount of grey between the disk driver and the data partition. Click Done.
Step 5
Quit Apple HD SC Setup and return to the heading “Hear” above, to install the operating system.
Getting Software onto the Emulator
At this point, if you have an optical drive, you should be able to install any software you own on original CDs. This only gets you so far though. I’ve actually been moving files onto the disk image using another emulator. Basilisk II allows access to the host file system and while QEMU isn’t compatible with my Basilisk II disk images, the QEMU image works fine in Basilisk II. Other emulators might also work in this fashion, such as the Infinite Mac website, SheepShaver and others.
Make sure you don’t accidentally launch both emulators at the same time or you will possibly cause issues and corruption.
Limiting Processor Usage
On my fairly elderly laptop, when I run QEMU it consumes 100% of two cores (from the OSes perspective, as hyperthreading is on this isn’t strictly correct). This is enough to either cause the fan to ramp up to an annoying level, or if I am running from the battery, significantly reduce battery life.
The truth is, I don’t actually offer all of the speed this offers me, so I decided to look into how I might best throttle the performance of m68k QEMU to reduce the CPU time it consumes at the cost of emulator performance. Ultimately, I settled on using the program cputool which I had to install, but was available from the Debian repositories so a simple apt get install cputool sorted that.
This solution isn’t perfect as it makes the emulated graphics redraw stuttery, but it is OK if you’re mainly typing and not playing games or drawing.
After installing cputool, I was able to make a new script to launch QEMU, that just called my existing script. What I ended up with was a bash script containing…
cputool -c 50 -- ./startqemu.sh
Where “startqemu.sh” was my existing start script, “50” is the percent of each core’s total time I’m allowing. QEMU m68k uses two threads, so with this setup, I see the total CPU usage by the emulator halved and visible as 50% usage on two cores.
The above method should probably work with other emulators that consume all of an available core or core’s resources regardless of whether it is needed or not.
Advantages and Disadvantages
I’m pretty pleased with this emulator, with the only slight disadvantages I’ve seen so far (since installing an up to date version) are that it runs slower than some other emulators, it is harder to install and transferring files between the host and emulator isn’t as trivial as in emulators that mount the host file system on the desktop by default. This plays off against much better stability and compatibility when compared to Basilisk II for example, which I have been mainly using lately. One big compatibility improvement is sound. For example, SoundEdit 16 was not usable on Basilisk II due to constant crashes.
The driving factor for me trying QEMU was a bug that manifests in Basilisk II when writing software in REALbasic – if I convert an integer into a string in my REALbasic program, I get an incorrect result. This does not happen on real hardware such as my Centris 650 or my PowerBook G3, and also does not happen in QEMU.
Further Work
At this point, I should probably look into better ways of transferring files into the emulator. I believe that network filesharing, either using netatalk or possibly FTP, would be a fairly simple thing to setup. I’ve not looked into mounting the host system within the emulated Mac, I’m told this is possible, and will add instructions here when I look into it.
Obsolete Comments
This post was originally made with respect to an older, unofficial, build of QEMU with which I had a number of issues. I’ve moved the old list of issues here so that if someone is searching for terms they contain, they will still find this guide.
Issues (some minor) I experienced with the development branch and thread detailing how to build on Linux…
Build instructions don’t mention all dependencies.
Could not run configure due to permission issues if you try in a location outside your home folder, specifically on a secondary partition in my instance (I haven’t tried this again with the latest source).
The emulator is debouncing double clicks on my computer so they only count as a single click. It is not possible to double click in the normal manner. -fixed-
Disk image compatibility is very picky and the emulator does not seem to work with existing disk images.
After generating a disk image using QEMU’s own tool, it will not format, or even show on the emulated SCSI bus in Mac OS until you format it in Mac OS 8.1. -fixed-
The man pages are exclusively about x86 PCs even when called in relation to the m68k executable.
Resolution support is limited, more limited than real hardware.
The SDL mode does not work on my computer and just results in a blank screen.
Installing from the Debian repositories results in a non-working executable.
The most frustrating of these issues have been entirely fixed in the newer version of qemu-system-m68k, although some of the minor issues are still present (and others I haven’t re-checked for at this point). I have marked items I’ve tested and found solved as “-fixed-“.
Later versions of the Classic Mac OS let you use AppleShare (the regular client version) to directly connect to a specified IP address over the network or even internet, to access remote shares. But what some people don’t realise is that it is possible to install newer versions of the AppleShare software on older OSes to gain this functionality on older computers. This can be great for file sharing with friends over the modern internet, although some consideration should be given to security.
Requirements
I haven’t done extensive testing yet, but can confirm the described setup works on a Quadra 650 connecting to a remote AppleShare (crossing the Atlantic in my case). My expectation is that this setup would work back to System 7.1 on a 68020. This will need verifying.
An Ethernet capable Macintosh with a 68020 or later, running System 7.1.
The Open Transport 1.1.2 installer (provided).
The AppleShare 3.0.1 or later. 3.7.4 installer (provided).
An ethernet network with an internet connection.
Installation
First of all, download the following two installers, transfer them to your classic Mac and expand them.
Install Open Transport 1.1.2 only if your current version is older (or you don’t have any version installed). You can check the version by viewing file info for any of a number of Open Transport related extensions in the System Folder. After Installing, you will be forced to restart.
Install AppleShare 3.7.4. You will be once again instructed to restart.
In the Network or TCP/IP Control Panel, select the Ethernet option you intend to use and DHCP.
Make sure the System date and time is correct as this can be important with some networking. You may need to use the third party “SetDate” Control Panel to do this. I find the newest version crashes my computer, so use one of the older copies available on Macintosh Garden.
Ensure you are physically connected to your network and restart the computer.
Making an outgoing connection.
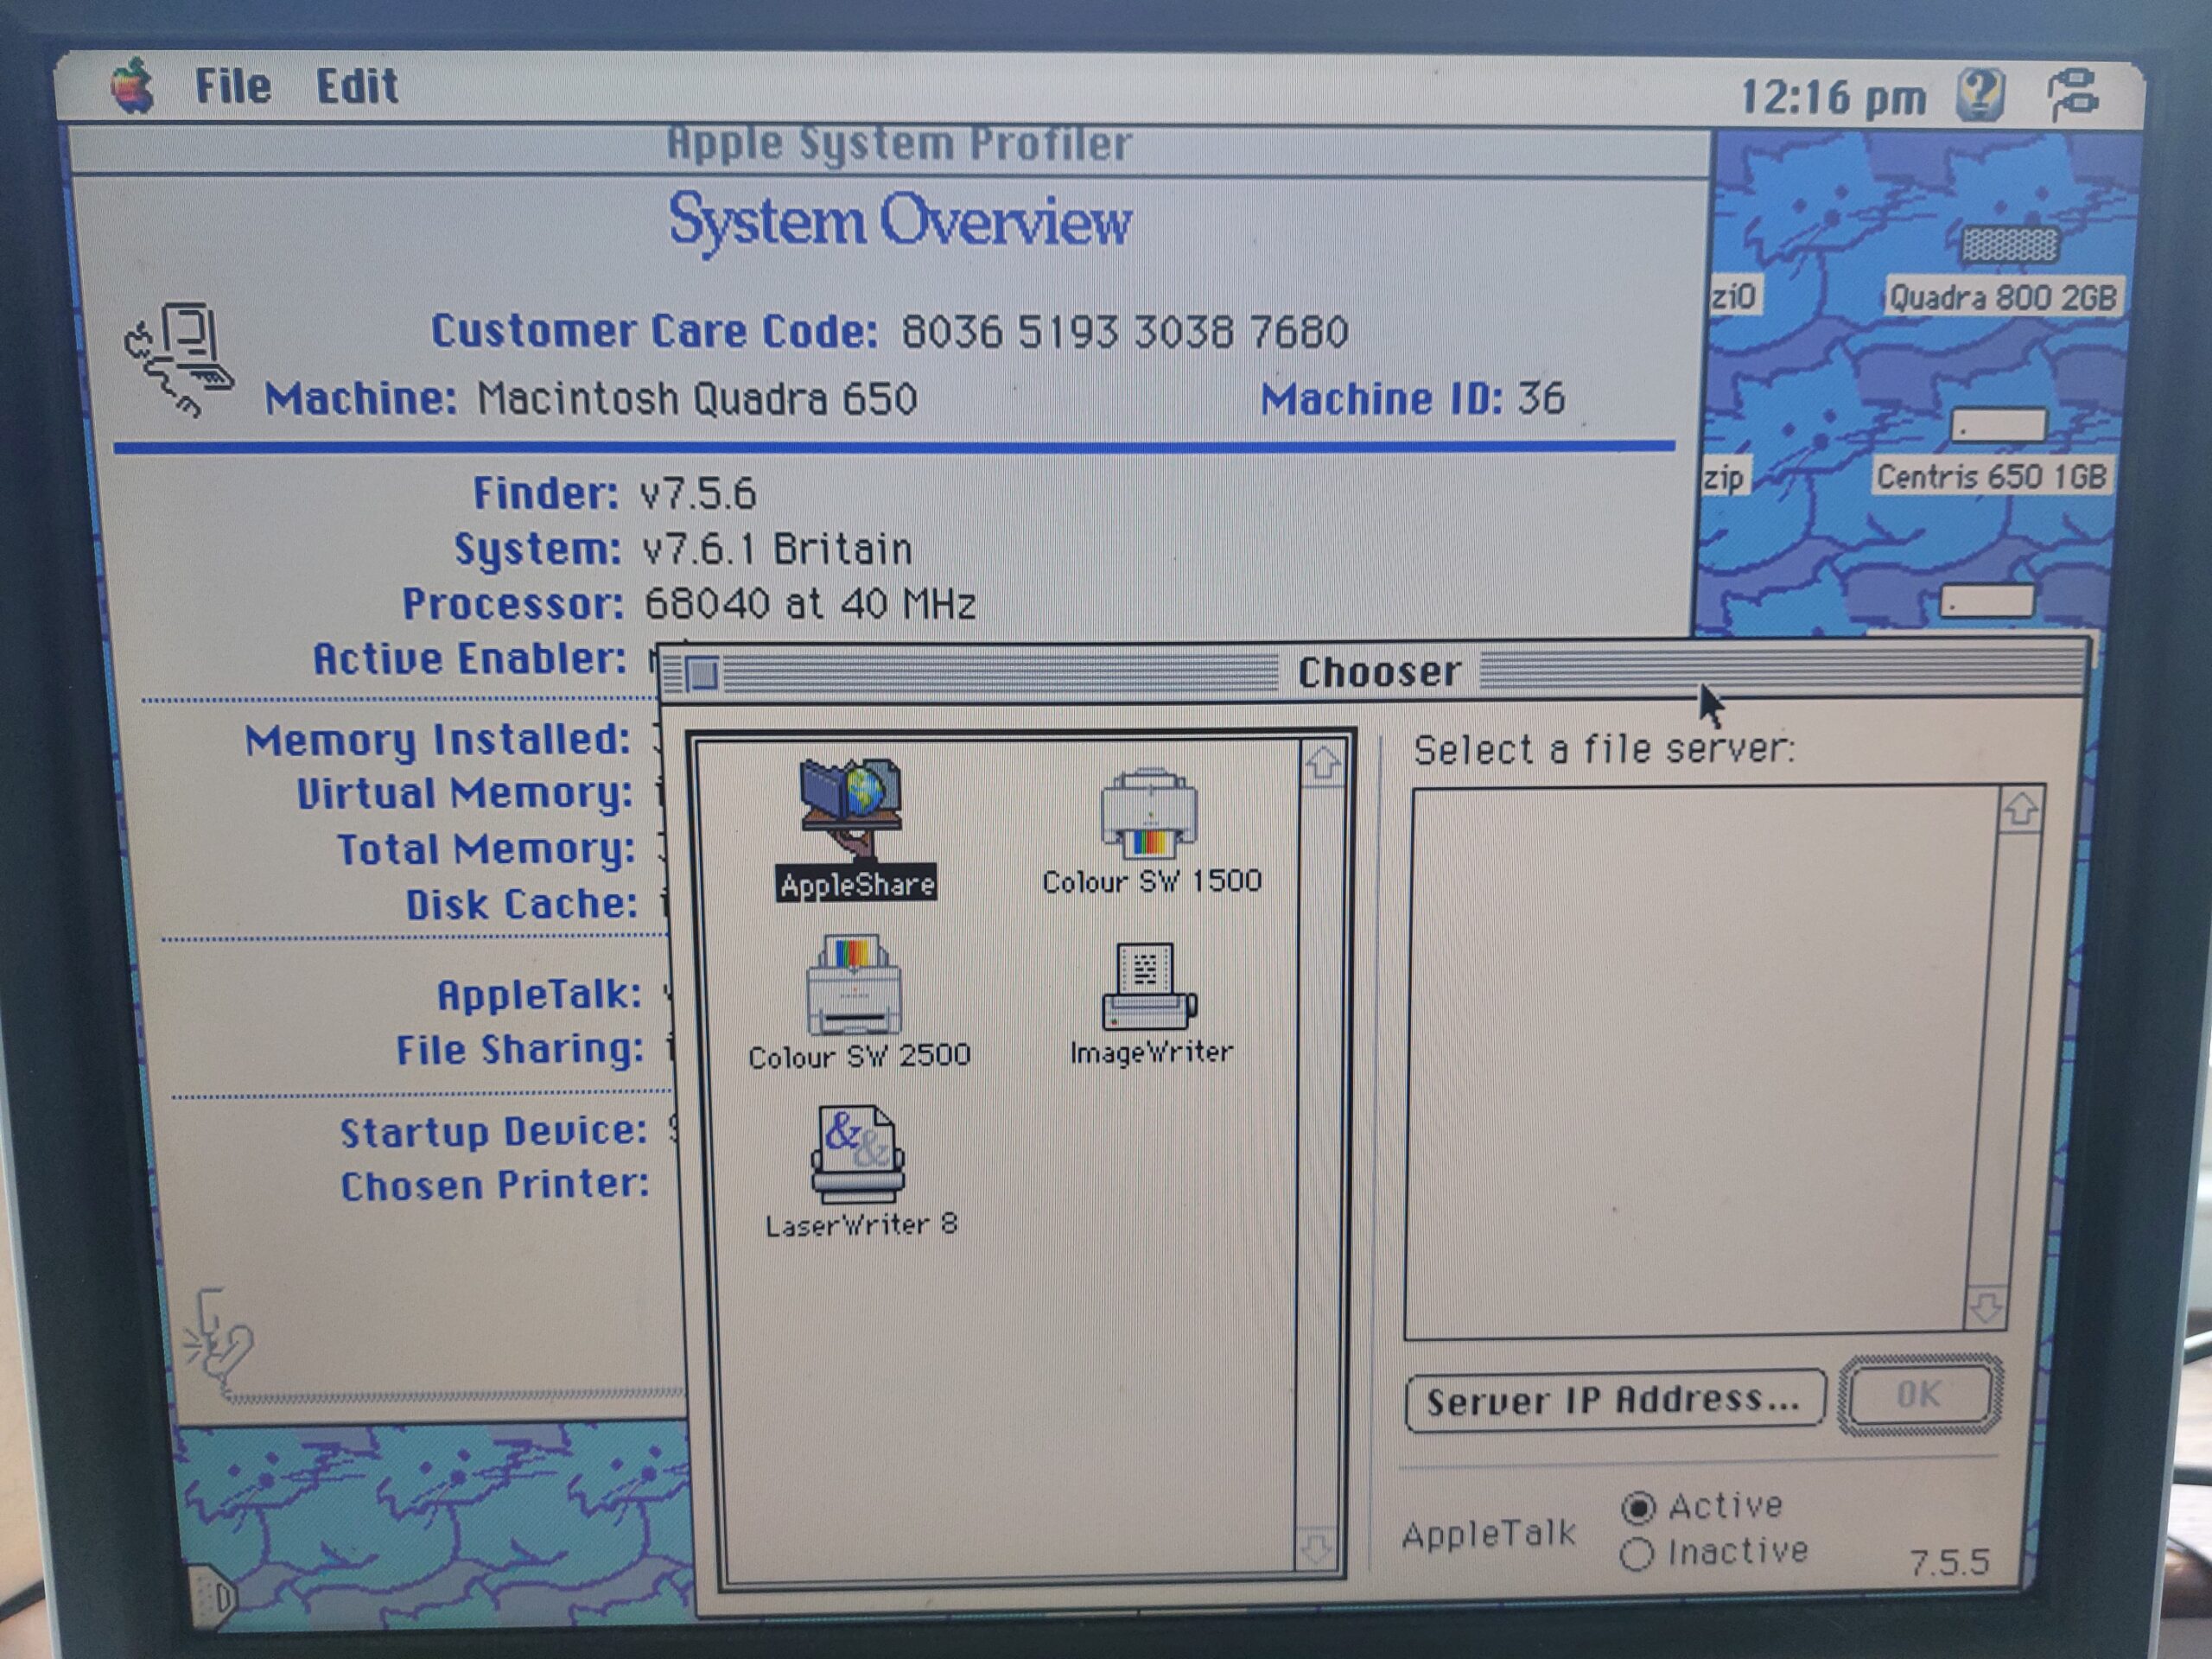
After ensuring the network is connected and AppleTalk is set up as described above, open the Chooser.
Select the AppleShare option, usually in the top left.
Click on the “Server IP Address…” button and in the dialog box that appears, enter the IP address or URL for the remote server you’re connecting to and click “Connect”.
Select “Guest” or enter the login details required for authentication and click “OK”.
At this point, if everything is successful, you should be presented with a list of available shares. You don’t need to click the checkboxes, they are only to save the servers so that they automatically mount at startup. To connect to a share, you just need to select it. You can select multiple shares by command-clicking.
Click “OK” and the remote share should mount on your desktop. Take things easy, especially if you are a long way from the server you have connected to as AppleShare is a little slow over the internet. Try to only do one thing at a time and consider how big a file or folder is before copying. Try to avoid getting info on folders containing a lot of files. Also, avoid opening files directly from the remote share – take a local copy first.
With my overclocked Quadra 650, I was able to get a little less than 1MB/s for transfers over a long distance. This is pretty good considering 10baseT is only about 1.2MB/s maximum, and has some overheads. I suspect the speeds I achieved are not much slower than I would get over a local network.
Preparing for an Incoming Connection
Turn on file sharing in the “Sharing Setup” Control Panel (moved to “File Sharing” on newer versions of Mac OS).
Turn off file sharing in the “Sharing…” option in the Finder’s “File” menu (moved to “Get Info” on newer versions of Mac OS) for all disks.
Create a new user in the Users and Groups Control Panel (moved to “File Sharing” on newer versions of Mac OS).
Create a shared folder and copy files you want to share into this folder.
Set the Sharing options for the shared folder so that it is read only for the user you created.
Optionally, create a drop box (a folder with write only permissions) inside the shared folder, or a guest folder (with read and write permissions) for people to upload their own files.
Log into your router’s settings page. Identify the IP address of your classic Mac.
Using instructions specific to your router, set up port forwarding to forward port 548 as TCP to the IP address associated with your classic Mac. Save and reset your router as required.
Security Suggestions
As AppleShare is an old and unsupported protocol, it is unlikely to be as secure as modern networking protocols. For example, traffic will be unencrypted and visible to anyone sniffing the connection. The following are a number of suggestions to improve security a little.
When you are not expecting incoming traffic, disable port 548 forwarding on your router. This removes a “hole” in your firewall and reduces the chance of someone stumbling on it, who might want to test your other security.
Don’t share with guest access enabled unless you are confident in what you are doing. Always set up a password protected user account for incoming connections.
Only share specific files you need to share, not whole disks.
Disable sharing when you’re not using it.
Ensure that you do not transfer private information over AppleShare.
Check that you don’t accidentally include personal information or files containing passwords / account details in the shared folder.
If you know how, consider setting up an SSH tunnel or VPN to transfer the AppleShare connection between local and remote sites. This will encrypt AppleShare traffic and shield transfers from prying eyes, although this will also make connecting more difficult.
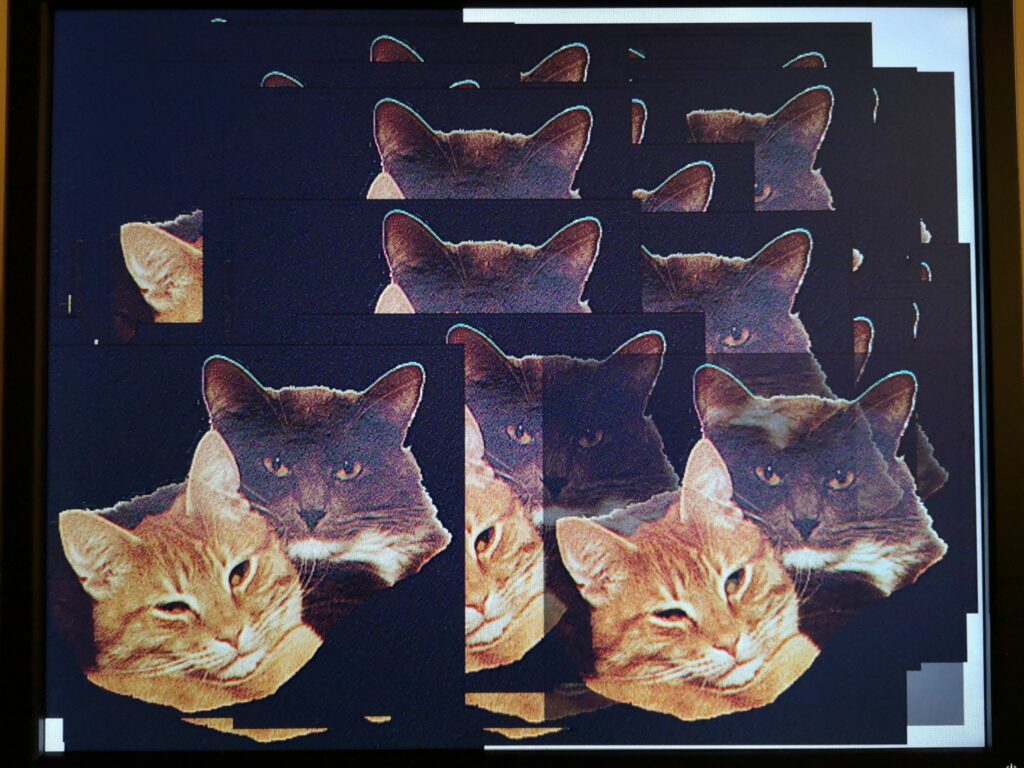
There are a number of classic Mac OS benchmarking tools available. Different ones have various benefits and personal preference is a major factor in choice. I’ve always used Norton’s System Info, which is provided as part of the Norton Utilities suite for Macintosh. I believe that it was first included with version 3 of Norton Utilities, but I need to verify that. As a kid, this was simply the only benchmark we owned, I like that it makes it clear what it is doing to benchmark (tests are named for the low level function that is being tested, often Macintosh Toolbox routines), and it uses a photo of two cats for the graphics tests that is clearly just a photo of a programmer’s pets. Its not even a very good photo, but this little human touch cheers me up every time I see it, and that’s worth a lot.
Lots of Norton Cats
System Info requires System 7 to run, and so an alternative benchmarking tool such as Snooper would be needed if you are running System 6. The newest versions of Norton Utilities claim to need Mac OS 8.* but it isn’t actually true.
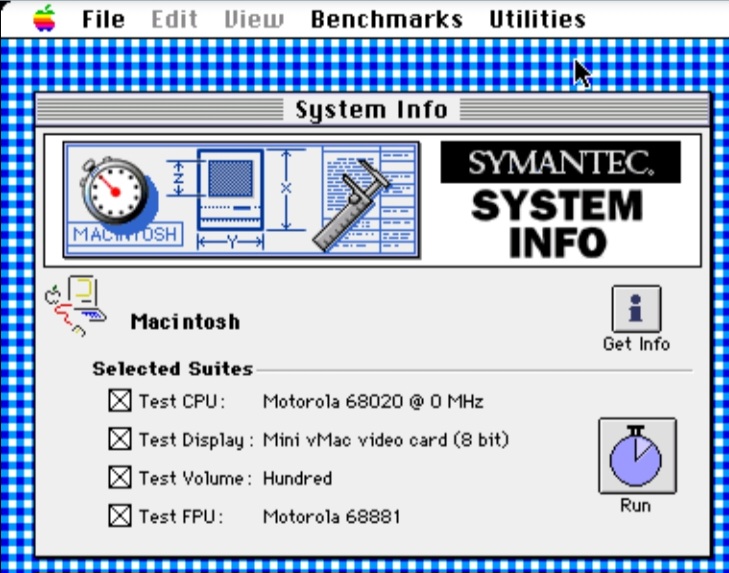
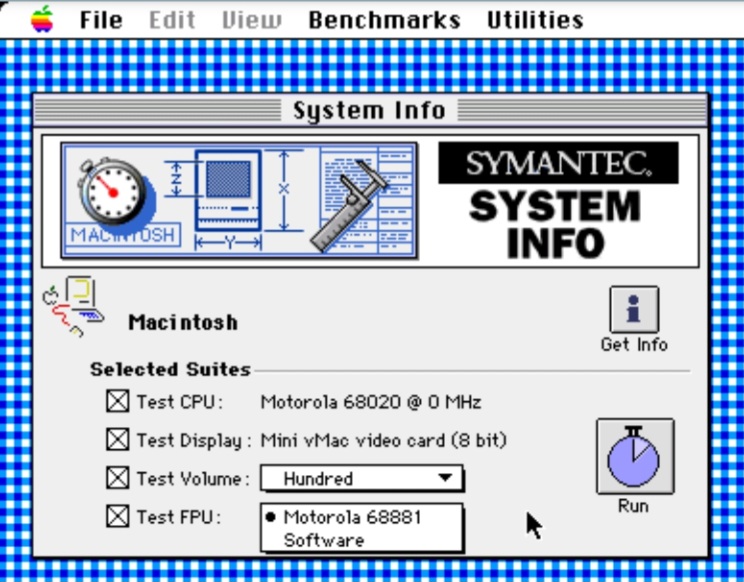
Over time, there were few obvious changes within the System Info application. Included benchmarks and System used as the baseline (100 in tests) varied through time. I… think it started as the SE, but haven’t seen this version lately… but more common versions were the Quadra 700, and later the Power Macintosh 6100/60. The following shows System Info’s default window on launch. Later versions show a splash screen while launching, earlier versions did not.
Norton System Info Default Window
Features include
Native 68k and PPC support.
An extensive collection of included benchmark results files for both stock and some accelerated Macintosh computers.
Top level CPU, 2D (Quickdraw) graphics, disk and FPU scores.
Ability to select PPC or emulated 68020 performance on a PowerPC, and physical or software FPU where available.
Ability to select which video card and which disk.
Advanced mode which shows more detail during tests, and gives more detail in results. Graphical and tabulated results available, with the ability to show tabulated results in relative or absolute terms.
Results can be easily shared as saved individual files for each test run.
A detailed description of the computer and settings automatically saved with the results file.
Warns about some system settings which may impact performance, such as AppleTalk, Virtual Memory, video bit depth and Disk Cache.
A tiny application.
Ability to export tab separated values (TSV).
Disadvantages
New users don’t notice the need to enable advanced features and assume the tool is more simplistic than it is.
As is often the case, the performance benefits of a relatively small cache are possibly exaggerated as the tests seem to be repetitive and fit within the cache (difficult because caches give significant real world advantages, but not in all instances).
Tests are very much function based and not representative of real world activities.
Graphics tests are only QuickDraw 2D, and don’t include any QuickTime, RAVE, QuickDraw 3D, Glide or OpenGL tests.
Not scriptable?
The CPU speed shown in the main window in MHz isn’t always correct, especially if the accelerator is only enabled during boot, or is able to change speed.
Tips and Tricks
Even if the version of Norton you’re using is too new for the computer you are using, if you go into the “Norton Tools” folder and run “System Info” from there, it will launch in most circumstances, as long as you have System 7 or newer.
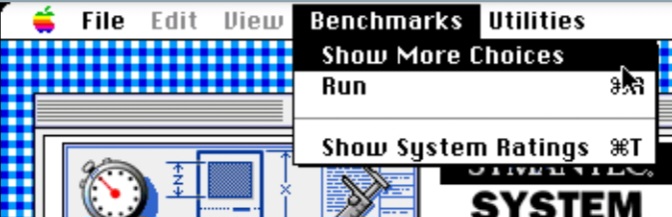
To enable advanced options within the software, select “Show More Choices” from the “Benchmarks” menu. This provides a number of additional drop down menus for fine tuning and seeing results in a greater level of detail throughout the application, as well as some additional menu items.
Selecting Show More Choices
System Info Default Window More Choices Shown for Volume and FPU, With the Latter Selected
Note that generally, the higher the video bit depth you run, the slower graphics performance will be, except where acceleration is only provided at higher bit depths. It was fairly common for video cards to not provide acceleration at bit depths below 8bit, and a small number of cards only provided 24bit acceleration.
Screen resolution doesn’t appear to have a significant impact on video scores for many machines, although running at 640×480 is probably best to ensure consistency with built in benchmarks. This said, Computers that use main memory as VRAM like the IIci, IIsi and 6100 can see significant CPU performance changes depending on video settings.
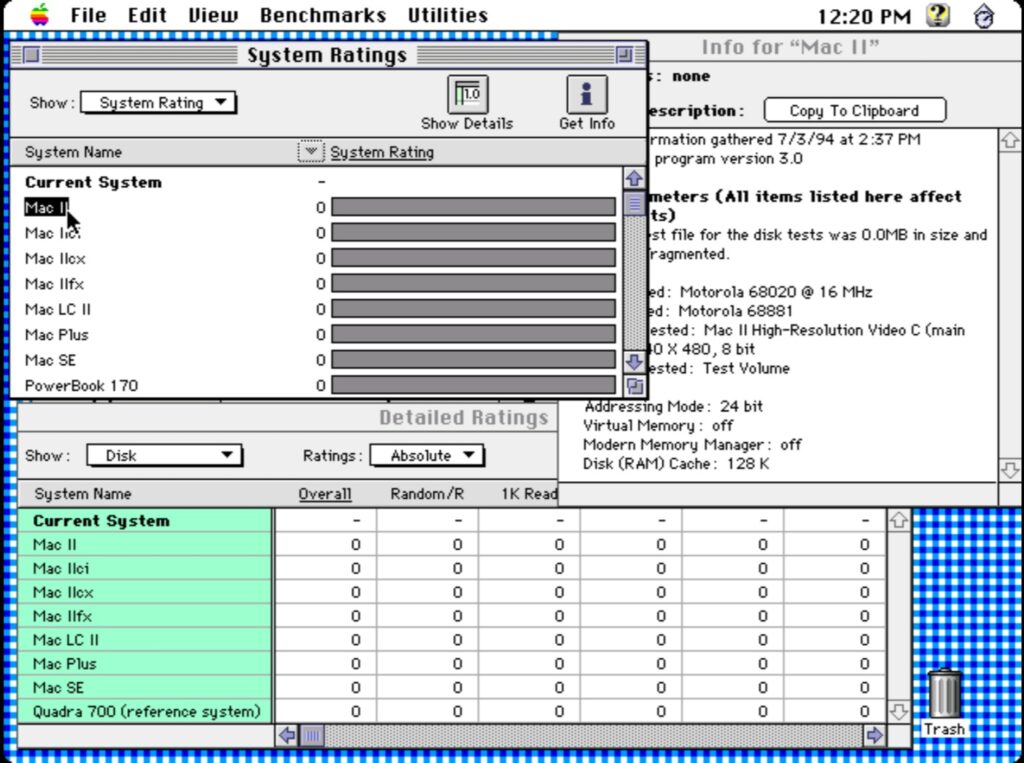
When in the “System Ratings” window, selecting a system from the list and clicking the “Get Info” button (see image “All Results Windows” below) will show a description of the system the benchmark was performed on. Details are given of both hardware, software and some system settings.
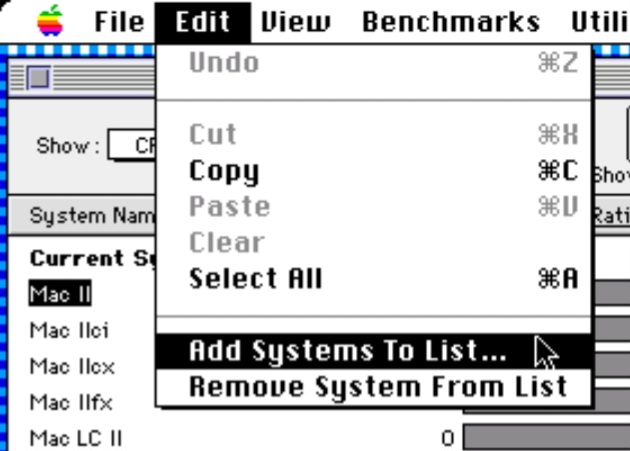
Additional results supplied, but not shown by default, can be added to the various results windows using the “Add Systems To List” menu item from the “Edit” menu.
Add Systems To List
Running a Test
Use the “Selected Suites” checkboxes to enable and disable each of the CPU, video, disk and FPU test suites and if in advanced mode, select between the real and emulated CPU, video card, disk (in reality, the list given is mounted partitions) and FPU or software. Not all of these options will be available at all times, depending on the computer under test.
Once the options are as desired, click the “Run” button. Note that at this point Norton will inform you of any System settings it has detected which will impact the scores and which it thinks you should change. Unless you’re doing specific testing, such as comparing 24bit mode between video cards, it is generally advisable to follow this guidance. A restart may be required for some changes (for example, disk cache, and AppleTalk on some System versions).
After this the tests will start. Depending on the performance of your computer, they may take quite a few minutes to run, especially the disk tests. In the advanced mode, you will be given greater detail of what test is currently being undertaken and what each test scores. This can help with the boredom of waiting for the tests to complete.
Once the benchmarks have completed, System Info automatically opens the System Ratings window, and lists the tests just undertaken as “Current System”. It is probably a good idea to save the results at this point if you plan to keep them for comparison.
Reviewing Results
All Result Windows
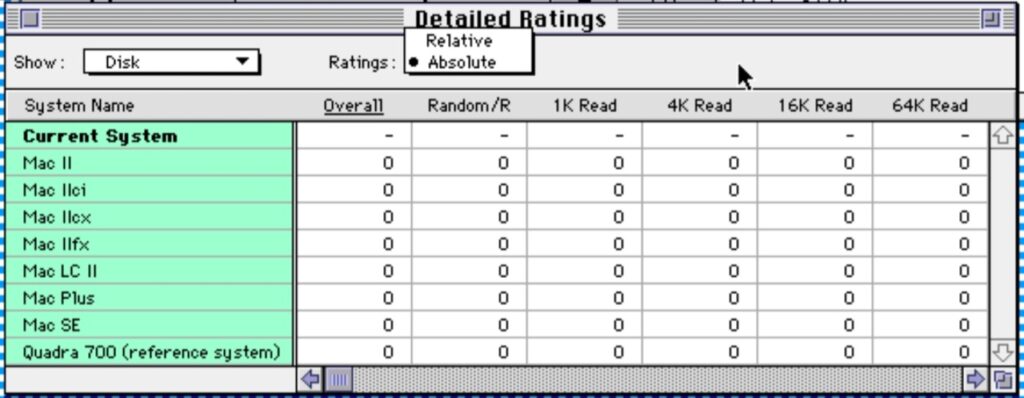
Note – The screenshot above incorrectly shows zeros for all results. This is an oddity of running the software within some emulators. Something I did for convenience when getting screenshots. On real hardware you will see actual scores for your and other computers.
Viewing Overall Rating / Test Category / Individual Tests
At the top left of the “System Ratings” window, there is a pop-up menu labelled “Show”. This allows you to select each of the four test categories, CPU, Video, Disk or FPU, as well as the default overall summary “System Rating”. The numbers to the right of each system name represent a score, relative to the baseline system (e.g. scaled where a Quadra 700 equals 100, or a 6100/60 equals 100 etc. dependant on the version of System Info you are using. The baseline system is identified in the list by the text “(reference system)” following its name). The bars to the right of these numbers (ordinarily) vary in length and graphically represent the score for each system.
If all tests were not run, the Current System will show as a dash “-” for the tests which were not completed, as well as for the overall “System Rating”.
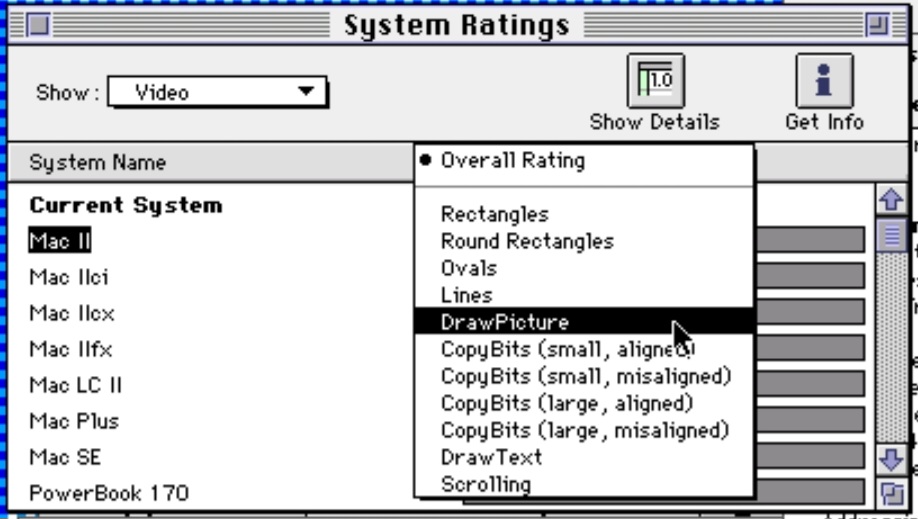
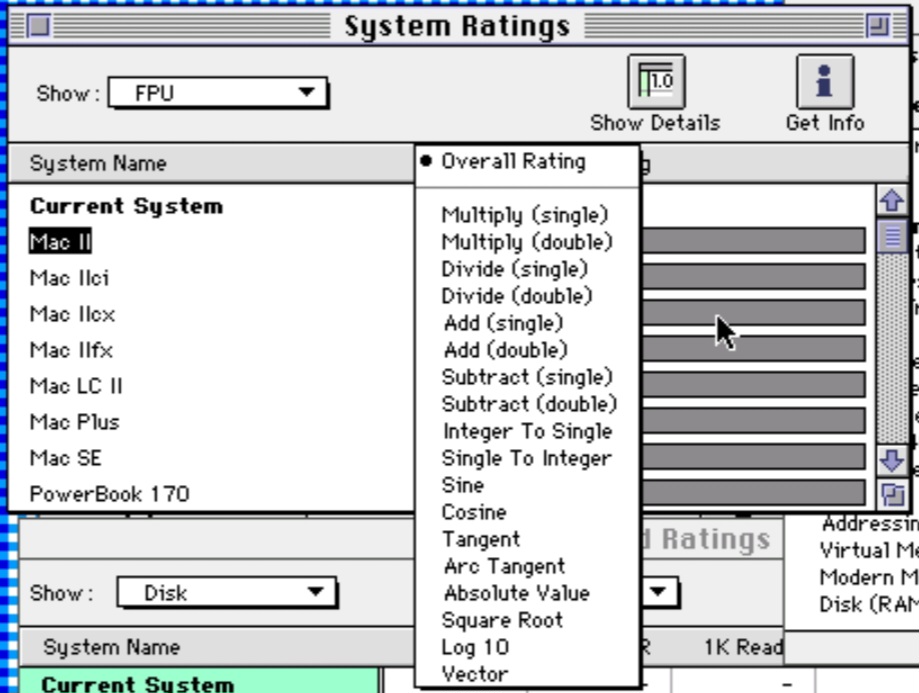
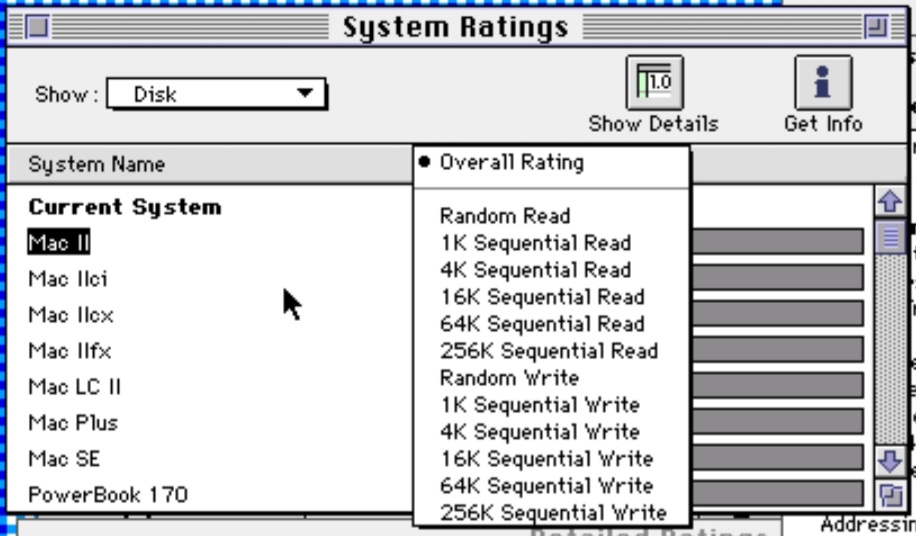
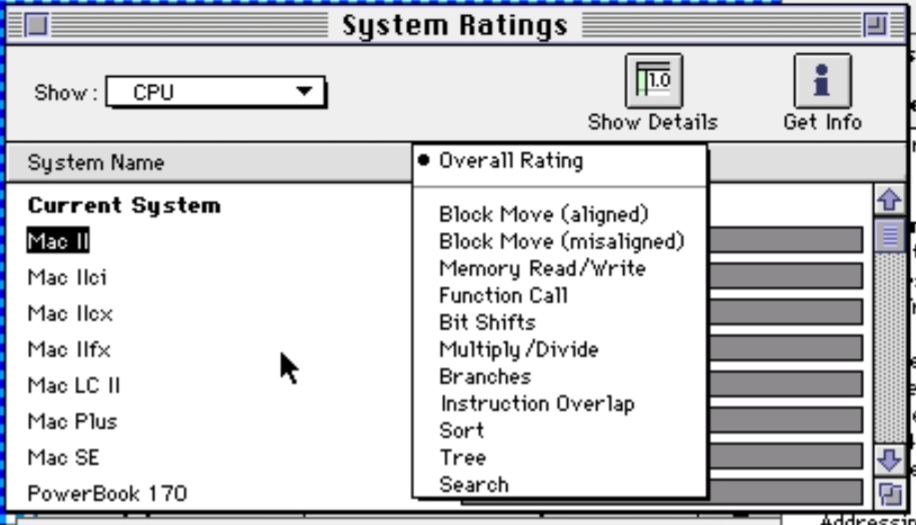
If you are in advanced mode (i.e. with “show more choices” enabled), an additional drop down menu is available by clicking the downwards pointing triangle to the left of the “System Rating” column heading. This menu allows you to select individual tests for the category currently selected, for example, if you have selected “Disk”, then you will be able to choose to display specifically the random write, or perhaps 1K read test.
It is worth studying the results at this level, especially with respects to video accelerator performance, because it can be interesting to see how different cards perform in different areas. A card that scores well overall might be weak when it comes to rendering text compared to another card that scores lower overall. In this case, if your primary use case is… rendering text – the supposedly “slower” card might be the best card for you as it performs better in your application that mainly renders text.
Video Individual Test Results MenuFPU Individual Test Results MenuDisk Individual Test Results MenuCPU Individual Test Results MenuEach Menu for Individual Tests
To assist in comparing results on a test by test basis, clicking the “Show Details” button presents tabulated results. Within this window, a drop down menu enables you to select between “Absolute” and “Relative” results. I find that generally, “Relative” is more usable with the exception of disk scores, as the “Absolute” scores for the disk results are given in KB/s, which is meaningful.
If you manually select a subset of results in the “System Ratings” window before clicking “Show Details” only details for those, plus the baseline system, will be shown.
Tabulated Results
Exporting Results
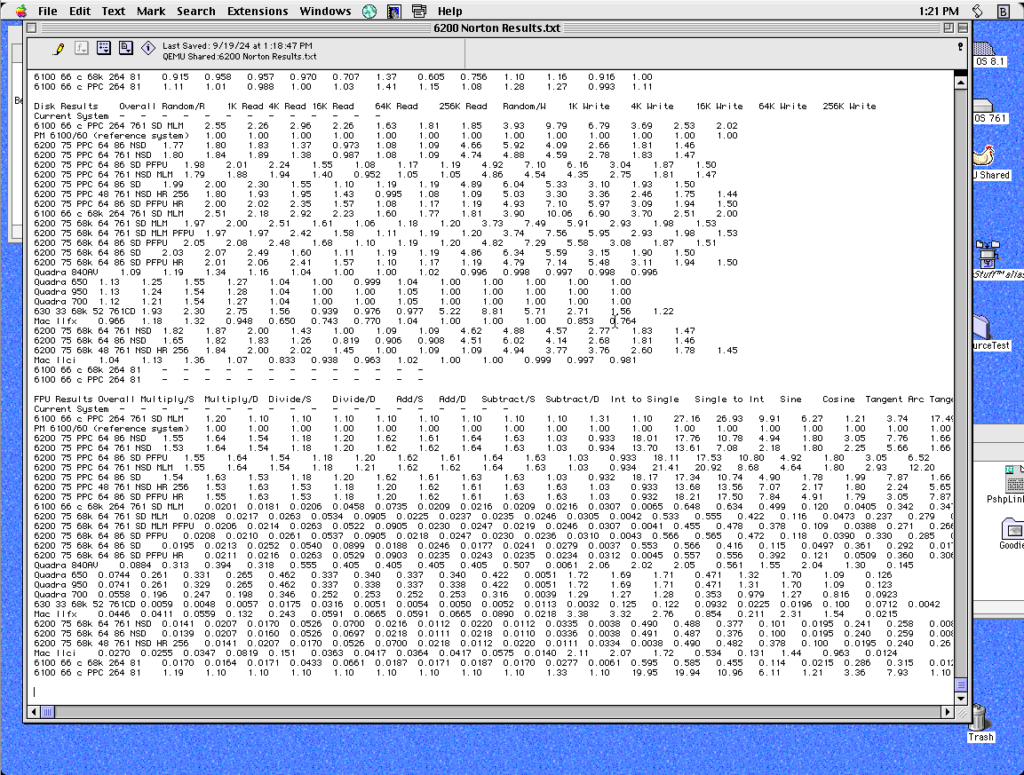
While in the Detailed Ratings view, pressing Command-C will copy a summary of all results to the clipboard. This text can then be pasted into another application, such as for example, in the following screenshot, a text document. To remove unwanted entries either select a subset of results in the “System Ratings” window before clicking the “Detailed Ratings” button, or alternatively quit System Info and move unwanted benchmark files in the “Benchmark results” folder into the “Hidden Results” folder. Any results in the hidden folder wont show in the results lists / export. Moving them back afterwards will make them re-appear next time you relaunch the program.
Results Copied from the Detailed Ratings View, and Pasted into the Text Editor BBEdit
Note that the exported text includes all result types (CPU, Video, Disk and FPU), not just the results that were currently being viewed. The data is Tab Separated Values (TSV) and should be fairly trivial to paste into a Spreadsheet such as Excel or ClarisWorks.
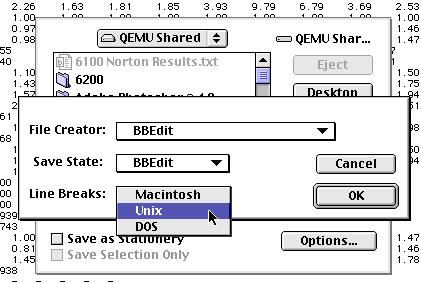
Moving data to a modern computer can be easily achieved with BBEdit. I recommend BBEdit, because it will run on 68k Macs, and is aware of the three common line ending types. By pasting in the data, selecting save, and then clicking the “Options…” button, you will get the following dialogue box, where you can select your preferred line ending type. I’m picking “Unix”, which is best for Linux and modern versions of Mac OS, but if you are on Windows, you will likely want to pick “DOS”.
Saving for Other Platforms
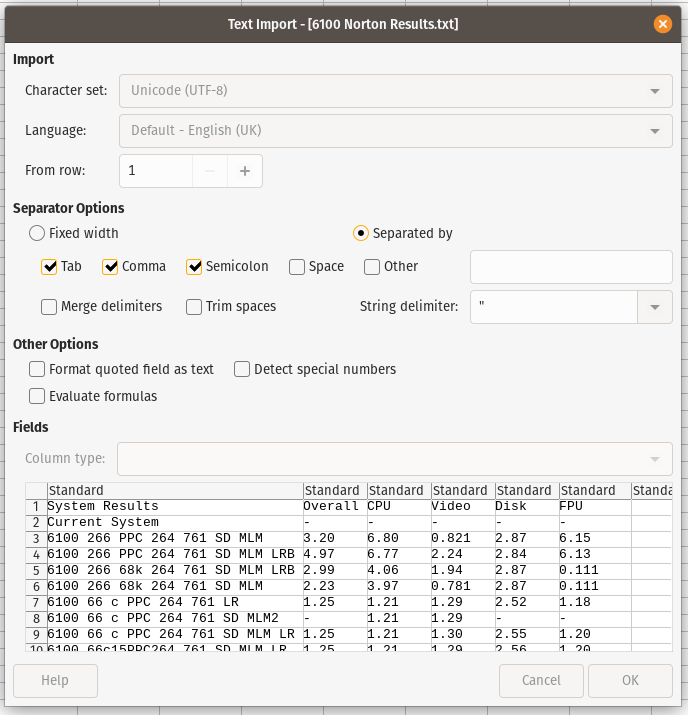
Name the file, including a “.txt” or “.tsv” file extension and save. Once you have moved the file to your modern computer, you should be able to trivially import the data. You may have minor issues if there are unusual characters, due to the classic Mac OS Roman text encoding. The following shows my example exported collection being opened in LibreOffice Calc.
Importing Norton System Info Results into LibreOffice
Note – You should probably uncheck “Comma” and “Semicolon” if you have used these characters in your system descriptions, or if you are using continental European number formats.
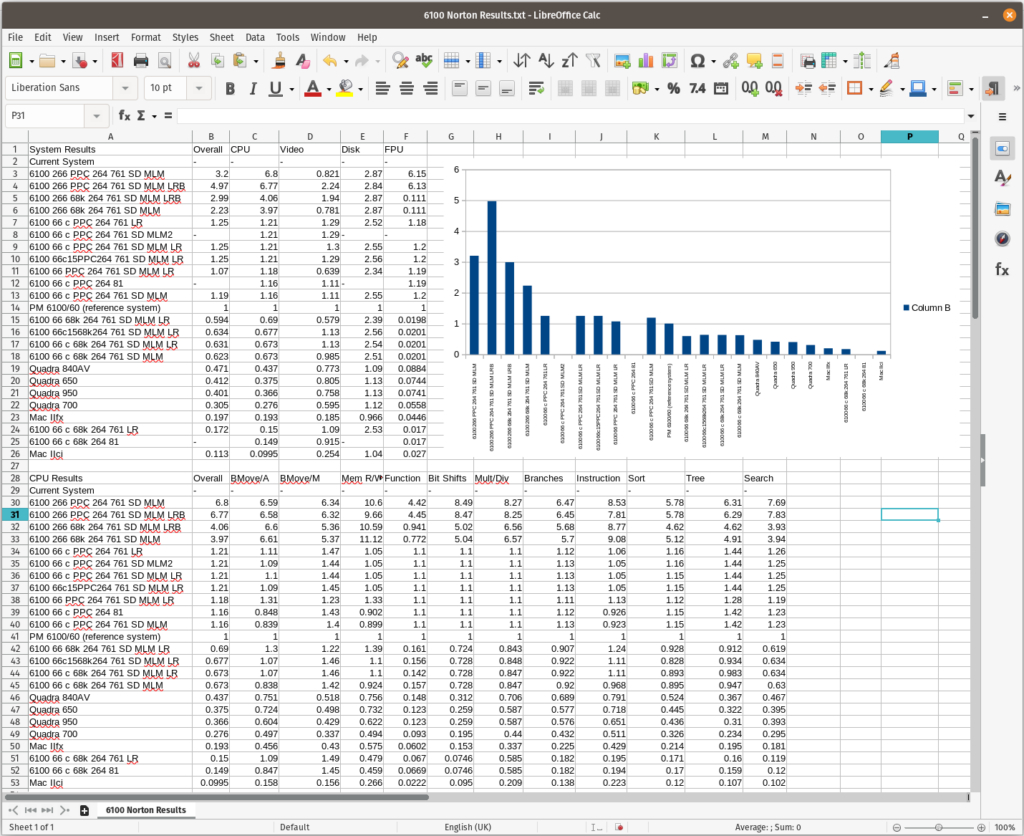
The following screenshot shows the text file imported with no further manipulation, other than creating a chart based on the “Current System” and “Overall” columns of the first table of data.
Working with Norton System Info Data in LibreOffice Calc
Description of the Individual Benchmark Tests
The following is an extract from the Norton Utilities 3.2 manual.
Manual Extract for Norton System Info Benchmarks
Variations in test results of up to 1 percent are normal. For disk tests, variations of up to 7 percent are normal due to disk drive operation.
CPU Benchmarks
Some CPU tests actually test more than the CPU itself. For example, some tests access memory (RAM), which tests not only the CPU, but the system bus, memory speed, and caching (if any). These factors can influence test results substantially. For the purposes of benchmarking, these factors are all considered to be part of the CPU.
BlockMove Aligned and BlockMove Misaligned: Measures the rate at which the Macintosh can move memory using the ROM trap BlockMove. On all Macintosh computers, BlockMove is highly optimized and thus is a good measure of memory bandwidth (how much data can be moved per unit time). An aligned and misaligned case are used because on some Macintosh computers performance is much poorer when data is not aligned properly. Newer models, such as the Power Macintosh computers, have excellent performance in both cases.
Memory Read and Write: This is also a memory bandwidth test, but the benchmark accesses memory in the way a program normally would and does not make use of any special machine instructions.
Function Call: Measures the overhead associated with making a series of function calls with arguments. Most application programs make large numbers of function calls.
Bit Shifts: Measures how fast bits can be shifted in a machine word. This type of instruction is used frequently by a wide variety of software.
Multiply and Divide: Measures speed of integer multiplication and division. The tests are slanted more towards multiplication. Application programs frequently use this type of instruction to access arrays.
Branches: Measures how fast code containing conditional branches can run. Branches are on of the most common types of instructions used and can substantially affect performance on some CPUs. Power Macintosh computers have a special processing unit dedicated to processing branch instructions.
Instruction Overlap: Measures the ability of the CPU to execute integer (not floating point) instructions at the same time it accesses memory. The benchmark is written in such a way that memory access should be able to execute at the same time all intervening computations are performed.
Sort: A high-level benchmark that sorts a large array using a quick-sort and insertion-sort hybrid algorithm that makes heavy demands on memory and looping constructs.
Tree: A high-level benchmark that builds a large, sorted binary tree by repeated insertion. Good caching and/or memory bandwidth can speed up this test considerably.
Search: A high-level benchmark that performs a sophisticated string-searching algorithm that makes extremely heavy demands on memory in a partially-sequential way. This test is designed to access memory in a way that most machines cannot cache effectively without a substantial amount of cache memory.
Video Benchmarks
The Video benchmarks test the speed at which common Quickdraw operations can be performed. The benchmarks are designed to measure frequently used operations – not esoteric transfer modes or rarely utilized Quickdraw routines. For example, scrolling operations are emphasized in the overall video rating because they are heavily used by all users. Note that as the video bit depth is reduced, video performance generally increases. If you compare video performance on two different systems, make sure to test at the same video bit depth.
Rectangles, Round Rectangles, and Ovals: These tests cycle through painting, erasing, filling, framing, and inverting the respective shapes with different fill patterns and colors, where appropriate.
Lines: Draws lines of varying slopes and colors. The video circuitry of some Macintosh computers is highly optimized for drawing lines.
Picture: Draws a bitmapped picture at the same bit depth of the screen. It tests the ability of Quickdraw to decode a PICT format picture and place its bits on the screen.
CopyBits: Measures how fast bits can be moved around on the screen using the CopyBits ROM routine, which is heavily used in screen drawing. The small cases are 32 by 32 (the size of a large icon). The small cases are significantly impacted by the overhead of calling Quickdraw and its setup. The large cases minimize this overhead and, thus, more accurately test the actual speed at which bits can be moved. Aligned (to a 32 pixel boundary) and misaligned cases test optimal and non-optimal situations.
DrawText: Measures how fast a sentence can be drawn on the screen. Primary emphasis is placed on drawing plain text, although bold and italic text are tested as well.
Scrolling: Measures how fast bits can be scrolled on the screen. Emphasis is placed on vertical scrolling, but some horizontal scrolling is also performed. Results of this test vary widely depending on the bit depth of the screen.
Disk Benchmarks
By design, the disk tests do not isolate disk speed alone. The benchmarks include factors applications normally experience, such as CPU speed, SCSI bus speed, impact of the disk cache, and fragmentation.
Random Read and Random Write: These benchmarks read or write data into a file in three 1MB bands. The data size read and written varies from 4 bytes to 4 kilobytes. These tests reflect seek time, the effects of the disk cache, and how fast a drive can process numerous small requests to read or write data. They are a good indicator of overall disk performance.
Sequential Read and Sequential Write (1K, 4K, 16K, 64K, and 256K): Measure how fast the drive can read/write data when requested in a specific size chunk. Some drives can transfer data efficiently only in large chunks, others are efficient with many small chunks, but slow down with large chunks. These sequential tests intentionally bypass the built-in disk cache (to eliminate cache overhead) and provide a better indicator of performance of the disk itself. Smart, disk-intensive applications such as Norton DiskDoubler Pro bypass the disk cache, when appropriate, to provide maximum performance. Few current applications employ this technique, however.
FPU Benchmarks
All FPU tests are directly comparable among themselves. For example, you can directly compare the speed of a multiply to an addition, square root, or cosine.
A single-precision floating-point number is 32 bits. Because of differences in the floating point formats supported on various machines, a double-precision number varies in size. For double precision, the fastest format available that is at least 64 bits in size is used.
Multiply, Divide, Add, and Subtract: Measure basic FPU performance in both single and double precision. On some machines, double precision may actually be faster than single precision because single precision numbers must first be converted to double precision before the calculation occurs.
Integer To Single and Single To Integer: Convert an integer number to a single precision floating point number and vice versa. Some machines have hardware instructions for both operations, some have neither, and some have just one. This accounts for dramatically different results that you may encounter, depending on which way the conversion goes.
Sine, Cosine, Tangent, and Arc Tangent: Measure trigonometric performance on double-precision numbers. These results can vary dramatically from computer to computer. Some older models of the Macintosh can actually outperform the new Power Macintoshes on these functions because the Power Macintoshes implement these routines in software.
Absolute Value, Square Root, and Log 10: Measure the absolute value, square root, and logarithm in base 10, respectively, of a double-precision number.
Vector: Measures how fast an array of numbers (vector) can be manipulated. Each element in the array is multiplied by a constant, a constant is added, and the result is stored back into the array (X’ = aX + B).
Getting Norton System Info
Norton System Info was provided as part of the Norton Utilities for Macintosh suite of software. The best way to get a copy of this is by buying a genuine copy on eBay, although I’m quite sure there are copies on Macintosh Garden.
Feedback on this Post
If you have any additional information which you wish to suggest is added to this page, or would like to correct any errors / inaccuracies, please use my contact form to let me know.
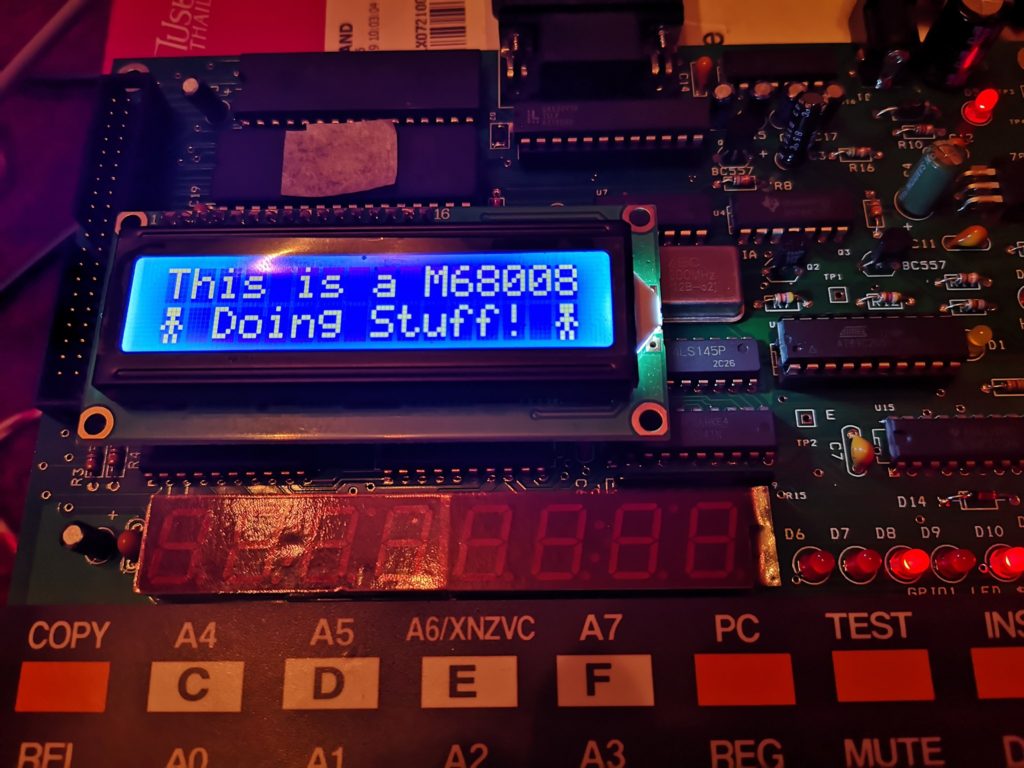
The following is my first attempt at controlling the LCD on my Wichit Sirichote (URL updated 2024 to new website) Single Board Computer. Please forgive any terrible programming as I’m not very familiar with assembly language, and even less so with 68k assembly language programming. I’ve tried to make the code a little modular so the subroutines can be re-used. I previously described the software setup I’m using to program the board from Linux here. There are two versions of the same program (almost) in this post, the second of which animates the little stickman using interrupts for timing.
; Hardware Locations in Memory
gpio1		equ	$f0000		; LED PORT
lcdcw		equ	$60000		; LCD command WR
lcddw		equ	$60001		; LCD data WR
lcdcr		equ	$60002		; LCD command RD
lcddr		equ	$60003		; LCD data RD

; LCD Commands
lcdbsy		equ	$80		; LCD BUSY
lcd8bt		equ	$38		; Select 8 bits interface
lcdinc		equ	$06		; Entry Mode - Increment
lcddcb		equ	$0E		; Display On, Cursor On, Blink OFF
lcddnc		equ	$0C		; Display On, Cursor Off, Blink Off
lcdoff		equ	$08		; Display Off, Cursor Off
lcdclr		equ	$01		; Clear Display
lcd1st		equ	$80		; Set first line start
lcd2nd		equ 	$C0		; Set second line start

; Program location in memory
		org 	$400		; start of program

START
		move.l	#stack,a7	; sure
		move.w	#$2100,sr	; what these do
		bsr 	subinit		; initialise LCD
		bsr 	subcust		; send little man
		bsr 	subclr		; clear screen
		bsr 	subrow1		; go to home address
;send text
		lea	text1,A2	; get address of text string
		bsr 	subsend		; send the text located at A2
		bsr 	subrow2		; go to second line
		lea 	text2,A2	; next line text address
		bsr 	subsend		; send it
loop		jmp	loop		; forever

; ---------------------------------------------------

sublcdr	; wait for lcd ready
		movem.l	D0-D1,-(sp)
		move.w	#$ffff,D1
lcd_bu0
		move.b	(lcdcr),D0
		andi.b	#lcdbsy,D0
		beq.s	lcd_bu1
		dbra	D1,lcd_bu0
		moveq	#1,D1
lcd_bu1
		movem.l	(sp)+,D0-D1
		rts

subinit ; set up the display
		move.b	#lcd8bt,(lcdcw)	; write command $38 - 8 bit mode
		move.b	#lcd8bt,(lcdcw)
		move.b	#lcd8bt,(lcdcw)
		bsr	sublcdr		; wait for ready
		move.b	#lcdinc,(lcdcw)	; write command $06 increment cursor
		bsr	sublcdr
		move.b	#lcddnc,(lcdcw)	; display on, cursor off, blink off
		rts

subclr	; clear the display
		bsr	sublcdr		; wait for ready
		move.b	#lcdclr,(lcdcw)	; write command $01, clear display
		rts

subrow1	; go to first line
		bsr	sublcdr
		move.b	#lcd1st,(lcdcw)	; write command $80, first line start
		rts

subrow2	; go to second line
		bsr	sublcdr
		move.b	#lcd2nd,(lcdcw)	; write command $C0, first line start
		rts

subsend	; send string that starts at A2, and ends with zero
		movem.l	D0,-(sp)
ss1		bsr	sublcdr
		move.b	(A2)+,D0
		beq.s	senddone
		bsr	sublcdr
		move.b	D0,(lcddw)
		bra ss1			; blt next
senddone
		movem.l	(sp)+,D0
		rts

subcust	; create and send a custom character
			bsr	sublcdr
			move.b	#$48,(lcdcw)	; custom char 0 edit
			lea man,A2		; send data for man (note, can't have 0 in data)
			bsr	subsend
			rts

; string to display, terminating with zero
text1		dc.b	'This is a M68008',0
text2		dc.b	1,' Doing Stuff! ',1,0	; 1 gives special char 1. (a little man)
man			dc.b	%01110,%01110,%00100,%01110,%10101,%00100,%01010,%01010,0

ram	ds.b	32		; not sure
stack		equ	*	; what these do
This second version uses interrupts for timing a simple animation, but there is more code that I do not understand in it, so please forgive me if there are non-critical errors. The code isn’t very efficient in its use of data registers.
; Hardware Locations in Memory
gpio1		equ	$f0000			; LED PORT
lcdcw		equ	$60000			; LCD command WR
lcddw		equ	$60001			; LCD data WR
lcdcr		equ	$60002			; LCD command RD
lcddr		equ	$60003			; LCD data RD

; LCD Commands
lcdbsy		equ	$80			; LCD BUSY
lcd8bt		equ	$38			; Select 8 bits interface
lcdinc		equ	$06			; Entry Mode - Increment
lcddcb		equ	$0E			; Display On, Cursor On, Blink OFF
lcddnc		equ	$0C			; Display On, Cursor Off, Blink Off
lcdoff		equ	$08			; Display Off, Cursor Off
lcdclr		equ	$01			; Clear Display
lcd1st		equ	$80			; Set first line start
lcd2nd		equ 	$C0			; Set second line start

; Program location in memory
		org 	$400			; start of program

START
		move.l	#service_level2,$68	; not
		move.l	#stack,a7		; sure
		move.w	#$2100,sr		; what these do
		move.b	#$0,d2
		move.b	#$0,d3
		move.b	#0,d4
		bsr 	subinit			; initialise LCD
		bsr 	subcust			; set up little man in char 1 & 2
		bsr 	subclr			; clear screen
		bsr 	subrow1			; go to home address
;send text
		lea	text1,A2		; get address of text string
		bsr 	subsend			; send the text located at A2
loop		cmpi.b	#1,d4			; Don't re-send if you've already done so
		bge	loop			; loop if already shown
		bsr	subrow2			; pre-move to the start of the second line
		cmpi.b	#1,d3
		blt	alt			; go to alt if d3<1
		lea 	text2,A2		; send text2
		bsr 	subsend			; send it
		move.b	#1,d4
		bra	loop
alt		lea	text3,A2		; send text3
		bsr	subsend
		move.b	#1,d4
		bra	loop			; forever - note jmp is an absolute address, bra is rel

; ---------------------------------------------------

service_level2
		addi.b	#1,d2		; increment d2
		cmpi.b	#50,d2		; check if d2 is 50 or more
		blt	skip		; rte if not 50
		clr.b	d2		; reset d2 to 0
		move.b	d3,gpio1	; debug code - shows status on leds
		clr.b	d4		; reset "don't send again" value
		addi.b	#1,d3		; increase d3 (which line 2 to send)
		cmpi.b	#2,d3		; check if d3 is too big
		blt		skip	; if it isn't, finish
		clr.b	d3		; if it is, make it = 0
skip		rte			; return

sublcdr	; wait for lcd ready
		movem.l	D0-D1,-(sp)
		move.w	#$ffff,D1
lcd_bu0
		move.b	(lcdcr),D0
		andi.b	#lcdbsy,D0	; check if the lcd is busy
		beq.s	lcd_bu1
		dbra	D1,lcd_bu0
		moveq	#1,D1
lcd_bu1
		movem.l	(sp)+,D0-D1
		rts

subinit ; set up the display
		move.b	#lcd8bt,(lcdcw)	; write command $38 - 8 bit mode
		move.b	#lcd8bt,(lcdcw)
		move.b	#lcd8bt,(lcdcw)
		bsr	sublcdr				; wait for ready
		move.b	#lcdinc,(lcdcw)	; write command $06 increment cursor
		bsr	sublcdr
		move.b	#lcddnc,(lcdcw)	; display on, cursor off, blink off
		rts

subclr	; clear the display
		bsr	sublcdr				; wait for ready
		move.b	#lcdclr,(lcdcw)	; write command $01, clear display
		rts

subrow1	; go to first line
		bsr	sublcdr
		move.b	#lcd1st,(lcdcw)	; write command $80, first line start
		rts

subrow2	; go to second line
		bsr	sublcdr
		move.b	#lcd2nd,(lcdcw)	; write command $C0, first line start
		rts

subsend	; send string that starts at A2, and ends with zero
		movem.l	D0,-(sp)
ss1		bsr	sublcdr
		move.b	(A2)+,D0
		beq.s	senddone
		bsr	sublcdr
		move.b	D0,(lcddw)
		bra 	ss1					; blt next
senddone
		movem.l	(sp)+,D0
		rts

subcust	; create and send a custom character
		bsr	sublcdr
		move.b	#$48,(lcdcw)	; custom char 0 edit
		lea 	man,A2		; send data for man (note, can't have 0 in data)
		bsr 	subsend
		rts

; --------------------------------------------------------


; string to display, terminating with zero
text1		dc.b	'This is a M68008',0
text2		dc.b	2,' Doing Stuff! ',1,0	; 1 gives special char 1. (a little man)
text3		dc.b	1,' Doing Stuff! ',2,0	; 2 gives special char 2. (a little man arms up)
man			dc.b	%01110,%01110,%00100,%01110,%10101,%00100,%01010,%01010,%01110,%01110,%10101,%01110,%00100,%00100,%01010,%01010,0

ram	ds.b	32		; not sure
stack		equ	*	; what these do
Having grown up using computers based on Motorola’s 68k family of microprocessors, I have been considering trying to build a simple 68k processor computer of my own. Given how long it took me to get around to build a breadboard Z80 computer, and with a growing sense that I really should learn how to program a GAL or CPLD to reduce the chip count… I decided to buy one of Wichit Sirichote’s single board computers based on the 68008 processor (URL updated 2024 to new website).
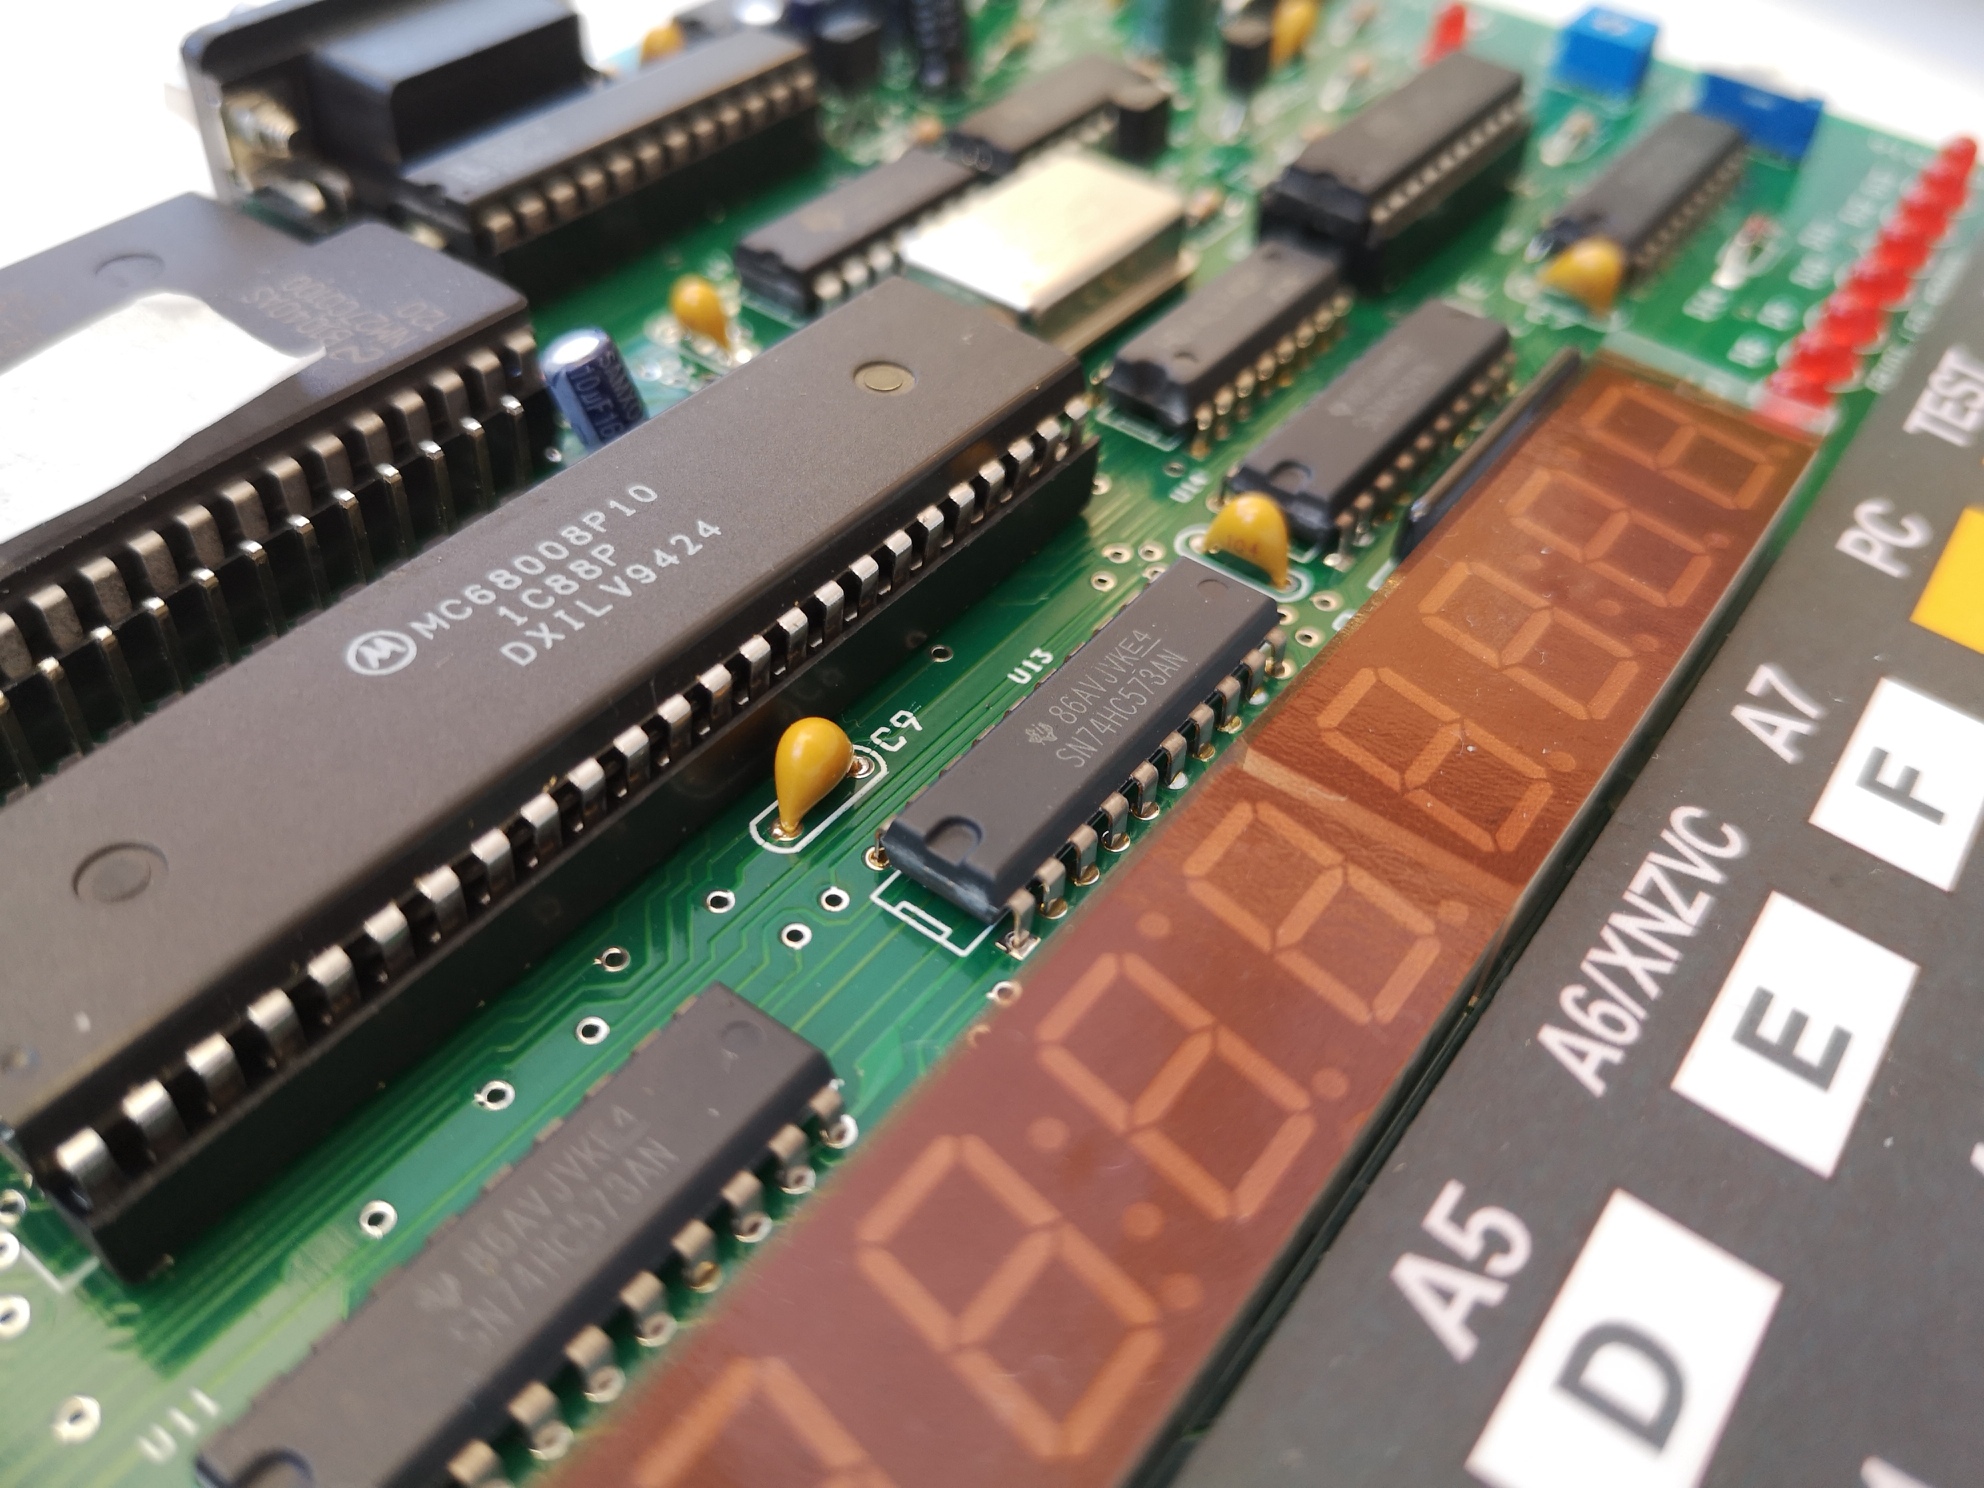
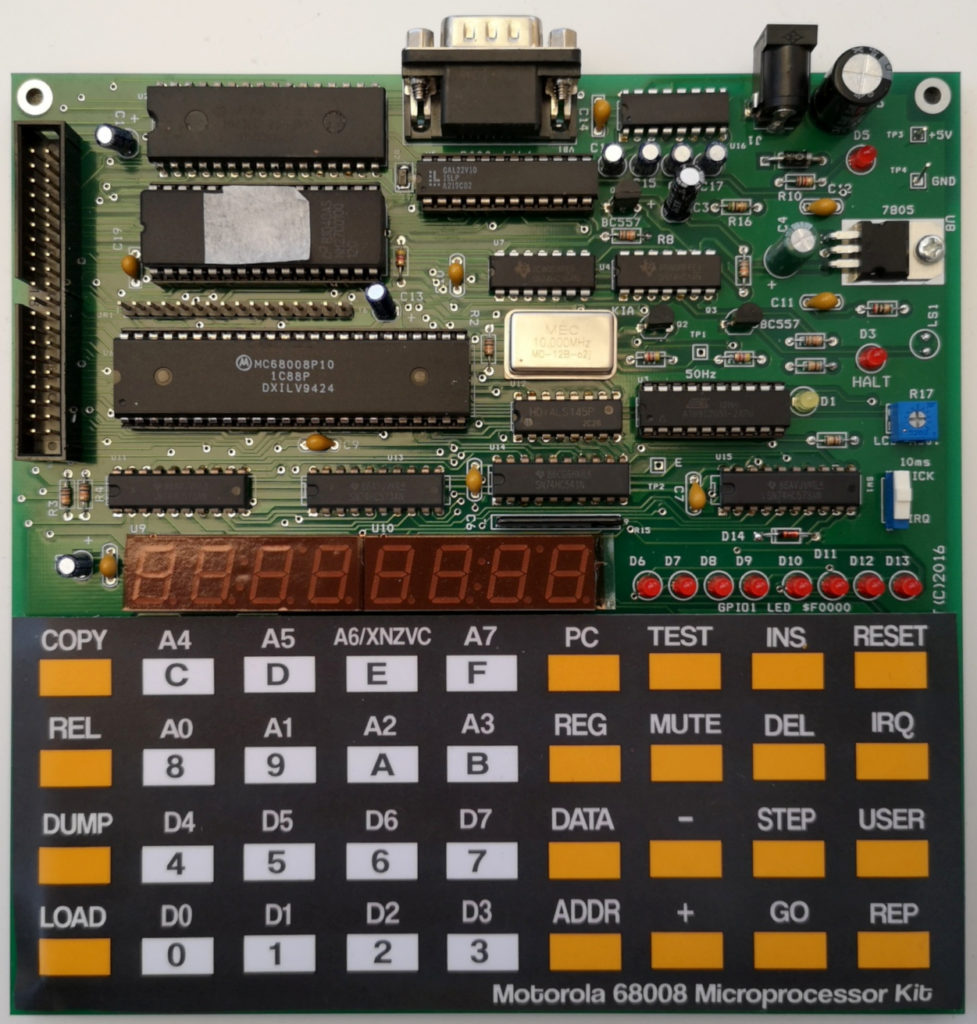
68008 Single Board Computer
The Motorola 68008 is a slightly odd chip which has 32 bit internal functionality, coupled to an 8 bit data bus instead of the 16 bit data bus of the regular 68000. It was designed to be a cheaper / simpler alternative to the 68000 processor.
The following page details how I got to the point that I could run my own software written on a Debian-ish Linux machine, on the 68008 board.
Step 1 – Get the Assembler and Compile it
I decided to use the vasm assembler. It runs on multiple platforms and can assemble code for a large number of processors including the Z80, 6502 and 68008, all of which are of interest to me for various computers / projects. I downloaded the latest release source, which at the time of writing is v1.8g (locally hosted here).
I extracted the source code into a folder called vasm (using the GUI archive tool because I’m lazy), before navigating to within the folder in a terminal. To decompress from the command line you should use the command “tar -xvf ./vasm.tar.gz” from within the same directory – note this is “-xvf” not “-xvzf” as the file appears to be only a tar and not zipped, but misnamed. Given that I’m running linux, I figured I could use the default make file and so all I had to do was run the command :
make CPU=m68k SYNTAX=mot
This tells the compiler what our target CPU family is, as well as the assembly language syntax / style we plan to use (in this case Motorola, rather than the GCC syntax which is a little different).
Once the compiler had finished building the project, I was able to copy the new program called “vasmm68k_mot” from the current directory to where I wanted to run it from – note I didn’t bother installing it and am just running it from a folder in my home directory.
Step 2 – Writing a Test Program in Assembly Language
Wichit Sirichote’s webpage includes a download of several example programs, which are also listed in the manual. The following simple program loads the number 12345678 into a register (d0) and then displays part of it on the LEDs (memory mapped at f0000). The fist line identifies where in memory the program should be located. A copy of this program in assembly can be downloaded here. This is a text file and can be opened and edited in any text editor.
I have saved this assembly program as “FirstTest.asm” in the same location that I have placed the vasm application. After a bit of fiddling, I was able to work out the required parameters to assemble my files into a correctly formatted hex file and settled on the format vasmm68k_mot -m68008 -Fsrec -s19 -o <outputfile.hex> <inputfile.asm>. The -Fsrec parameter uses the Motorola S Record output format, with the -s19 parameter using 16bit S Record mode. So, to assemble the FirstTest.asm file into FirstTest.hex, all in the same folder as the vasmm68k_mot application, I use the following command.
This gives the following feedback that doesn’t indicate there were any errors (if you get errors, double check you pointed it to the correct files and didn’t make any typos in your assembly – also, check that tabs are used between columns).
vasm 1.8g (c) in 2002-2019 Volker Barthelmann
vasm M68k/CPU32/ColdFire cpu backend 2.3f (c) 2002-2019 Frank Wille
vasm motorola syntax module 3.13 (c) 2002-2019 Frank Wille
vasm motorola srecord output module 1.0 (c) 2015 Joseph Zatarski
CODE(acrx2):	          12 bytes
Opening the resultant FirstTest.hex file in a text editor shows the following, which is the assembled program in Motorola hex.
If you’ve got this far, congratulations, you’ve cross-assembled a 68k program. Now it is time to load your creation into the 68k Computer.
Step 4 – Connecting the SBC to a Computer
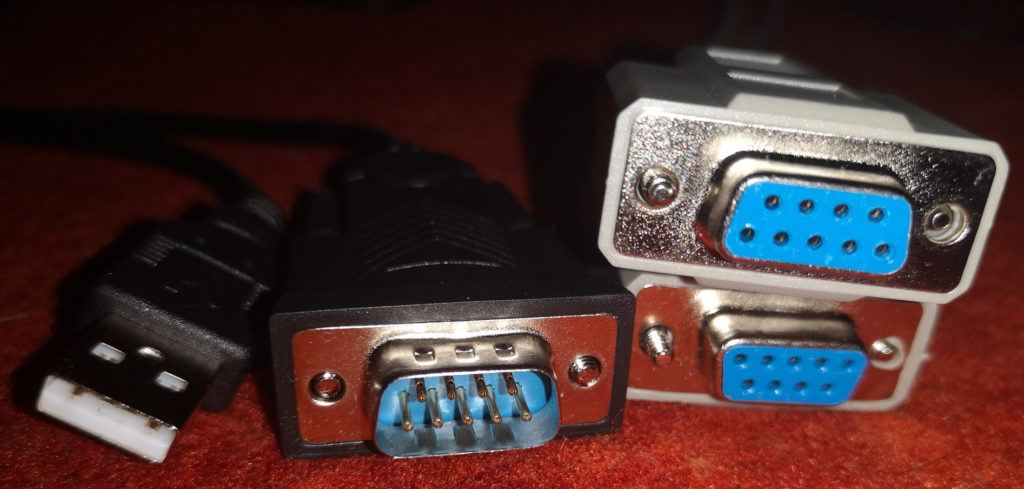
Programs can be loaded directly into RAM on the 68008 board over serial. To connect the 68008 board to a modern computer it is most likely that you’ll need a USB to RS232 adapter, but it is worth noting that since both devices being connected are computers (rather than a computer and a peripheral), both ports are likely to be male. As such, we’ll need a “null modem” cable, which is similar to an ethernet crossover cable in that the TX and RX wires are switched so that you’re not connecting TX to TX and RX to RX. I have been using a cable similar to this linked item, as well as a bodge using a USB to UART and a UART to RS232 adapter to get up and running while I waited for a null modem cable in the post. I have had issues with cheap cables failing in the past and so have ordered a 4 port RS232 box with a USB interface as a replacement. The box hasn’t arrived yet.
Cables
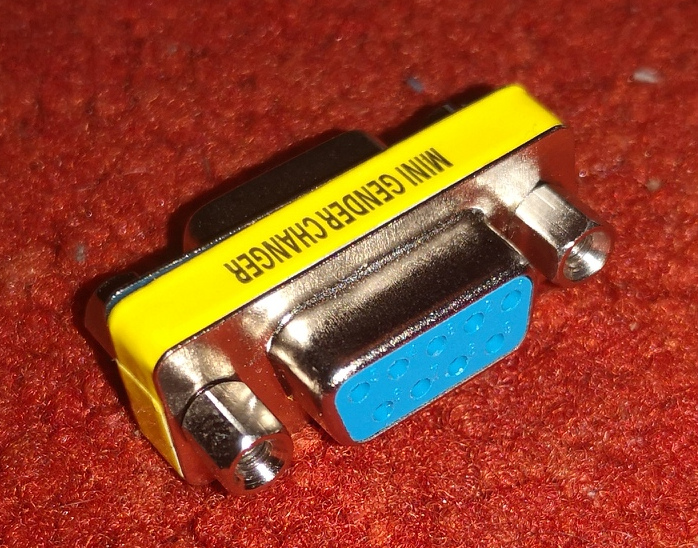
Note it is possible to get “gender changer” adapters which do not cross over the TX and RX pins, meaning that while you can physically connect your computer and the 68008 board, they will not communicate.
Gender Changer – Note this didn’t work for me
Once you have all the right cables, with the 68008 board powered down, connect the null modem cable to the 68008 board and the USB RS232 adapter, plug the USB RS232 adapter into your computer and run the following command.
ls /dev/tty*
There will likely be an item listed as ttyUSB0, or similar. If no serial device is clearly obvious, unplug the USB RS232 adapter and run the command again. Compare the two lists and identify what has changed. This is your serial port. Next, make sure that the software “screen” is installed on your Linux machine by running the following command at the command line and following on screen prompts (either telling you it is already installed and is the latest version, or asking if you would like to install it).
sudo apt install screen
Note that some users on Linux do not have permissions to access serial ports. Running the following command (substituting “MY_USER_NAME” for your user name) and restarting your computer should fix this.
sudo usermod -a -G dialout MY_USER_NAME
Next, run the following command at the command line on your Linux computer (substitute ttyUSB0 for the correct serial port name if you found it to be different earlier).
screen /dev/ttyUSB0 2400
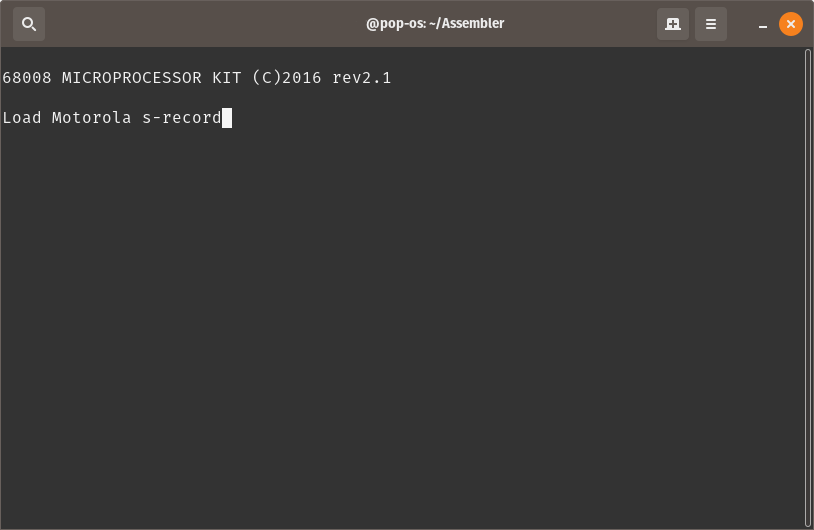
This command connects to the USB RS232 adapter at a baud rate of 2400. Now turn on the 68008 board and you should see the text “68008 MICROPROCESSOR KIT (C)2016 rev2.1” or similar. This shows that communications are working. If you don’t see this, check your connections and cables. Make sure you didn’t have any permissions errors. Try running the “screen” command using sudo.
Step 5 – Loading the Program
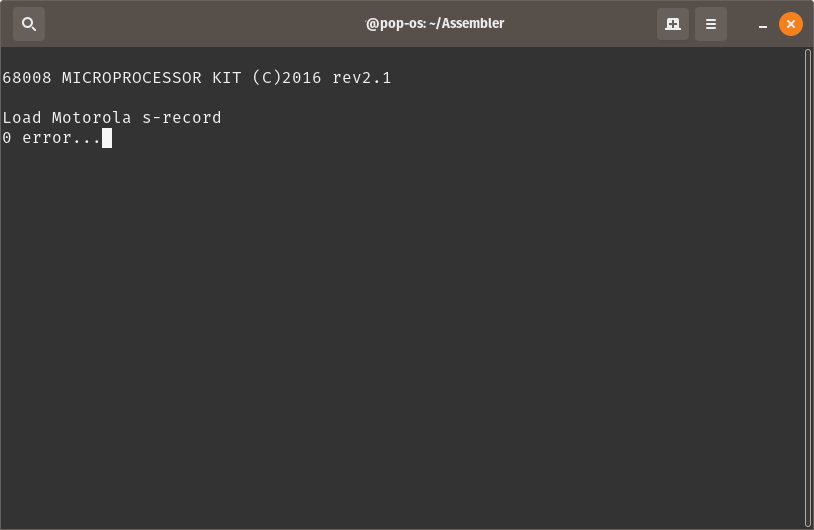
Assuming you were able to establish the connection between your Linux computer and the 68008 board, press the “LOAD” button on the 68008 board. You should now see the message “Load Motorola s-record” in the window.
Ready to Upload
Copy the entire contents of the FirstTest.hex to the clipboard, and then paste the copied text into the terminal window in which “screen” is running (often right click in the terminal window and select the option “Paste”). If everything works correctly, once the program is loaded, you should see a message saying that there were no errors.
Upload Successful
Step 6 – Stepping Through the Program
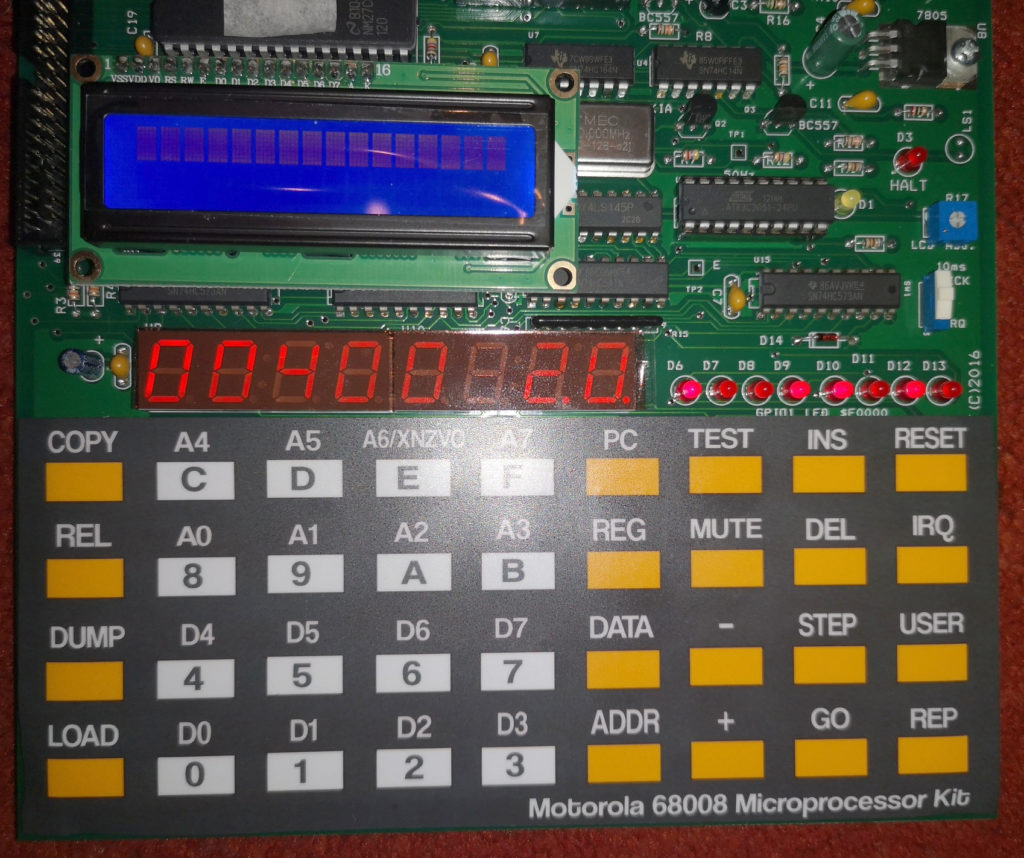
To check that the program is now in memory, press the “PC” button (PC stands for Program Counter) on the 68008 board. If the 7 segment display now shows 00400 20, this is a very good sign. The 00400 is the Program Counter address, where the machine will start running a program from. The “20” is the first byte of the program that was loaded over serial. If it says anything other than “20”, then something isn’t right. Press the “+” key repeatedly, and you should see the following sequence 3C, 12, 34, 56, 78. These are the next few bytes of the program. Press “PC” again to return to the start of your program.
Ready
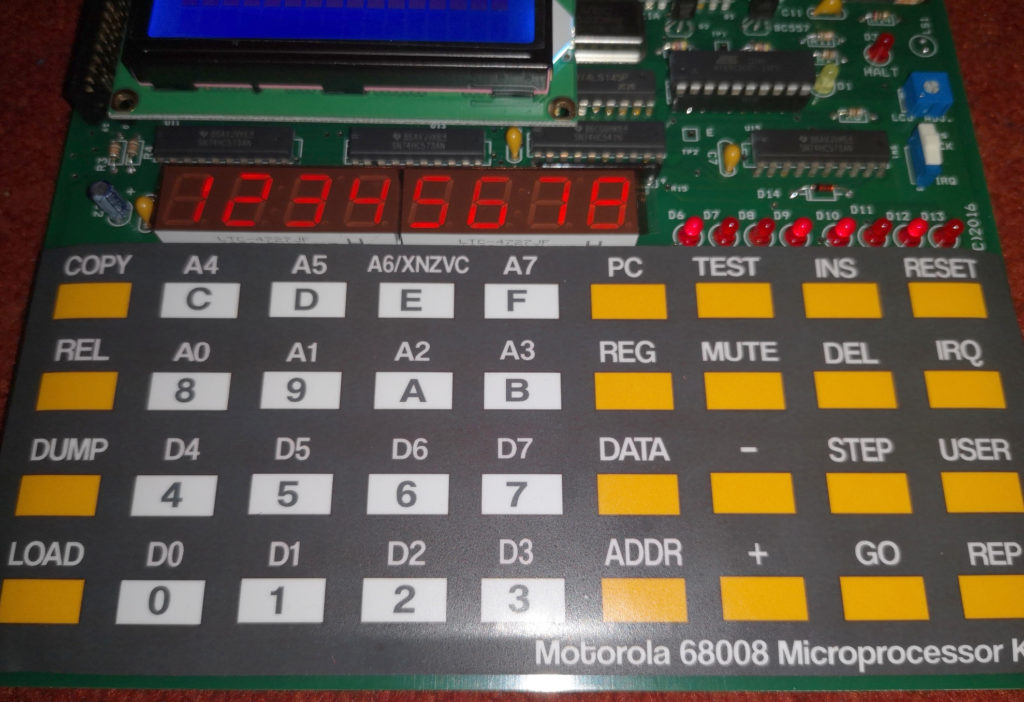
If the “STEP” button is pressed, the 68008 board will execute the first command in the program – in this case, load 12345678 into the register D0. You can check this by pressing the “REG” key, followed by the “0” (zero) key. The 7 segment display should show 12345678. Press “PC” to return to displaying the current location in the program.
View Data Register D0
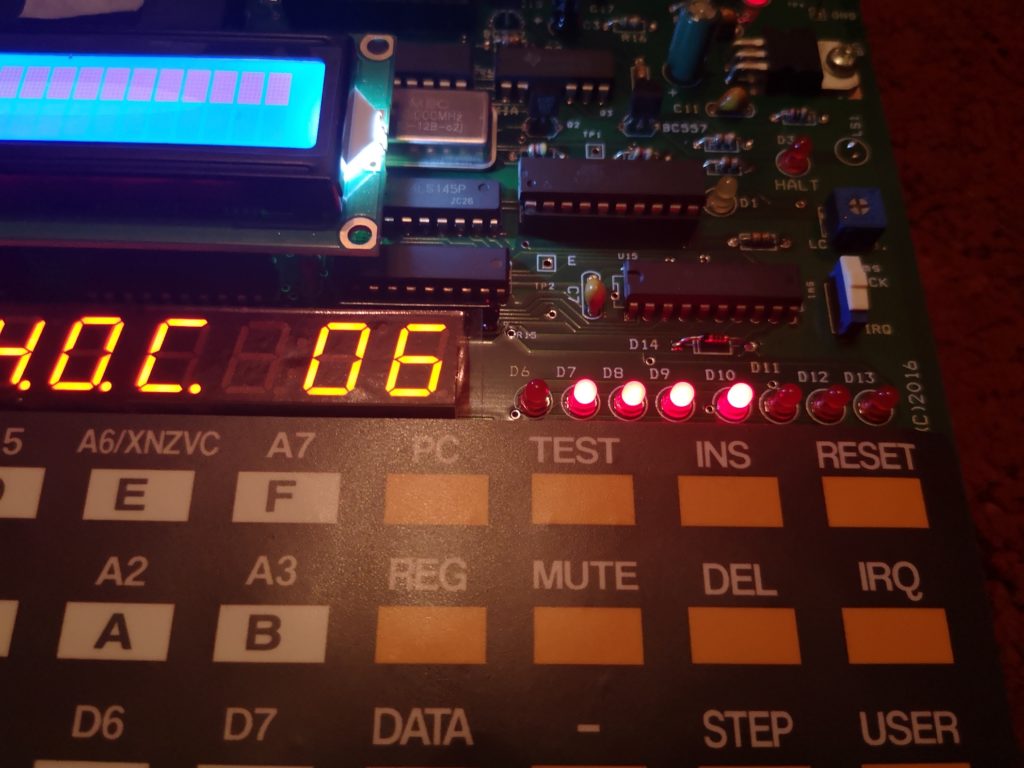
Press “STEP” again, and part of this number will be shown on the eight LEDs on the right hand side of the 68008 board.
LED Output
Congratulations, you’ve completed loading and stepping through the tiny example program.
Step 7 – Trying Another Program
The following program is based on one of the other provided examples, modified to alternatively flash every second LED, rather than count in binary as the provided example does.
The code uses the 10 ms tick feature on the board (a 100hz pulse) and an interrupt to time the changes. The (inverse of the) initial state of the LEDs is set in the line “move.l #$55,d1”. Changing the number #$55 (remember this is in hex as indicated by the “$” sign) will change the initial state of the LEDs. For example, replacing it with #$00 will cause all eight LEDs to flash together.
The speed at which the LEDs flash can be changed by modifying the line “cmpi.b #20,d0”. #20 is (in decimal, as there is no “$” sign) the maximum number the code will count to before changing the state of the LEDs. In the example above, #20 means that when the value in d0 reaches 20, the LEDs will be inverted and d0 will be reset to 0. Otherwise, d0 will be increased by 1 and the program will wait for the next 10ms tick to trigger an interrupt. “service_level2” is triggered each time one of these 10ms ticks occur, otherwise the processor runs in the infinite loop “here bra here”.