Aluminium Raspberry Pi Case


I recently picked up a new case for my raspberry pi from Banggood.

RPi Case 1

The case is machined aluminium and very well made. It came with a pitft compatible 2.2 inch screen which plugs directly into the GPIO port. It also provides six buttons connected to GPIO pins, an infrared receiver and a I2C port. There is a clear plastic screen protector and all spacers and screws provided, including an allen key. I expect the case works with the Raspberry Pi 2 and 3 (which I am using).

RPi Case 1

Setting with a Raspberry Pi 3

Mechanically, assembly is simple enough. The only tricky bit might be getting all the buttons in place as they are not retained in any way until everything is brought together. Remember to take the protective film off both the screen and the clear plastic screen protector.

The software setup process isn’t immediately obvious on the banggood page, but someone has asked a question and received a couple of answers which help. There are various links to pre-made images which I was unable to download due to permissions and / or dead links (random third party images aren’t my preferred source of OS images anyway) the manual instructions are usable for the most part though and I was able to get the screen running following these instructions.

I will repeat them here just in case the other website goes down – the following is confirmed to work on a Raspberry Pi 3 running Jessie, although it did not prove possible to rotate the display by changing the angle in config.txt. I already had a newer version of the GPIO software and so didn’t bother installing their recommended version.

Update the OS.

sudo apt-get update
sudo apt-get upgrade
sudo apt-get dist-upgrade

Make sure required software is installed. Ensure that the GPIO software is newer than their suggested version (0.5.11).

First run apt-get to install gcc, pygame and python-dev. I suspect these will already be installed. If they are, there is nothing to worry about, apt-get will just pass over them.

sudo apt-get install gcc python-pygame python-dev

Next, lets find what version of the GPIO software we have:

find /usr | grep -i gpio

This will list installed software in the /usr folder containing the text “gpio” and should give a clue to the version. Running on one of my Pis, the following are the first few lines of output :

/usr/lib/python2.6/dist-packages/RPi.GPIO-0.6.2.egg-info
/usr/lib/python2.6/dist-packages/RPi/_GPIO.so
/usr/lib/python2.6/dist-packages/RPi/GPIO

This tells me that I have version 0.6.2 installed – newer enough I think!

Next, make sure that SPI and I2C are both enabled. To do this, I will use the raspi-config tool rather than directly editing the settings file as they do in the original instructions :

sudo raspi-config

On the following screen, select option 8, “Advanced Options”.

raspi-config

In the Advanced Options menu, select option A6, “SPI”.

raspi-config-spi

Select “Yes”.

raspi-config-spi2

Do the same for I2C by selecting Option 8 again, then option A7 (instead of A6) and selecting “Yes” to enable I2C.

Press the right arrow key on the home menu to select “Finish” and exit the program. You might be asked to restart the machine, I wouldn’t bother for now although it isn’t an issue if you do.

Enter the following command to open the file config.txt in the text editor nano.

sudo nano /boot/config.txt

Once the file is open, scroll to the end and append “dtoverlay=pitft28-resistive, rotate=270 speed=48000000 fps=30” excluding quotes (and all on one line). I have tried adjusting rotate=270 to other values, but it hasn’t changed the console display. I haven’t tried this while running the GUI, where it might make a difference.

To make the console appear on the display it is necessary to edit the file cmdline.txt. We also take this chance to change the font to make it more visible on the small screen.

sudo nano /boot/cmdline.txt

With this file open, we add the text “fbcon=map:10 fbcon=font:VGA8x8 ” (excluding quotes) just before the word “rootwait”. It might be necessary to scroll to the right with the right arrow key to find the text.

Reboot (sudo reboot) and it should all work.

Other things to discuss at some point…

Setting Up the GUI

Working with the Buttons

Not Used IR Yet

Screen faults, new screen, smaller buttons.

Shutdown and restart python. False triggering.

Reduced wifi range. Access to GPIO – possibly counter with I2C.

Screen and splitscreen. Run at boot.
GPIO Using a Cheap FTDI Board

During a discussion with my dad about doing GPIO style projects from a regular, full fat computer,  I was telling him about the Adafruit FT232H Breakout board. These boards allow you to use several different serial protocols such as SPI, I2C and UART as well as provide a GPIO mode if you are willing to get involved enough. It provides an elegant solution to connecting external electronic devices, because it doesn’t require any software to be loaded into the device itself – all your code is running on your computer. The one downside is that, here in the UK at least, these boards cost in the region of £15, meaning that personally I would usually just grab a cheap Arduino and write some kind of pass-through program for most things I’d want to do.

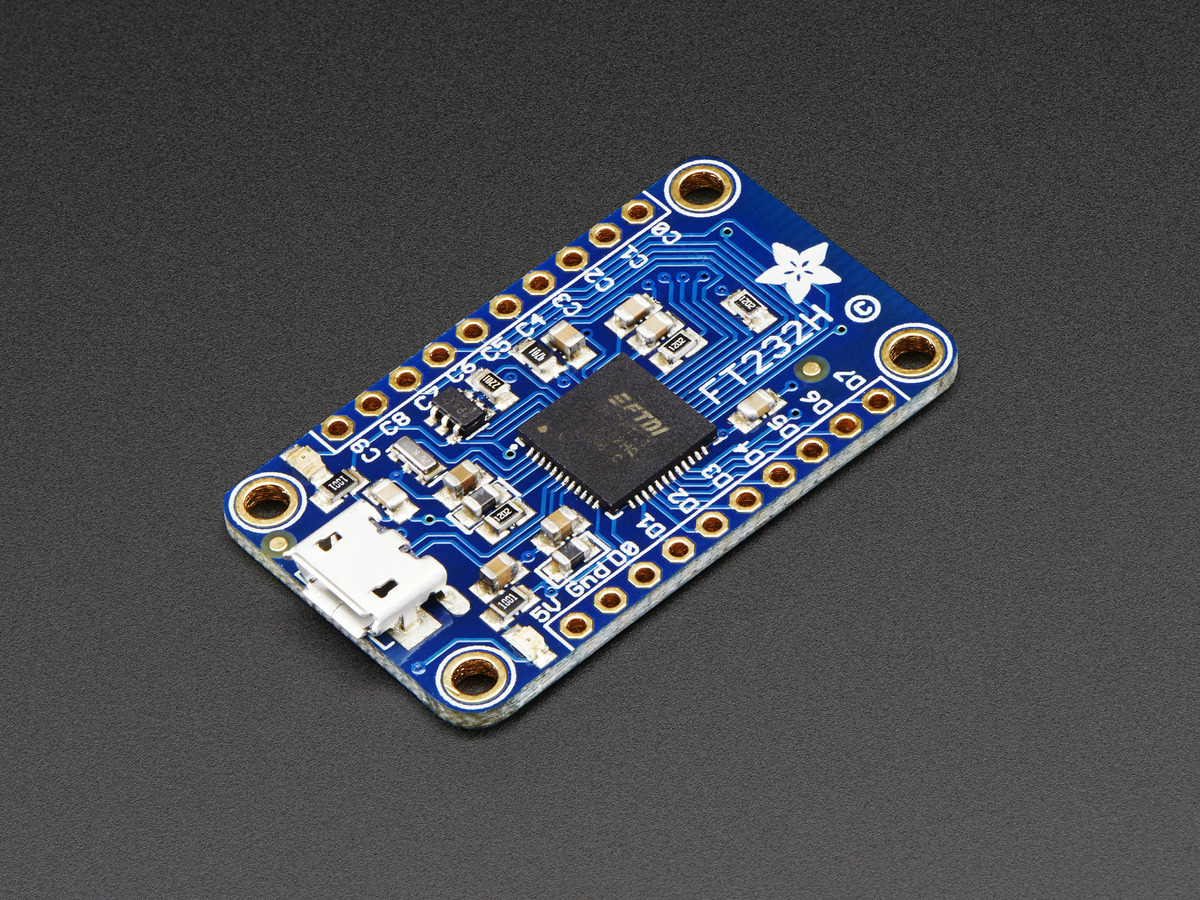
AdafruitFT232H
Adafruit FT232H Breakout

Yesterday evening, I installed the various software identified in Adafruit’s “Learning System” page relating to the product to allow me to set up various pins as inputs and outputs from a python program, in a similar style to how you might use the GPIO pins on a Raspberry Pi. Looking at what I needed to install and the fact that you had to specifically tell some of the libraries what chip you were connecting got me thinking that perhaps some of the software tools would work more generally with FTDI chips. I knew it was possible to use FTDI chips such as the FT232RL (commonly used in USB to UART serial adapters) as external USB connected GPIO, but my previous investigations hadn’t found clear (and simple enough) instructions to get anywhere in the time I had available. Today I dug out a cheap FT232RL based board and decided to have a play. At £1.38 each, these boards don’t exactly break the bank, and I have a pile of them already. I also like that you can easily switch the voltage using the jumper on these boards.

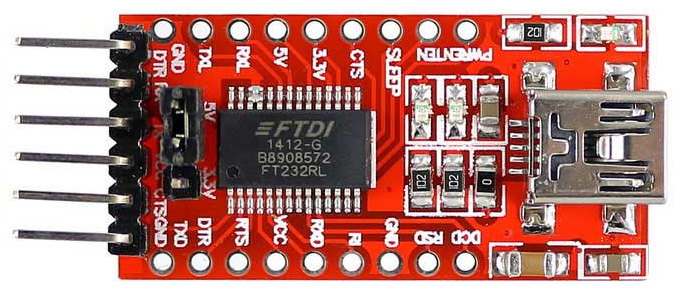
FT232RL
FT232RL USB to Serial Board

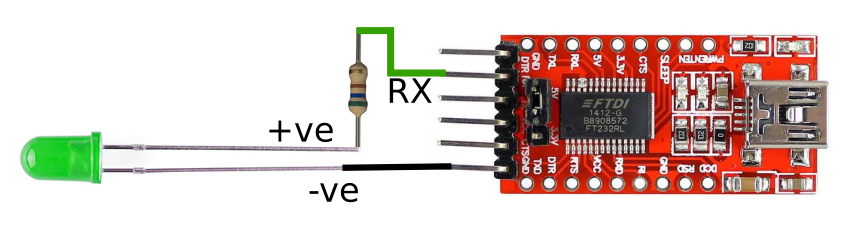
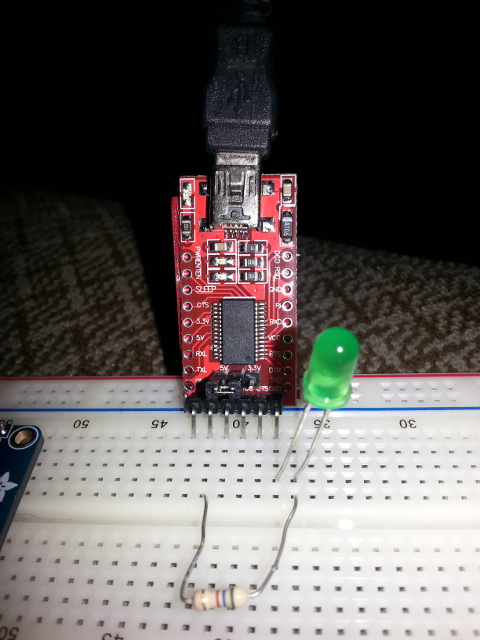
The following instructions relate specifically to Linux (Ubuntu 17.10), but following the instructions given on the Adafruit website may get you up and running on Windows or MacOS. Hardware-wise, any sensible computer with USB, a USB cable (Type A to Mini-B), a breadboard, a run-of-the-mill LED, an appropriate current limiting resistor (I used a 560 Ω resistor, which should be fine in most cases) and a FT232RL based board similar to the one above. The circuit is as follows (note the +ve side of the LED is identified by the longer lead, and the -ve by a flat on the side of the lens) :

FT232RL Circuit
FT232RL Circuit

Following the Adafruit instructions for Linux, carefully enter the following commands in a terminal :

sudo apt-get update
sudo apt-get install build-essential libusb-1.0-0-dev swig cmake python-dev libconfuse-dev libboost-all-dev
wget http://www.intra2net.com/en/developer/libftdi/download/libftdi1-1.2.tar.bz2
tar xvf libftdi1-1.2.tar.bz2
cd libftdi1-1.2
mkdir build
cd build
cmake -DCMAKE_INSTALL_PREFIX="/usr/" -DPYTHON_INCLUDE_DIR="/usr/include/python2.7" -DPYTHON_LIBRARIES="/usr/lib/python2.7/" ../
make
sudo make install

This installs the dependencies, fetches the source code for libftdi1, compiles it and finally installs it.

To test that everything installed correctly, launch the python interpreter by typing “python” (excluding quotes) at the command line and pressing enter, then type “import ftdi1” and press enter. If there are no errors, then it installed just fine. Exit the interpreter by typing “exit()” and pressing enter.

Now would probably be a good time to return to your home directory and perhaps create a folder for your python project. We’ll then create a new file called LEDBlink.py and open it in nano (a text editor) :

cd ~
mkdir ftdiGPIO
cd ./ftdiGPIO/
nano ./LEDBlink.py

Once you have the empty file open in the window, enter the following python program (which is based on the code found here). Note you can copy and paste from here – but use the copy button in the top right of the code container to ensure consistent formatting :

#!/usr/bin/env python

import ftdi1 as ftdi
import time

ftdic = ftdi.new()

# try to list ftdi devices 0x6010 or 0x6001
ret, devlist = ftdi.usb_find_all( ftdic, 0x0403, 0x6010 )
if ret <= 0:
    ret, devlist = ftdi.usb_find_all( ftdic, 0x0403, 0x6001)

# open usb
ret = ftdi.usb_open( ftdic, 0x0403, 0x6001 )

# bitbang
ret = ftdi.set_bitmode( ftdic, 0xff, ftdi.BITMODE_BITBANG )

for i in range( 64 ):
    ftdi.write_data( ftdic, chr(0x02), 1)
    time.sleep ( 0.5 )
    ftdi.write_data( ftdic, chr(0x00), 1)
    time.sleep ( 0.2 )

ftdi.disable_bitbang( ftdic )

# close usb
ret = ftdi.usb_close( ftdic )
print ('device closed')
ftdi.free( ftdic )

This is a basic program with no error checking – it assumes that a device of the correct type is connected an available. Note that it will probably need to be run as root to access the hardware. The program finds and connects to the FT232RL (assuming it is plugged in), then blinks the LED 64 times, being on for 0.5 seconds and off for 0.2 seconds each time. Once the code is entered, press ctrl-x, then “y” and finally enter to exit and save. Check that everything is wired up as follows :

FT232RL Circuit Breadboard

If everything is OK, plug the USB into the computer and enter the following commands :

chmod +x ./LEDBlink.py
sudo ./LEDBlink.py

The first command sets permissions to allow the python program to be executed, the second executes it. If all goes well you’ll be asked for your password and then the LED will start blinking.

If it doesn’t, then… erm… well it worked on my machine…

The following code does the same thing, but includes error checking. A lot of it!

#!/usr/bin/env python

import os
import sys
import ftdi1 as ftdi
import time

ftdic = ftdi.new()
if ftdic ==0:
	print( 'new failed: %d', ret )
	os._exit( 1 )

# try to list ftdi devices 0x6010 or 0x6001
ret, devlist = ftdi.usb_find_all( ftdic, 0x0403, 0x6010 )
if ret <= 0:
    ret, devlist = ftdi.usb_find_all( ftdic, 0x0403, 0x6001)

if ret < 0:
    print( 'ftdi_usb_find_all failed: %d (%s)' % ( ret, ftdi.get_error_string( ftdic ) ) )
    os._exit( 1 )
print( 'Number of FTDI devices found: %d\n' % ret )
curnode = devlist
i = 0
while( curnode != None ):
    ret, manufacturer, description, serial = ftdi.usb_get_strings( ftdic, curnode.dev )
    if ret < 0:
        print( 'ftdi_usb_get_strings failed: %d (%s)' % ( ret, ftdi.get_error_string( ftdic ) ) )
        os._exit( 1 )
    print( 'Device #%d: manufacturer="%s" description="%s" serial="%s"\n' % ( i, manufacturer, description, serial ) )
    curnode = curnode.next
    i += 1

# open usb
ret = ftdi.usb_open( ftdic, 0x0403, 0x6001 )
if ret < 0:
    print( 'unable to open ftdi device: %d (%s)' % ( ret, ftdi.get_error_string( ftdic ) ) )
    os._exit( 1 )


# bitbang
ret = ftdi.set_bitmode( ftdic, 0xff, ftdi.BITMODE_BITBANG )
if ret < 0:
    print( 'Cannot enable bitbang' )
    os._exit( 1 )

for i in range( 64 ):
    #val = 2**i
    #print( 'enabling bit #%d (0x%02x)' % (i, val) )
    #ftdi.write_data( ftdic, chr(val), 1 )
    #time.sleep ( 1 )
    ftdi.write_data( ftdic, chr(0x02), 1)
    time.sleep ( 0.5 )
    ftdi.write_data( ftdic, chr(0x00), 1)
    time.sleep ( 0.2 )

ftdi.disable_bitbang( ftdic )
print( '' )


# close usb
ret = ftdi.usb_close( ftdic )
if ret < 0:
    print( 'unable to close ftdi device: %d (%s)' % ( ret, ftdi.get_error_string( ftdic ) ) )
    os._exit( 1 )

print ('device closed')
ftdi.free( ftdic )

Line 51 turns on the LED connected to the RX pin on my board which is the second pin out of 8. Pins are defined as follows :

Pin #0 = 0x01
Pin #1 = 0x02
Pin #2 = 0x04
Pin #3 = 0x08
Pin #4 = 0x10
Pin #5 = 0x20
Pin #6 = 0x40
Pin #7 = 0x80

Obviously these are binary sequence in Hex, meaning each bit represents a pin. To turn on multiple pins at once, just add the values together. 0x00 on line 53 turns all pins off.

The example code I previously mentioned was the basis of this program also contains a commented out section showing how to use pins as inputs. It is commented out because it doesn’t work with Python 3, but should work fine under Python 2.x.

UPDATE…

I’ve discovered that SainSmart produce relay boards that work in a similar way to this. Building on the above, I have produced a new post showing how to use these with Python on Linux.