Tag Archives: hard drive

SCSI Hard Disks

SCSI Hard Disks

I recently picked up a non-functioning Macintosh IIx which appeared to have suffered from battery and capacitor corrosion damage. After recapping it and some trace repair, I found the hard disk was in the process of failing, although I was able to boot it from the SCSI2SD from my Macintosh SE (4MB, 40MB, 800k). This wasn’t a long term solution as the SCSI2SD really belongs with the SE!

I decided to find a second hand SCSI hard disk and started searching eBay. Following a discussion with a seller (conistonmal) who was selling a bunch of SCSI 3, 68 pin drives and me asking them would they sell the disks in smaller quantities, I discovered that they were actually also looking to clear out a stock of 50pin SCSI 2 style drives. These drives fit straight into most traditional (pre G3) Apple Macs. Given the collection of machines that my family has, I took the opportunity and bought a load, especially as the seller was fully testing each disk before selling them.

Connecting the Drives

I decided that since there was so much room inside the IIx (it was designed for a 5.25″ hard disk), I would make an adapter bracket to take two hard disks side by side. This required making the physical bracket, matching the interfaces to what was already there, as well as making up my own double headed SCSI cable of the correct length, and obtaining a Molex extension and “Y” splitter. I have also ordered a small but quiet 40x10mm fan that I believe will be able to encourage airflow through the rear vents and over the disks as one of the disks gets quite warm (it is a 10,000rpm 18GB drive).
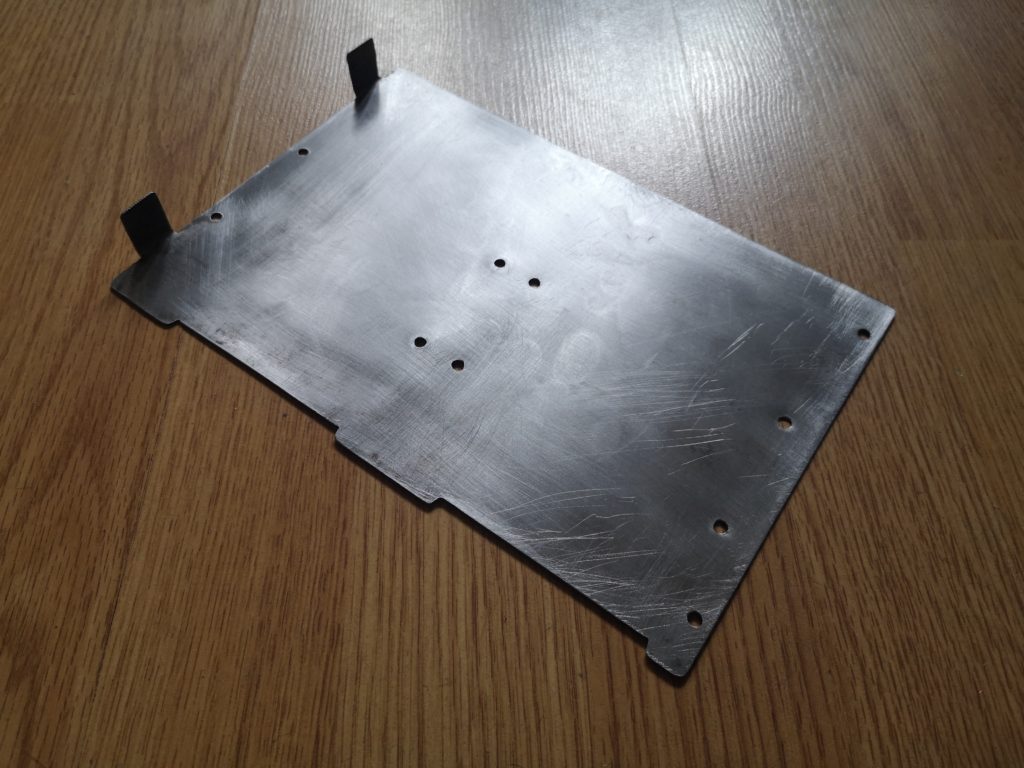
Hard Disk Bracket

Secondly, as I had a few drives to format, I decided a needed a faster / more elegant way to connect and disconnect the drives quickly to format and test each one. I bought a dual voltage mains connected Molex Power adapter and pinched the DB25 to 50pin IDC adapter from my SCSI2SD board.
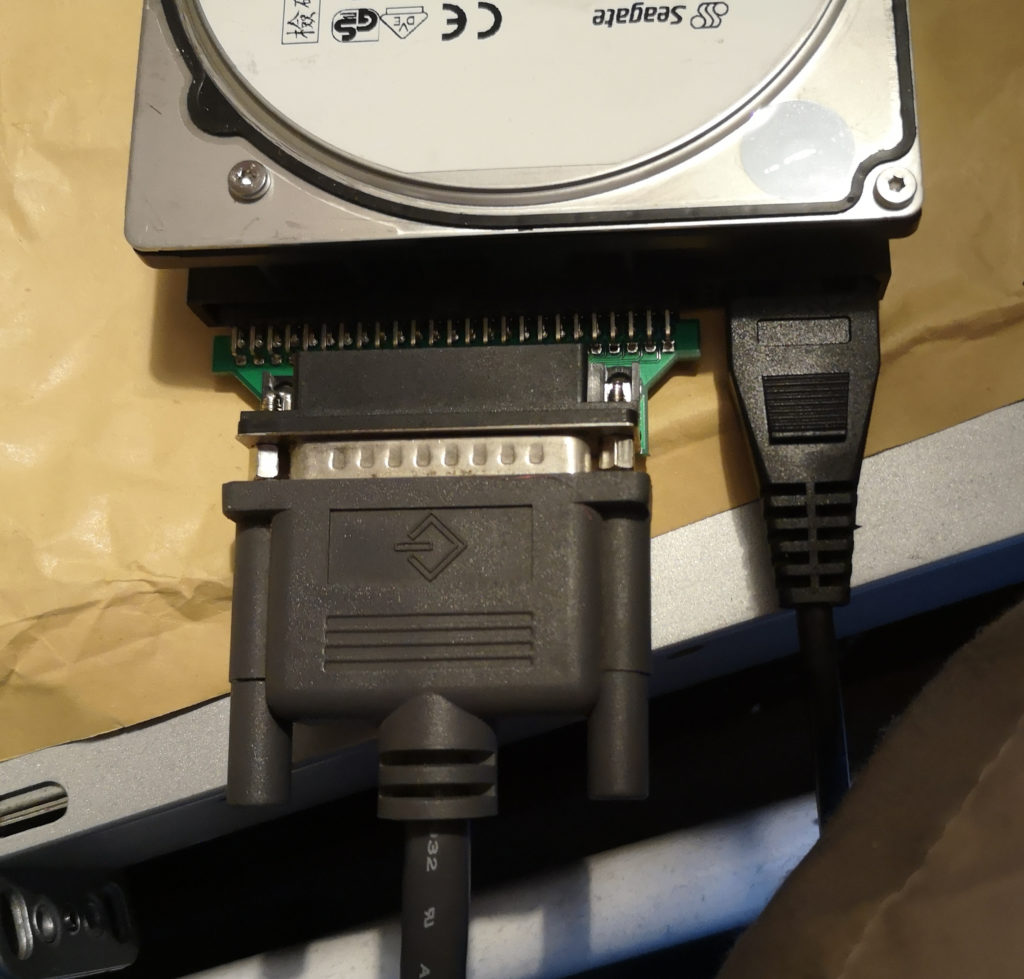
Drive Connections

I placed a fan I usually use to cool my overheating work laptop next to the disk to make sure it had sufficient cooling.
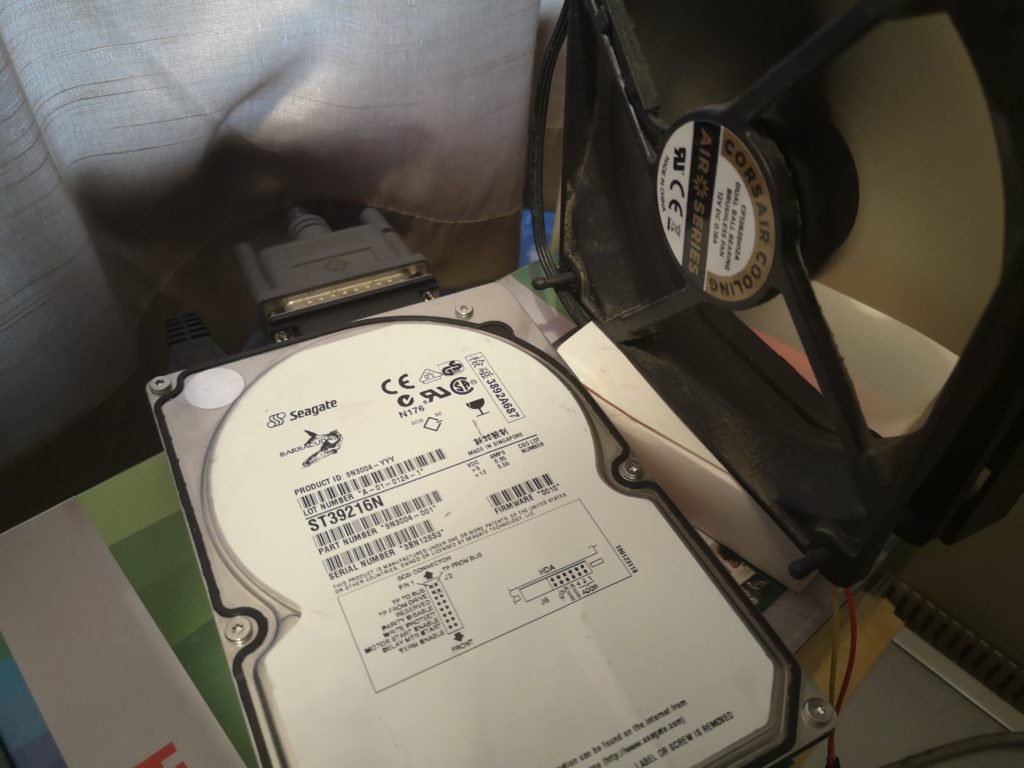
Disk Cooling

Drive Settings

How sensitive to incorrect termination settings your setup is depends on the specific Mac – you should set it correctly, but you might not notice sometimes as you seem to get away with it on some machines. The main jumper settings that needed attention on the disks I was using were…

  • Termination enabled (on the last internal and external device)
  • Termination power from bus
  • SCSI ID

Specific to the model of Seagate drive I was using (the ST39216N), I used J6 to set the SCSI ID and J2 for various (mostly termination related) settings. The LED output was also on J6, but I did not use this. Unusually, these disks have a built in activity LED – I don’t think I’ve seen that before. The manual for the drives I was using can be found here. Remember to search for the drive type that you have to find the correct settings, as it is unlikely that everything on your disk will be identical. If your drive does not include termination, you may need to ensure that there is a device which does on the end of the SCSI chain, or buy a stand alone terminator.
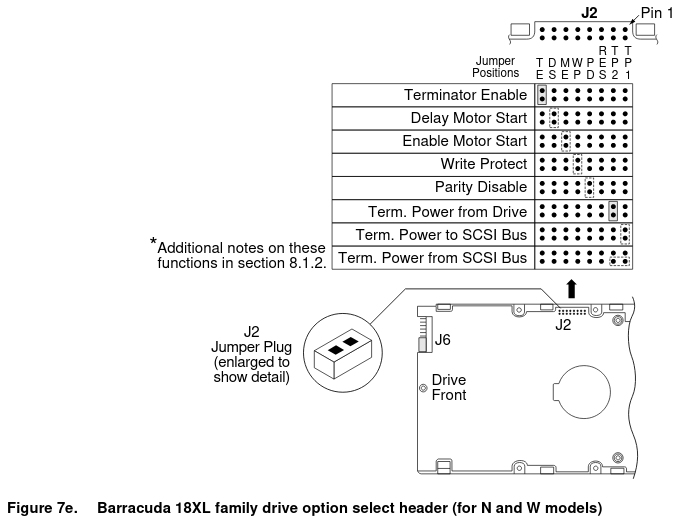
Disk Jumper Settings
My Disks Jumper Settings

Following the details shown above from Seagate, I set my disk to “Term. Power from SCSI Bus” and “Terminator Enabled”. The termination power setting is the one I understand to be correct for Macs, and I enabled the built in terminator because the disk was the only device connected externally to the SCSI bus. Only the final item on either the internal, or external SCSI connector needs to be terminated, terminating other devices or no devices will potentially cause issues. Note that the IIfx is weird so look for additional instruction if you are lucky enough to have one! The following photo shows my settings on J2. J2 and J6 both use 2mm jumpers on this disk. They can be bought from eBay if you need any.
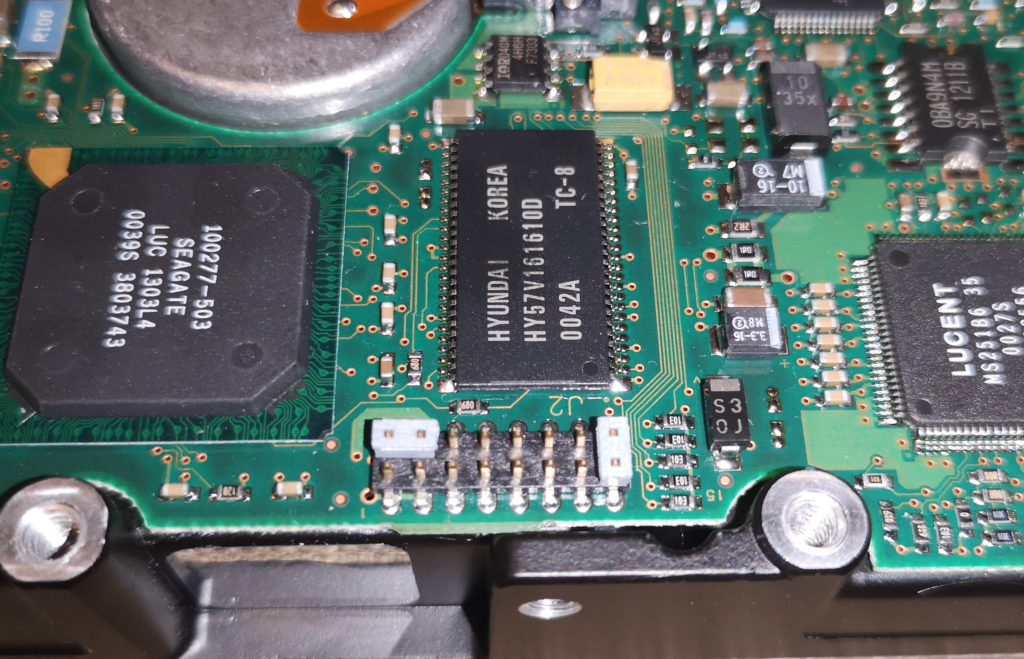
Jumpers Photo

Software

You will need the following software (alternatives are available) :

  • Macintosh System 7.5.3 Disk Tools
  • Drive Setup 1.7.3 (Patched)

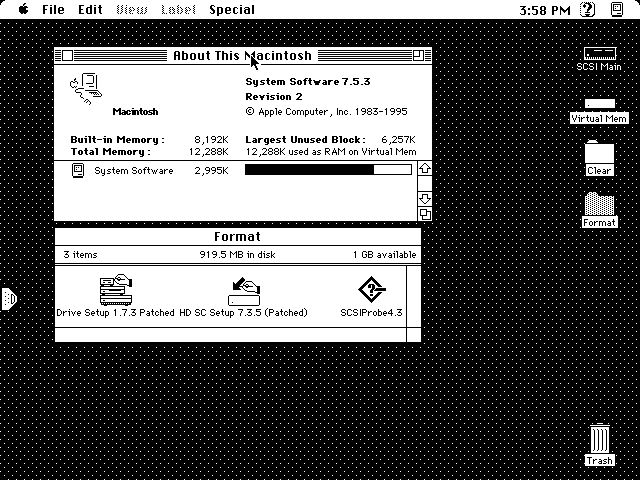
System 7.5.3 combined with Drive Setup 1.7.3 allows you to format a disk in 4GB partitions and should run on anything back to a Mac Plus if it has enough RAM (possibly earlier machines with some creativity). While I wouldn’t pick it for a daily driver OS on something like my SE, it is fine for running the disk tools. From my limited testing, these 4GB partitions appear to be bootable and usable from System 7.1 (with Finder 7.1.3 installed to get the Scriptable Finder and a few other features), which covers my use case as this is my preferred system for the IIx. If you’re planning to frequently use older operating systems, I recommend keeping partition sizes at less than 2GB. Note that limit on the number of partitions is quite high – they are treated as open files and you are allowed up to something in the region of 170 open files. Extensions and Control Panels are also counted as open files, so you don’t want to get too carried away, but you are more likely to run out of room on your desktop in terms of pixel real estate, than hit the partitions limit with 2GB partitions.
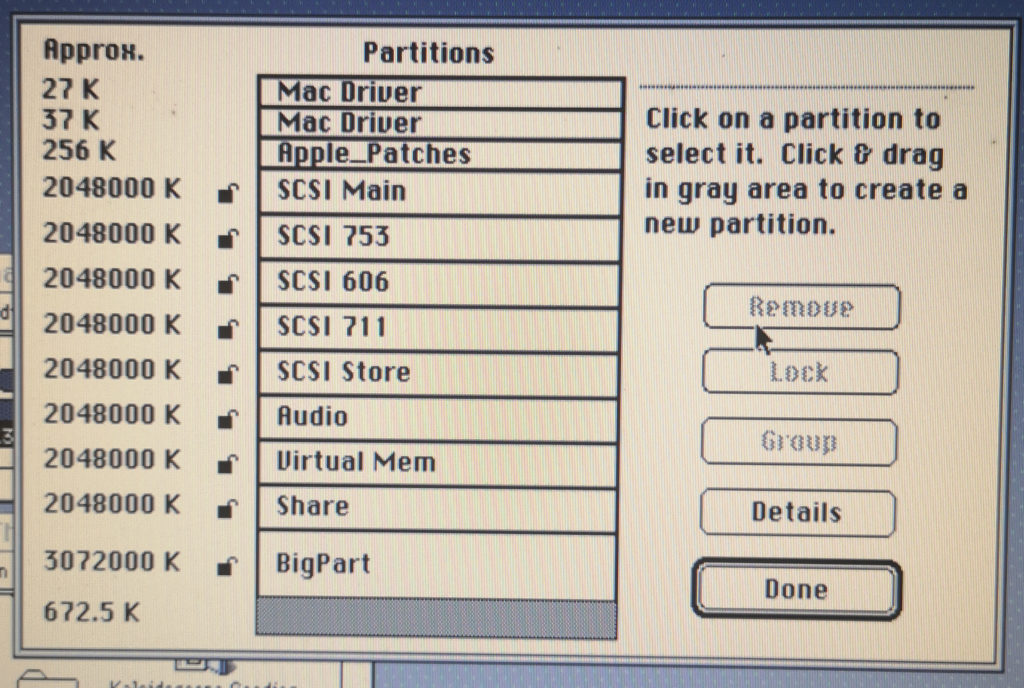
Drive with Many Partitions

I have created a disk image that boots Most Macs that have SCSI and automatically launches the Drive Setup utility to allow you to format your new disk. I believe it will boot machines from the Plus up to the Power Macintosh 8500. The only pre-G3 machines I don’t believe it will boot are the 7300, 8600 and 9600 – I’ll see if I can solve this at a later date! Note that these machines all have CD drives so this is less of an issue as you can easily write a boot CD.

The version of Drive Setup is patched and allows the software to work with non-Apple disks. The version selected allows you to up to 4GB partitions even on older (e.g. 68030 and probably older) machines. You can either write the disk images to floppy disk and boot from it, or just fetch the patched version of Drive Setup from it and use your own OS. Note to use this version of Drive Setup you’ll need to be running at least System 7.1.2, or possibly even 7.5, and you can’t format the disk that you have booted or launched the application from.

You can download my disk image from here as a Mini vMac / DOS style disk image :

Bootable Drive Setup ".dsk"

Or here as a Disk Copy image :

Bootable Drive Setup

Formatting

Prior to starting up your computer, make sure your jumper settings on your SCSI disk are correct, connect it to the SCSI bus (internally or externally), then connect the disk power (the Molex connector). Make a note of the SCSI ID you have used so that you can select the correct disk to format. Then, either boot your Macintosh from a floppy of the Bootable Drive Setup image, or otherwise from your existing System install if it is new enough.

Note : When booting from the Drive Setup floppy, you will not see the desktop or Clock in the upper right. This is normal.
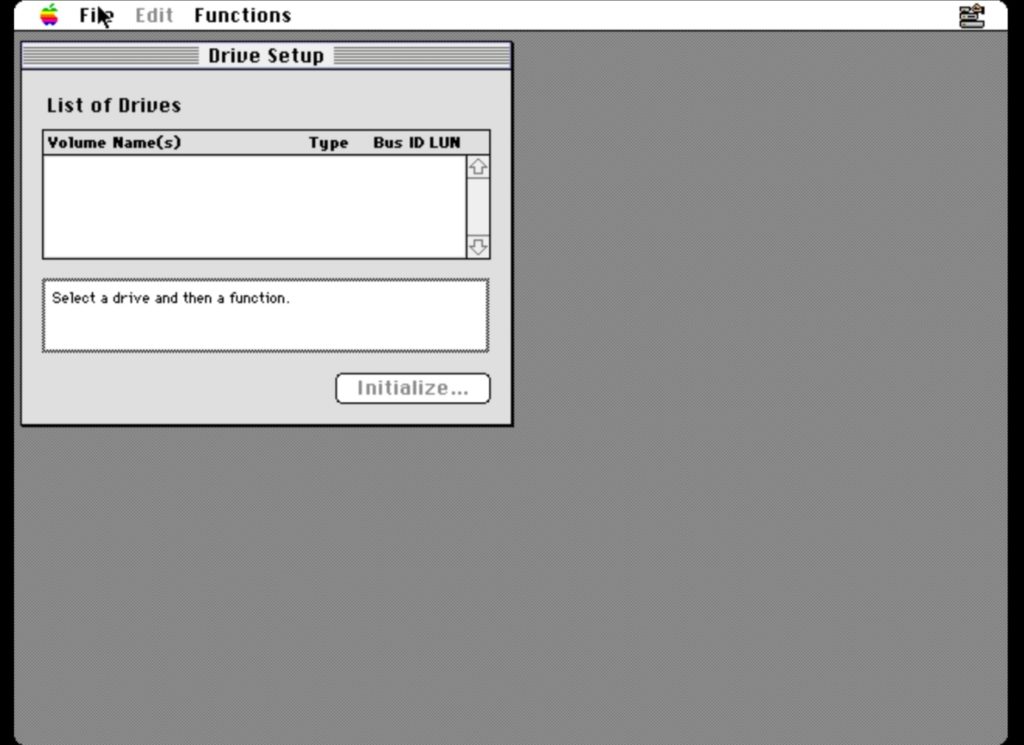
Bootable Drive Setup

Once you reach the desktop, the new disk may appear if it has been previously formatted, don’t worry if it doesn’t. If the drive to be formatted does mount, unmount it by dragging the disk icons for all of its partitions to the Trash / Wastebasket. Launch the patched version of Drive Setup.
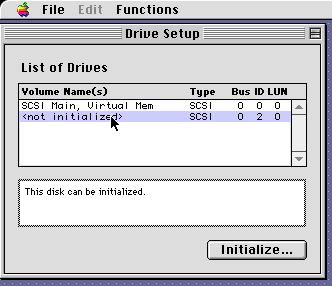
Drive Setup 1

The new disk should appear in the list, identified by its SCSI ID which you most certainly made a note of earlier. It will also be identified as “<not initialized>”. Select this item (make absolutely sure you select the right one or you could delete your files!). Click Initialise (“Initialize”).
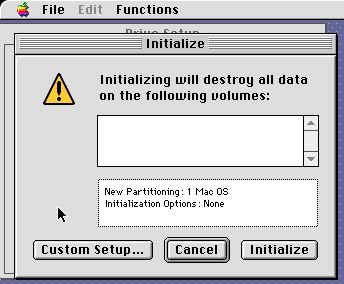
Drive Setup Initialize

Click on the “Custom” button.

Drive Setup Customise

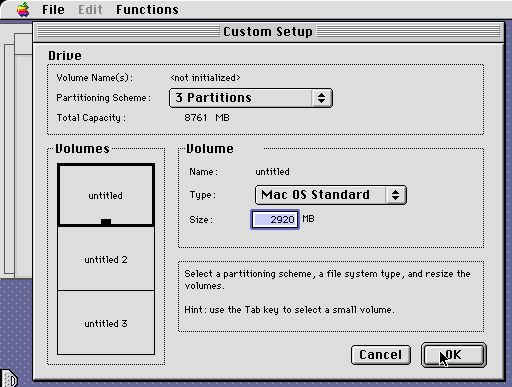
From the drop down menu, select the partitioning scheme that best suits your needs. I chose to divide my disk into the smallest number of equal parts that resulted in partitions les s than 4GB. This resulted in 3 partitions of approximately 3GB each on my 9GB disk. You can drag the little black tab on the selected partition to resize it.

Confirm your choices (if you are sure).
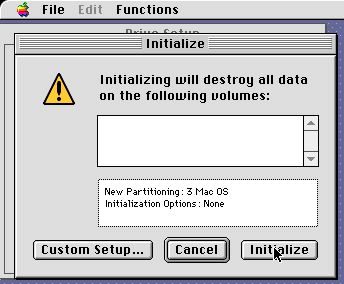
Drive Setup Initialize 2

Drive setup will then format the drive, and mount the partitions as “Untitled” and a number (you won’t see this if you’re using the bootable floppy). Feel free to rename them.
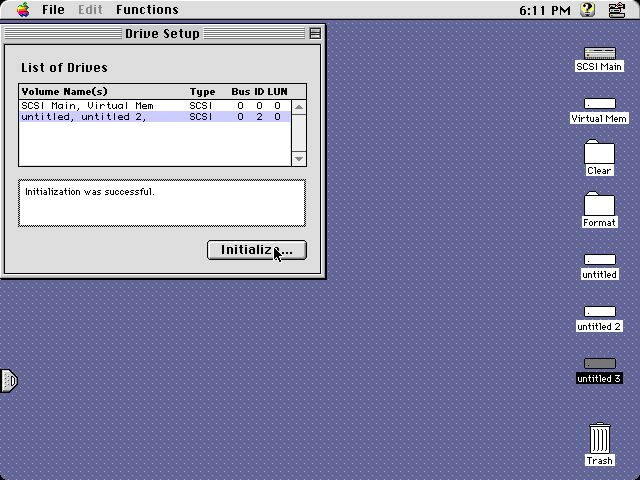
Drive Setup Done

At this point you are basically done. You can install your software on the drive and boot from it if needed. I particularly like that this method uses the Apple driver rather than a 3rd Party disk driver.

If you booted from the Drive Setup floppy, quit Drive Setup and you will be asked if you would like to shutdown or restart.

Appendix A – Using Apple HD SC Setup v7.3.5 (Patched)

It is also possible to format your drive using the other formatting tool “Apple HD SC Setup”. I don’t recommend this for a number of reasons.

  • I find that it sometimes crashes with large disks
  • It is very slow – it takes 15 minutes to do with what Drive Setup does in 20 seconds
  • When you create a completely custom partition scheme, it doesn’t seem to enable the mount on startup functionality on your partitions, or format them.

Do not be mistaken in thinking that the application has crashed unless it throws a System Error – it is really slow when you format a 18GB disk with it.

Where Apple HD SC Setup seems to provide more functionality than Drive Setup is in the flexibility it gives in creating partitions. You can easily (if slowly) delete, create, size and locate individual partitions, and it offers more formatting options (AUX) than Drive Setup. I have used Apple HD SC Setup to modify existing partition schemes and then used Drive Setup to re-enable mount on boot. Note that the menu option in Drive Setup is picky. I found that I had to restart, then unmount all partitions of the drive, then launch Drive Setup and select the disk before the appropriate menu item for setting the correct flag appeared. It may be worth using a 3rd Party utility to do such work instead.

Finally note, there have been times when I’ve broken the driver on a disk and it will not mount. Selecting Update Driver in Drive Setup has not helped… but doing the same in Apple HD SC Setup has. This is a useful thing to know when trying to save yourself after you’ve trashed a disk.

Appendix B – Booting from Individual Partitions

I have been having some issues booting from individual partitions on my Mac IIx. When it first arrived it would only boot from the first partition on any physical device. I later installed some software including the Startup Tuner system extension as I understood this fixed such issues and for a period of time I was able to boot from any extension… until yesterday. I do not know what has changed (other than there are now two devices on the SCSI bus), but I can no longer select a specific partition in Startup Disk (it selects, but if I quit and return, all partitions on that drive are now selected).
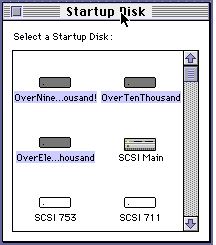
Startup Disk

Any advice welcome – I can’t remember if this is a disk driver issue, a ROM issue or a System software issue. I believe that the functionality wasn’t always there, and that you have to do specific things to enable it on older machines like the IIx… but my memory of the specifics fails me!

UPDATE! I’ve found that using “Startup Disk” from Mac OS 8.0 or 8.1 solves the issue. It doesn’t need to be installed in the System Folder, so I just keep a copy on my desktop.

Custom Hard Disk Cooling

Update : I’ve realised that changing the pull up resistor to a pull down resistor means that the circuit will react better if the fan 12V is applied before the Arduino power supply is activated. As such, I’ve moved my resistor so that it is now between the gate pin and ground.

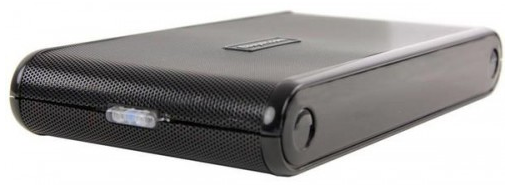
Having a bit of spare time, I decided to transfer a load of files from my previous computer (a Mac) to my new computer (Linux). As I had a lot of data from a number of hard disks to move, I decided the best method would be using an external eSATA drive. Thankfully, due to a stalled home build SAS project I started a few years ago, I have a couple to hand. The are branded as SUUNION SUBE3ZW enclosures, the “E” being optional and meaning they support eSATA. Helpfully they come with an internal SATA to eSATA expansion slot adapter and my motherboard has a feature in the BIOS that lets you turn hot swapping on for a SATA port. Without the latter, I’d have needed to power down my computer every time I wanted to switch in a different disk. These SUUNION enclosures have almost no internet presence, but were really cheap about 7 or 8 years ago when I bought them.

SUBE3ZW Enclosure
SUBE3ZW Enclosure

While transferring data, I noticed in the S.M.A.R.T data for the drive that it was getting quite warm and had reached 50°C. I looked up the temperature ratings for the drive in question (a 1.5TB Seagate Barracuda) and discovered they were rated to a maximum temperature of 50°C… oh dear. It seems that it isn’t great to run some (7200rpm) disks in fan-less enclosures.

Initially I grabbed my home made soldering air filter (120mm computer fan, connected through an inline power switch to a 12v wall-wart) without the filter to cool it down, but since I had time to kill waiting for the file transfers and the fan was quite loud considering my girlfriend was trying to work in the same room, I started looking into adding some speed control.

The Circuit

Parts used:

  • 1x Arduino Pro Mini (anything similar will do, including an UNO – note that devices with different main chips will have different PWM requirements and the code will not work without changes).
  • USB to UART board, like this one.
  • 1x 2N7000 MOSFET – an excellent all-rounder MOSFET.
  • 1x 1N4007 Diode – massively over-specified, but I have a bag of them and they cost very little. Any similar diode will do (I suspect anything from the 1N400x range is fine).
  • 1x 10k Resistor (0.5W).
  • Breadboard – the circuit could be built on protoboard for a more permanent solution.
  • Some wire, suitable for use in breadboard.

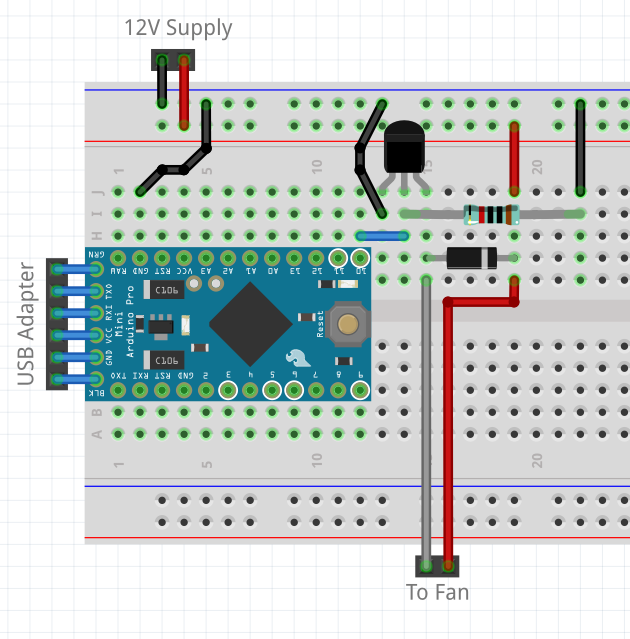
Breadboard Layout of Fan Controller

Three things to take care of :

  • Do not connect the 12V supply to the microcontroller – this will damage it, and potentially any connected computer.
  • Note the pins on the left of the Arduino are reversed on some clones – my device has the pins in the opposite order to those shown in the drawing above. If your Arduino matches the drawing above and you are using the same USB adapter as I am, your adapter should be face down into the table. If your Arduino and USB adapter are both identical to mine, the adapter should be face up.
  • Ensure the USB adapter power jumper is set to 5V if you are using a 5V arduino. The circuit should also work with a 3.3V Arduino (the minimum gate trigger voltage for the 2N7000 MOSFET is 3V), although ensure all voltages are correct.

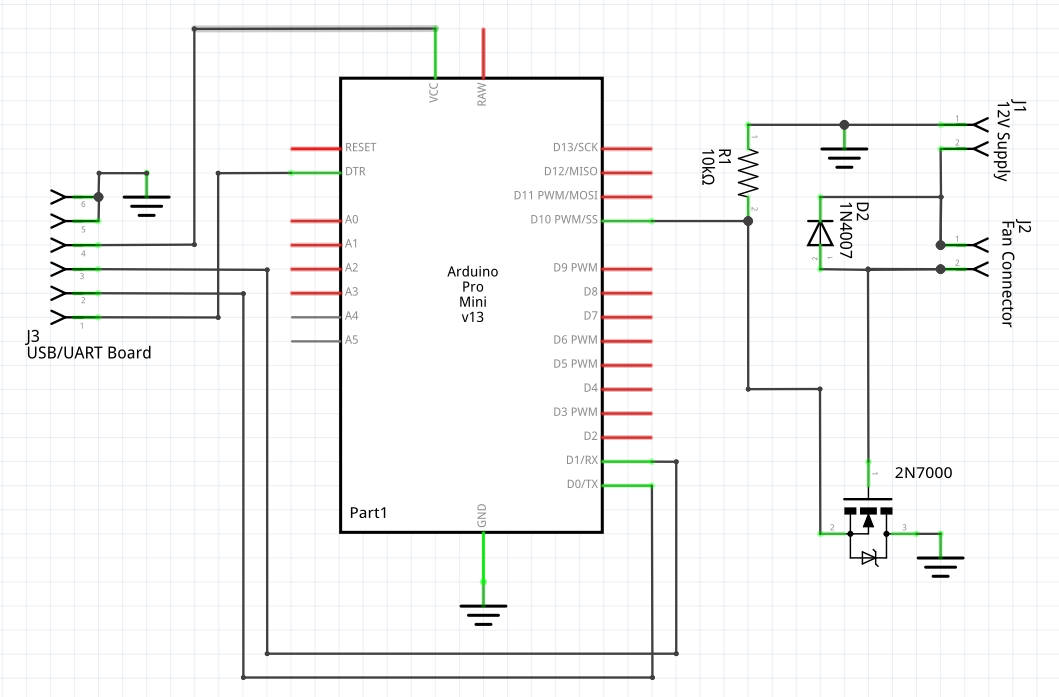
The following is a rough schematic – all ground points need to be linked (as per the breadboard layout).

Fan PWM Controller Schematic

The 10k resistor (R1) is a pull down resistor and is needed to control the input to the MOSFET – without this the MOSFET might get very hot and fail if the Arduino is removed or if the connected pin is set as an input. The resistor is best located as close to the MOSFET gate pin as possible. The Diode (D2) (yes, the numbering system is wonky) dissipates the back EMF generated by the fan when the supply is cut. The MOSFET (Q3) switches the 12V supply (on the low side of the fan) based on the PWM signal from pin 10 on the Arduino, while effectively isolating the Arduino from the 12V and preventing damage. On its own, the Arduino would not be able to provide 12V, and can not provide the 180mA required by the fan I am using. The 2N7000 MOSFET is actually able to switch voltages up to 60V, although that is more than my fan can handle.

Once I had programmed the Arduino, I disconnected the DTR pin from the USB adapter to prevent my computer from resetting the Arduino constantly – this will not be possible so easily if you’re using an Arduino Uno. The trick I like to use to do this with an Arduino Pro Mini is as follows :

  1. When soldering headers onto the Arduino Pro Mini, replace the supplied male header with a female header – this makes programming the boards much easier as the USB adapter has male headers.
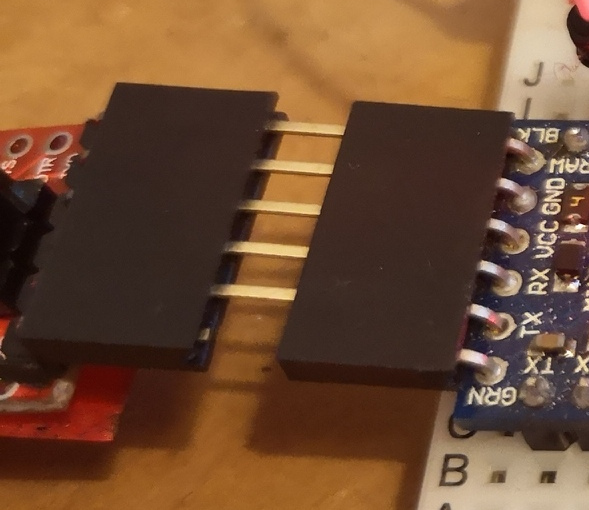
  2. Once programming is completed and you do not want the board to reset when a serial connection is established, place a 5 pin female header with extended pins (wire wrap / pass through style) between the Arduino and the USB adapter, taking care that the missing pin is the DTR (“GRN”) pin.

Note that it is still possible to program the board in this condition if you carefully press the reset button at the exact right moment. Also note that I actually use a 6 pin header with one pin trimmed off (because it reminds me what the header is for when I see it lying on my desk and I don’t throw it away).

Disable Reset
Disable Reset

The Fan

I’ve used a small 40x40x20mm fan that I had in a cupboard. Other fans will be fine, although note that at these high PWM frequencies, I did have some difficulty with one cheaper fan where it was struggling to start.

To help with this, I’ve modified my Arduino software to give the fan a short burst of maximum speed (a fraction of a second) whenever the fan speed changes to help ensure the fan is running – while there is still a PWM duty below which the fan will not run, I have found that this specific fan generally runs down to as low as 50/255 (~20%) of full. Note the PWM duty does not correspond to fan speed – most of the variation available is between 200 and 255 (~80% to ~100%).

It is recommended that you put a switch in the 12V supply so that it is possible to turn off the fan easily. An improvement might be to take the pull up supply from the 12V using a regulator to generate 5V (for the whole circuit). Care should be taken to not back feed the computer’s USB with a slightly different 5V supply. There is a built in regulator on the Arduino Pro Mini which could be used for this, where 12V could be provided to the “RAW” pin, although 12V is the maximum recommended voltage for this regulator and it might get warm with sustained use. This would be a good option if you were also measuring temperatures using the Arduino in another application.

The Stand

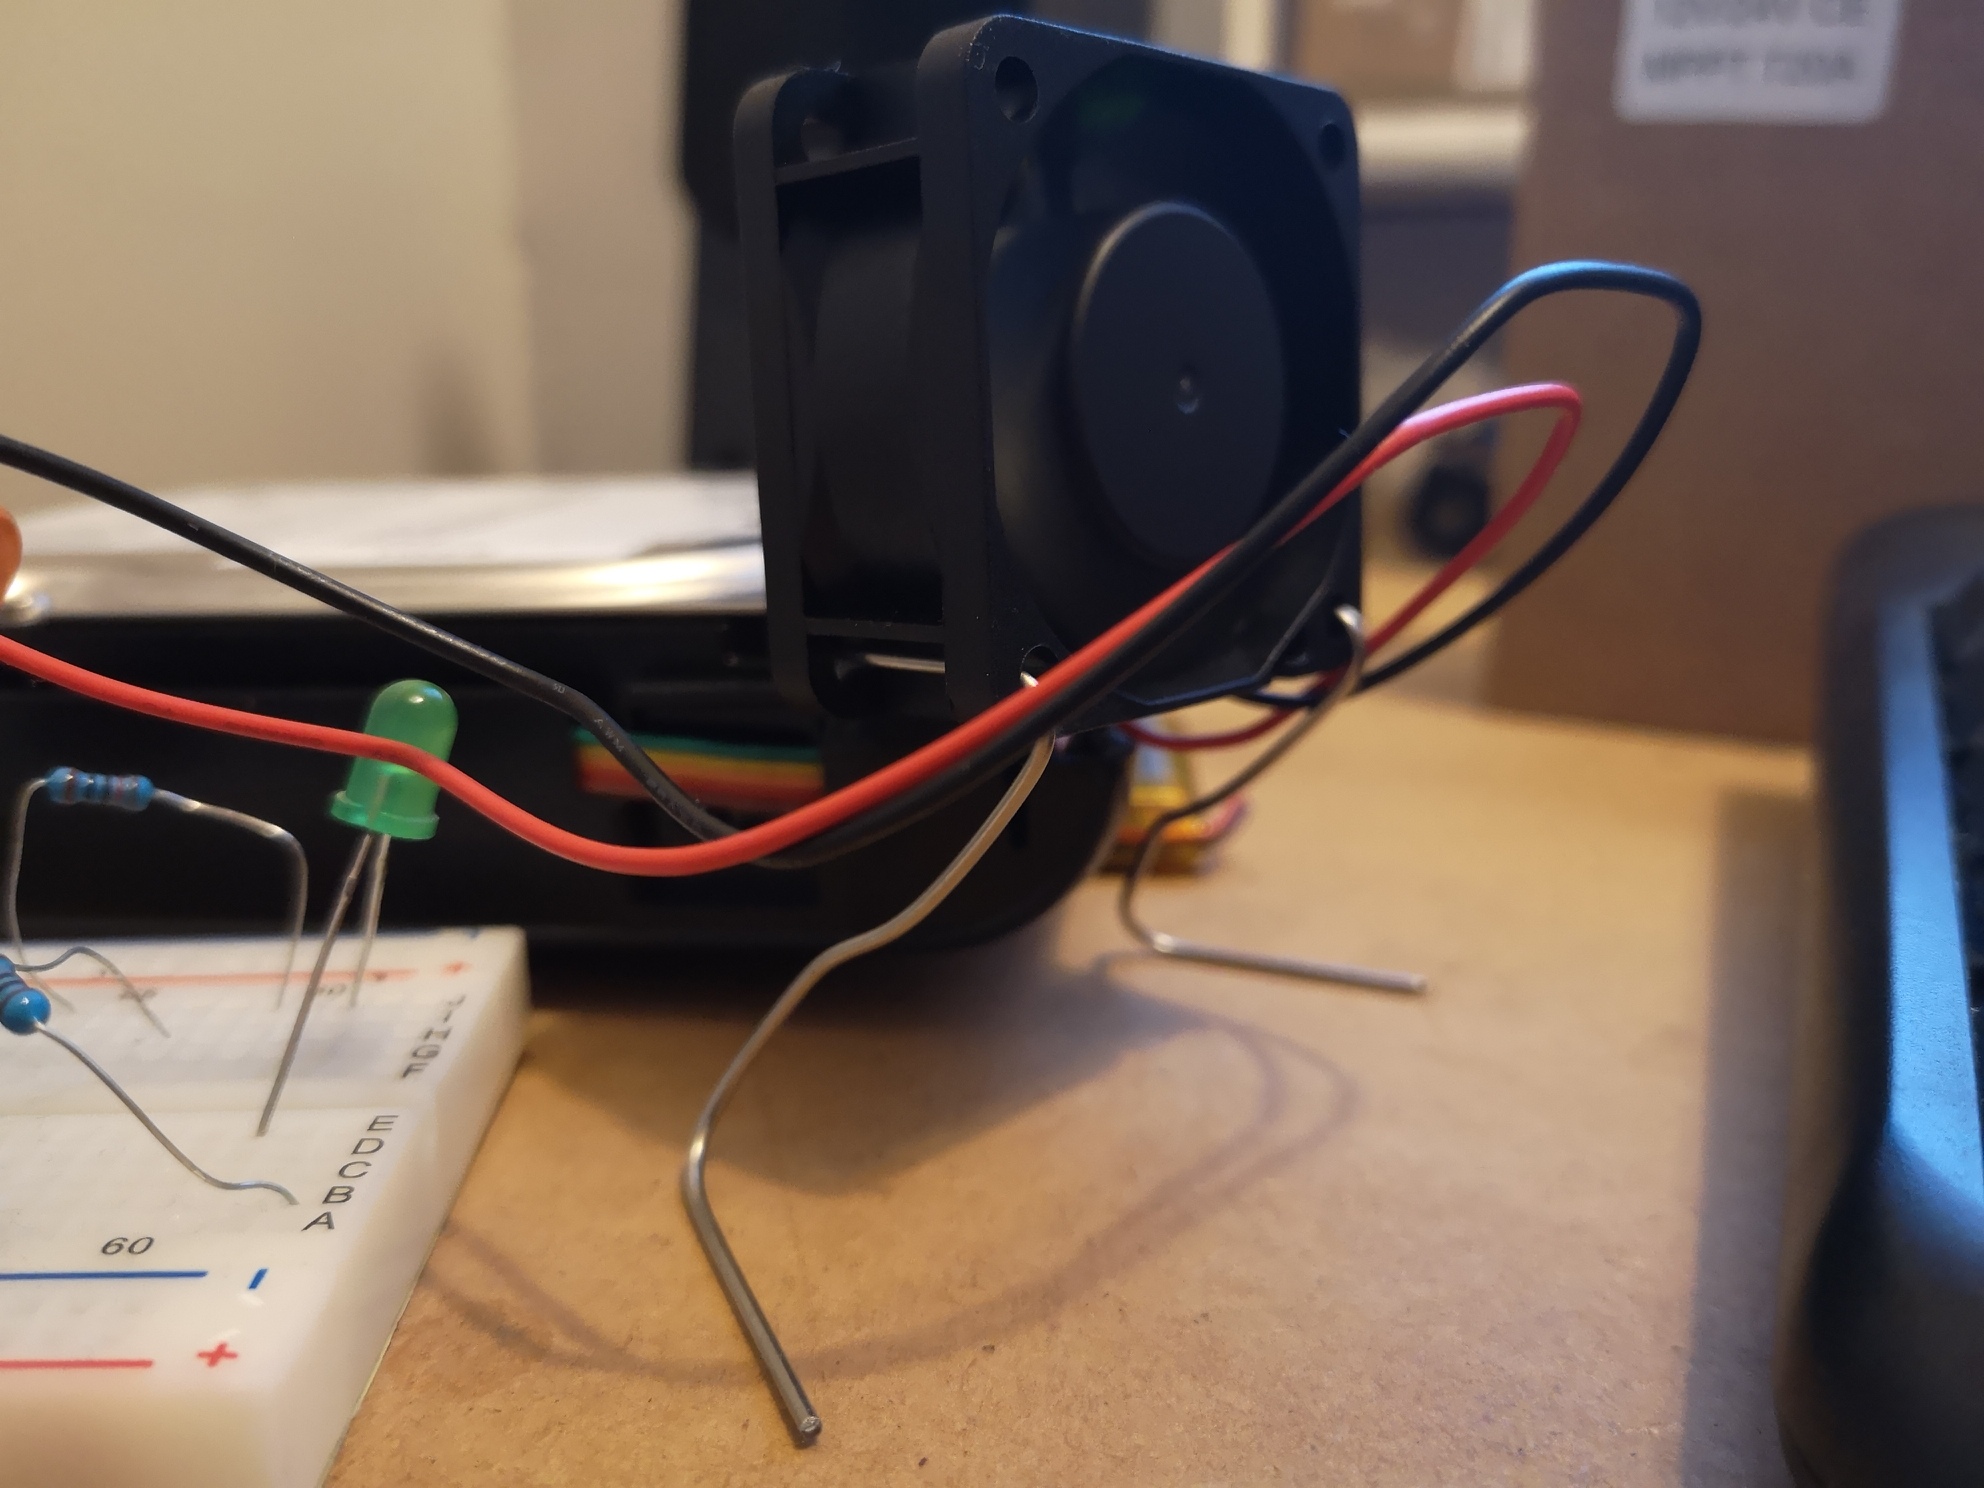
A quick and easy way to make an adjustable stand for a fan is to use a piece of stiff wire, bent into shape through two of the fan’s screw holes. I’ve used a piece of stainless steel welding wire as can be seen in the following photograph.

Fan and Stand
Fan and Stand

The wire is in one piece and crosses the front of the fan between the two screw holes (on the other side of the fan from the camera). Pliers will make bending the wire easier.

Arduino Software
/******************
 * Arduino High Frequency PWM Fan Controller Code
 * https://elephantandchicken.co.uk/stuffandnonsense
 * Circuit :
 * Connect the gate of a 2N7000 to arduino pin 10.
 * Connect a 10k Resistor between the gate and 5V.
 * Connect the source pin to ground.
 * Connect a 1N4007 diode between the drain pin and 12V with the band facing 12V.
 * Connect a fan between the 12V rail and the drain pin.
 * Remember to connect the grounds for the 12V and 5V circuits!
 * Do not mix 12V and 5V!
 * If in doubt, details of the circuit and software for controlling from linux
 * are on my website
 *******************/

int fan = 10; // set fan output pin
int fanspeed = 255; // start full speed
// for SerialEvent
String inputString = "";
boolean stringComplete = false;

void setup() {
  // set the fan pin as an output
  pinMode(fan, OUTPUT);
  
  // adjust the PWM speed to make it fast enough that you can't hear it
  // see : https://playground.arduino.cc/Main/TimerPWMCheatsheet
  TCCR1B = (TCCR1B & 0b11111000) | 1; // hard coded for pins 9 or 10
  
  // Start serial - doesn't need to be very fast
  Serial.begin(9600);
  Serial.println("\nPWM Fan Controller Started");

  // For safety, as we don't know what is happening yet, turn the fan onto full
  digitalWrite(fan, HIGH);
}

void loop() {
  if(stringComplete){ // We've recieved a message
    // reset the serial variables ready for the next message
    String msg = inputString; // store locally so serialEvent can get back to capturing input
    inputString = "";
    stringComplete = false;
    
    if(msg.startsWith("s")){ // "set" command
      if(fanspeed!=msg.substring(1).toInt()){ // if the requested speed is different...
        fanspeed = msg.substring(1).toInt(); // update the fan speed
        digitalWrite(fan, 1); // these two lines help with a stalled fan...
        delay(50); //             by ramping the speed to full with no PWM for a short period
        analogWrite(fan, fanspeed); // set the new PWM duty
      }
      Serial.println(fanspeed); // confirm the new speed to the host
    }else if(msg.startsWith("c")){ // "check" command
      Serial.println(fanspeed); // the host has asked what PWM duty we're currently using
    }
  }
}

void serialEvent() {
  // Standard serial code from "SerialEvent" example
  while (Serial.available()) {
    // get the new byte:
    char inChar = (char)Serial.read();
    // add it to the inputString:
    inputString += inChar;
    // if the incoming character is a newline, set a flag
    // so the main loop can do something about it:
    if (inChar == '\n' || inChar == '\r') {
      stringComplete = true;
    }
  }
}
Linux Software

Due to the limitations of my knowledge in various languages, I’ve used a mixture of bash and python as well as an existing piece of software to achieve what I wanted. My objectives were to continually monitor the external hard disk temperature, and set the fan speed based on this temperature. First things first, I used the “Disks” utility on Ubuntu to identify the external disks location – for exampe : /dev/sdc

The path “/dev/sd*” (where * is a letter of the alphabet) should exist for each connected disk, the similar files with a number on the end as well represent individual partitions and we are not concerned with these at the moment.

Next identify the serial port – with the adapter connected, type “ls /dev/ttyUSB*” at the command line. If you’re lucky, you will get a single result called “/dev/ttyUSB0” or similar. Note this can and does change, especially when you’re plugging and unplugging USB adapters, so you might need to re-check. If the previous command doesn’t return anything, try “ls /dev/tty*”. This will return a long list – ignore all entries which are just “/dev/tty#”, “/dev/ttys#” or “/dev/ttyprintk” where “#” is a number. Look at what else is there… unplug the adapter and run the command again. What is different? Plug the adapter back in again – does it re-appear? Whatever appears and disappears when you plug and unplug the adapter is the serial port you are looking for. As mentioned, the number might change as you are messing around.

Make a note of the disk path and serial port path. Mine are “/dev/sdc” and “/dev/ttyUSB0”.

Software which might need installing :

  • watch (sudo apt-get install watch) – allows you to run a command every n seconds
  • hddtemp (sudo apt-get install hddtemp) – reports the identified disk’s temperature
  • python (sudo apt-get install python) – programming language, probably already installed
  • pyserial (pip install pyserial) – a python library to work with serial ports

Create a folder and move into it (to do this in the command line, use mkdir HDDTemperature && cd ./HDDTemperature to create a folder called HDDTemperature at your current location). Create three plain text files called hddFanControl.sh, hddFanControl.py and run.sh using your favourite text editor. Enter the following scripts into each respectively :

# Script to check a hard disks temperature, and send a fan speed over serial
# Usage :
# run.sh /dev/sd* /dev/ttyUSB*
# Ensure run.sh, hddFanControl.sh and hddFanControl.py are all in the current
# active directory.
# Note you need permission to access both the hdd and the serial port
# Note you'll need to disable reset on the MCU
# Serial fan controller should accept speed settings in the format s[0-255]
# where [0-255] is the pwm value between 0 and 255. Note most speed control
# is between 200 and 255, and often a fan needs 255 to start (due to the high
# pwm frequency (I'm using 31khz I think - there aren't many options on an 8
# bit AVR, just 60khz and 30khz which don't create noise. 60khz struggled to
# start the motor. AVR code I used to set the pwm speed was :
# TCCR1B = (TCCR1B & 0b11111000) | 1;
# and I'm using pin 10 (this command would also work for pin 9)
# be warned that messing with these pwm settings impacts other timing commands
# 
# https://elephantandchicken.co.uk/stuffandnonsense
# 12/12/2018

# hdd location
VARHDD="$1"
# serial port
VARSER="$2"

TEMPERATURE=`hddtemp $VARHDD | grep -oh "..°C" | grep -ohE "[0-9]{1,4}"`
echo "Selected disk temperature is $TEMPERATURE°C"

python ./hddFanControl.py $VARSER $TEMPERATURE
# Script to check a hard disks temperature, and send a fan speed over serial
# Usage :
# run.sh /dev/sd* /dev/ttyUSB*
# Ensure run.sh, hddFanControl.sh and hddFanControl.py are all in the current
# active directory.
# Note you need permission to access both the hdd and the serial port
# Note you'll need to disable reset on the MCU
# Serial fan controller should accept speed settings in the format s[0-255]
# where [0-255] is the pwm value between 0 and 255. Note most speed control
# is between 200 and 255, and often a fan needs 255 to start (due to the high
# pwm frequency (I'm using 31khz I think - there aren't many options on an 8
# bit AVR, just 60khz and 30khz which don't create noise. 60khz struggled to
# start the motor. AVR code I used to set the pwm speed was :
# TCCR1B = (TCCR1B & 0b11111000) | 1;
# and I'm using pin 10 (this command would also work for pin 9)
# be warned that messing with these pwm settings impacts other timing commands
# 
# https://elephantandchicken.co.uk/stuffandnonsense
# 12/12/2018

import time
import serial
import sys
from math import log

# How aggressive to make the fan curve? 0.4 is normal, 0.1 ramps up quickly
# at the start then levels off, 1 is linear (pwm duty, not cooling), 2 mainly
# ramps at the top end (would be basically off until the temp was at the top)
fanCurve = 0.4 

Temperature = int(sys.argv[2])
maxTemp = 50
minTemp = 30
tempRange = maxTemp-minTemp

tempLift = Temperature-minTemp

if tempLift <= 0:
	pwmDuty = 0
elif tempLift >= tempRange:
	pwmDuty = 255
	print "\nWarning! Hard Disk is hot!"
	print "Disk is currently : " + str(Temperature) + " degrees C"
else:
	var1 = (tempLift**fanCurve)
	var2 = (tempRange**fanCurve)
	pwmDuty = int(255*var1/var2)
	print "\nCurrent Temperature : " + str(Temperature)
	print "Current Target PWM setting : " + str(pwmDuty)

ser = serial.Serial(
	port=str(sys.argv[1]),
	baudrate=9600,
	parity=serial.PARITY_NONE,
	stopbits=serial.STOPBITS_ONE,
	bytesize=serial.EIGHTBITS
)

ser.isOpen()

#flush with an empty line
ser.write('\n')
time.sleep(0.1)
ser.flushInput()

# moved the following into the mcu
#if pwmDuty > 0:
#	# make sure we are not stalled
#	ser.write('s255\n')
#	time.sleep(0.1)

#check current setting
ser.write('c\n')
time.sleep(0.1)
out = ''
while ser.inWaiting() > 0:
        out += ser.read(1)
if out != '':
        print "\nMCU previous PWM was : " + str(int(out))

#send pwm setting
ser.write('s' + str(pwmDuty) + '\n')

# pause and see if there was a response
time.sleep(0.1)
out = ''
while ser.inWaiting() > 0:
	out += ser.read(1)
if out != '':
	print "MCU current PWM is : " + str(int(out))

ser.close()
exit()
# See comment in hddFanControl
# https://elephantandchicken.co.uk/stuffandnonsense
# 12/12/2018

watch -n60 ./hddFanControl.sh $1 $2

Back at the command line, enter the following three commands to convert the files into runnable software :

chmod +x ./hddFanControl.sh

chmod +x ./hddFanControl.py

chmod +x ./run.sh

To run the software, ensure that the Arduino is powered and connected to the computer through the USB adapter, then apply power to the fan. The fan should start at maximum speed.

You’ll need the disk and serial port paths from above to run the software, once you have them and have checked they are correct, enter the following (but using your hard disk and serial port) :

sudo run.sh /dev/sdc /dev/ttyUSB0

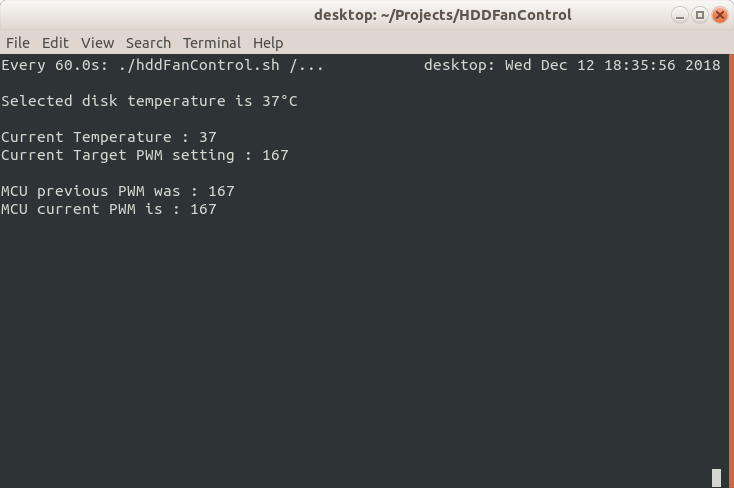
If everything works correctly, you should see something like the following, which will update every 60 seconds :

Screenshot
Screenshot

To stop the program, press Ctrl-C. Once you’re finished with the fan, power down the 12V fan supply and the Arduino.

Changing Parameters

To change the temperature update frequency, you will need to edit the file run.sh. The interval between measurements is represented by the 60 in “-n60” and can be replaced by other durations in seconds. To change the interval to be two minutes, run.sh would need to be changed to :

# See comment in hddFanControl
# https://elephantandchicken.co.uk/stuffandnonsense
# 12/12/2018

watch -n120 ./hddFanControl.sh $1 $2

All other parameters which can easily be modified are contained within the python file hddFanControl.py and allow the “normal” temperature range, and temperature/PWM response curve to be modified. Normal temperatures are defined by the variables maxTemp and minTemp (set to 50 and 30 respectively in the provided code). When the measured temperature is outside of this range, the fan duty will be pegged at either 0% (30°C or less) or 100% (50°C or more). These values can be modified the shift the operating temperature range if needed.

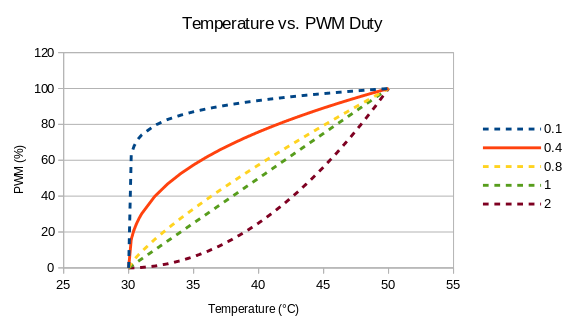
The temperature/PWM response curve is modelled as the temperature above the minTemp raised to a power (a variable called fanCurve). By adjusting the power, the characteristic of the curve can be adjusted. By default I am using a power of 0.4, which works well for my use case. The following plot shows the impact of varying the value of fanCurve.

PWM Plot
PWM Plot

Adjusting the value allows the user to modify how early or late the % duty increases. Note that this only relates to the PWM duty and not fan speed. I have generally found that most of the variation in fan speed is observed in the last 25% of PWM duty.

Note that modifying the fanCurve variable is the best way of adjusting the balancing temperature of a specific state. Using 0.4, I was able to achieve a stable 37°C disk temperature, which was considered satisfactory, and comparable to the temperatures of my internal hard disks.

Conclusions

If you’re wondering, the file copy still hasn’t finished. (Update : it finally has).