Getting Started with the ESP32 S2 Mini
The ESP32 S2 Mini i s a small development board based on the ESP32-S2FN4R2 chip. The ESP32-S2 Mini by Wemos can be used as an Arduino, which is what this post covers. It can also be programmed in other ways, including with MicroPython, CircuitPython and with the chip manufacturer’s (Espressif) own software development kit.


Capabilities
The board can be used as an Arduino, although as with all different Arduino boards, it will have quirks that will mean some libraries will need special versions. This is the same as different boards within the Arduino family to a degree, and is often due to a mixture of hardware features being on different pins, or software maturity. It is worth pushing through these issues for the benefits the chip brings over a standard Arudino Uno or similar.
- Processor Speed – 240MHz (32bit)
- 3.3V Power and digital outputs, but 5v tolerant digital input pins (you can send it 5V signals without harm)
- USB-C Connector
- Wifi capable (can be turned off if not needed)
- 4MB Flash (for programs, and for storing resources such as images, html files or sounds)
- 2MB of RAM
- 27 I/O pins
- 12 Digital I/O pins
- 18 Analogue Input Pins
- 2 Proper Analogue Output Pins (not PWM)
- 27 PWM Capable Pins
- 27 Pins Serial Capable
- Multiple I2C and SPI Busses
Note this specific chip doesn’t support Bluetooth (unlike other related products which sometimes do).
Reference Materials
Handy for looking up electrical specifications, the chip datasheet can be found here, and there is information on Arduino compatibility here.
The development board manufacturer has reference materials here and Arduino getting started here.
Adding the Board to the Arduino IDE and First Test
- Launch the Arduino IDE (I’m using version 1.8.9 on Linux).
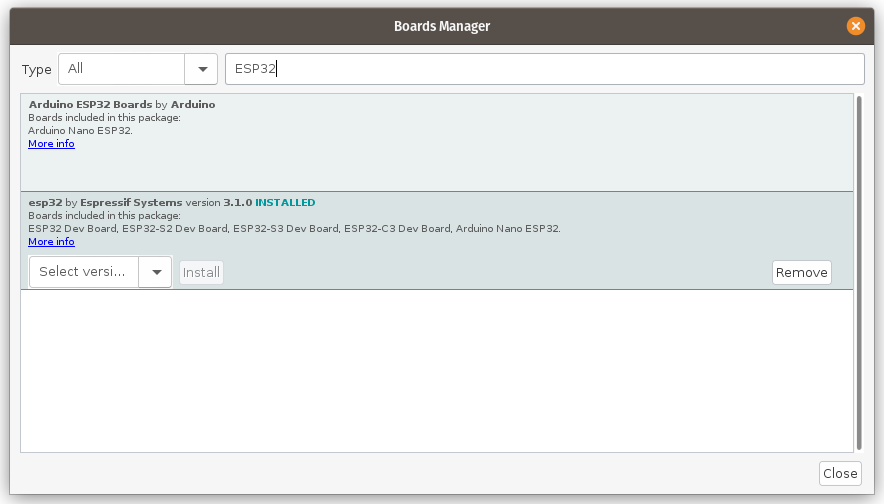
- Go to Tools>Boards>Board Manager, and type in “ESP32”.
- Select and install Version 3.1 (3.1 is the newest at the time of writing – version 3.0.5 didn’t work properly for me) “esp32 by Espressif Systems” (not “Arduino ESP32 Boards”).
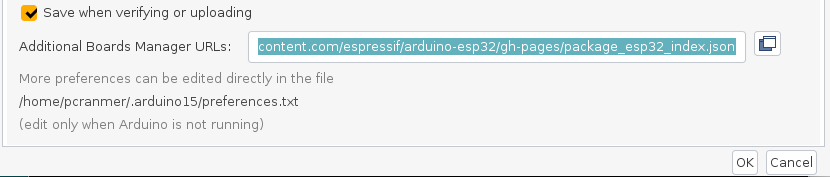
- If “esp32 by Espressif Systems” doesn’t show up in the list when you search, go to File>Preferences and add the following text to the “Additional Boards Manager URLs” text box. If there is already text in there, you need to add it to the end, after a comma and a space.
The text to add : https://raw.githubusercontent.com/espressif/arduino-esp32/gh-pages/package_esp32_index.json
Returning to the Boards Manager as above, you should now be able to see the “esp32 by Espressif Systems” option when you search.
- From the Tools>Boards sub menu, pick the option LOLIN S2 MINI.
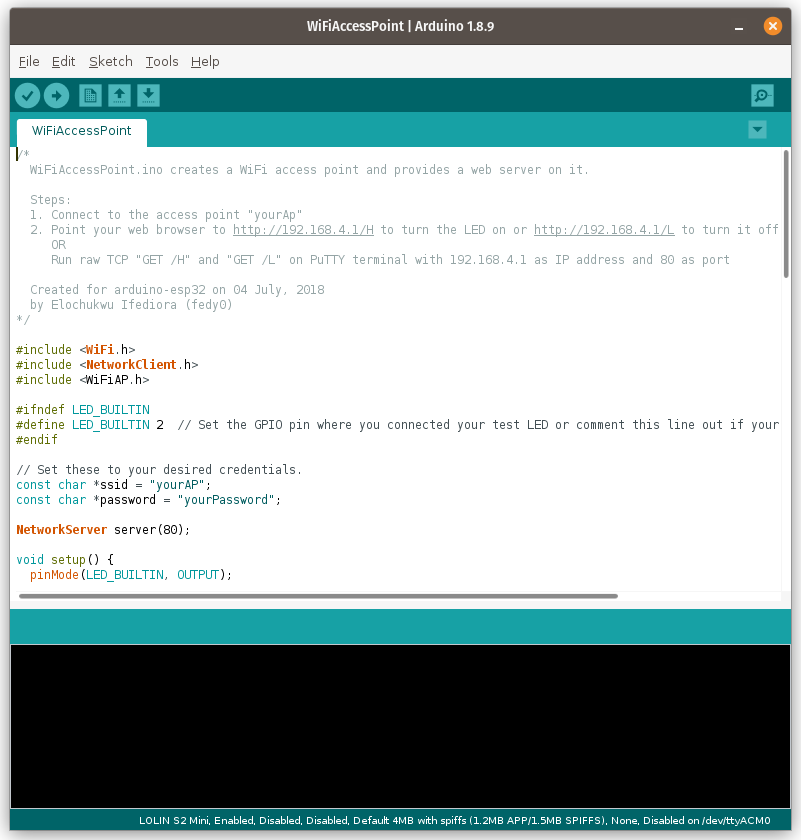
- Open the Blink example from File>Examples>01.Basics>Blink.
- Plug in the board using a USB-C cable.
- Press and hold the button on the board labelled “0”, and briefly press the “Reset” button, wait another two seconds and then release the “0” button.
- Select the board in the Tools>Port menu.
- Click the “Upload” arrow.
- Once the upload has finished, it might show an error, but regardless, press the “Reset” button on the board. The onboard LED should start blinking.
If you’re on Linux, you may need to set up USB permissions as per the instructions here.
If you have any issues, try a different USB cable. The first one I tried didn’t work properly (some don’t have all of the wires inside them).
A More Interesting Example
The most useful starting point is the provided example found at File>Examples>WiFi>WiFiAccessPoint. This example turns the board into its own WiFi network (separate to the house network). You can use your phone or laptop to connect to this network, and then load one or more web pages served up by a mini web server on the board. I often use this to provide an easy control interface (buttons and feedback). It is also possible to do firmware updates over WiFi, which can be very useful when the controller is buried deep in a machine. Obviously, make sure you use a password on the WiFi to stop other people messing with things.
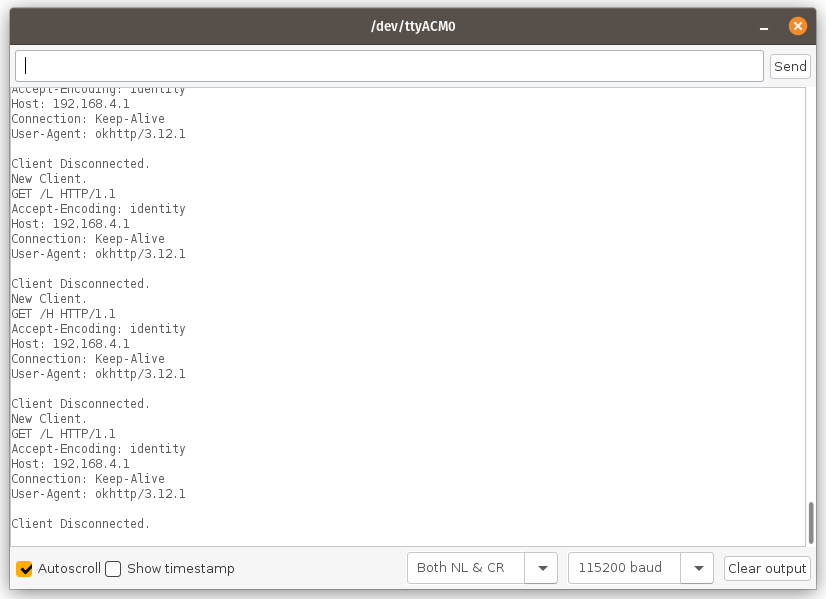
Upload the WiFiAccessPoint example onto the S2 Mini board. I’m not certain why, but I had to completely power cycle my S2 Mini before the WiFi appeared.
Plug the S2 Mini into a USB port on your computer and open the serial monitor. Using your phone or laptop, connect to the WiFi access point that has the name yourAP. The default password is yourPassword. You should see information appear in the Serial Monitor, including the “host” IP. This is probably 192.168.4.1. Go to this address in your browser by entering http://192.168.4.1 or just click that link if you have this page open on the computer you connected to the S2 Mini with.
You should be presented with a simple webpage that has two lines of text, each with a link in it. The two links turn the LED on the board On or Off. Clicking them causes more activity in the serial monitor.